Preparación PRIVATE MASK

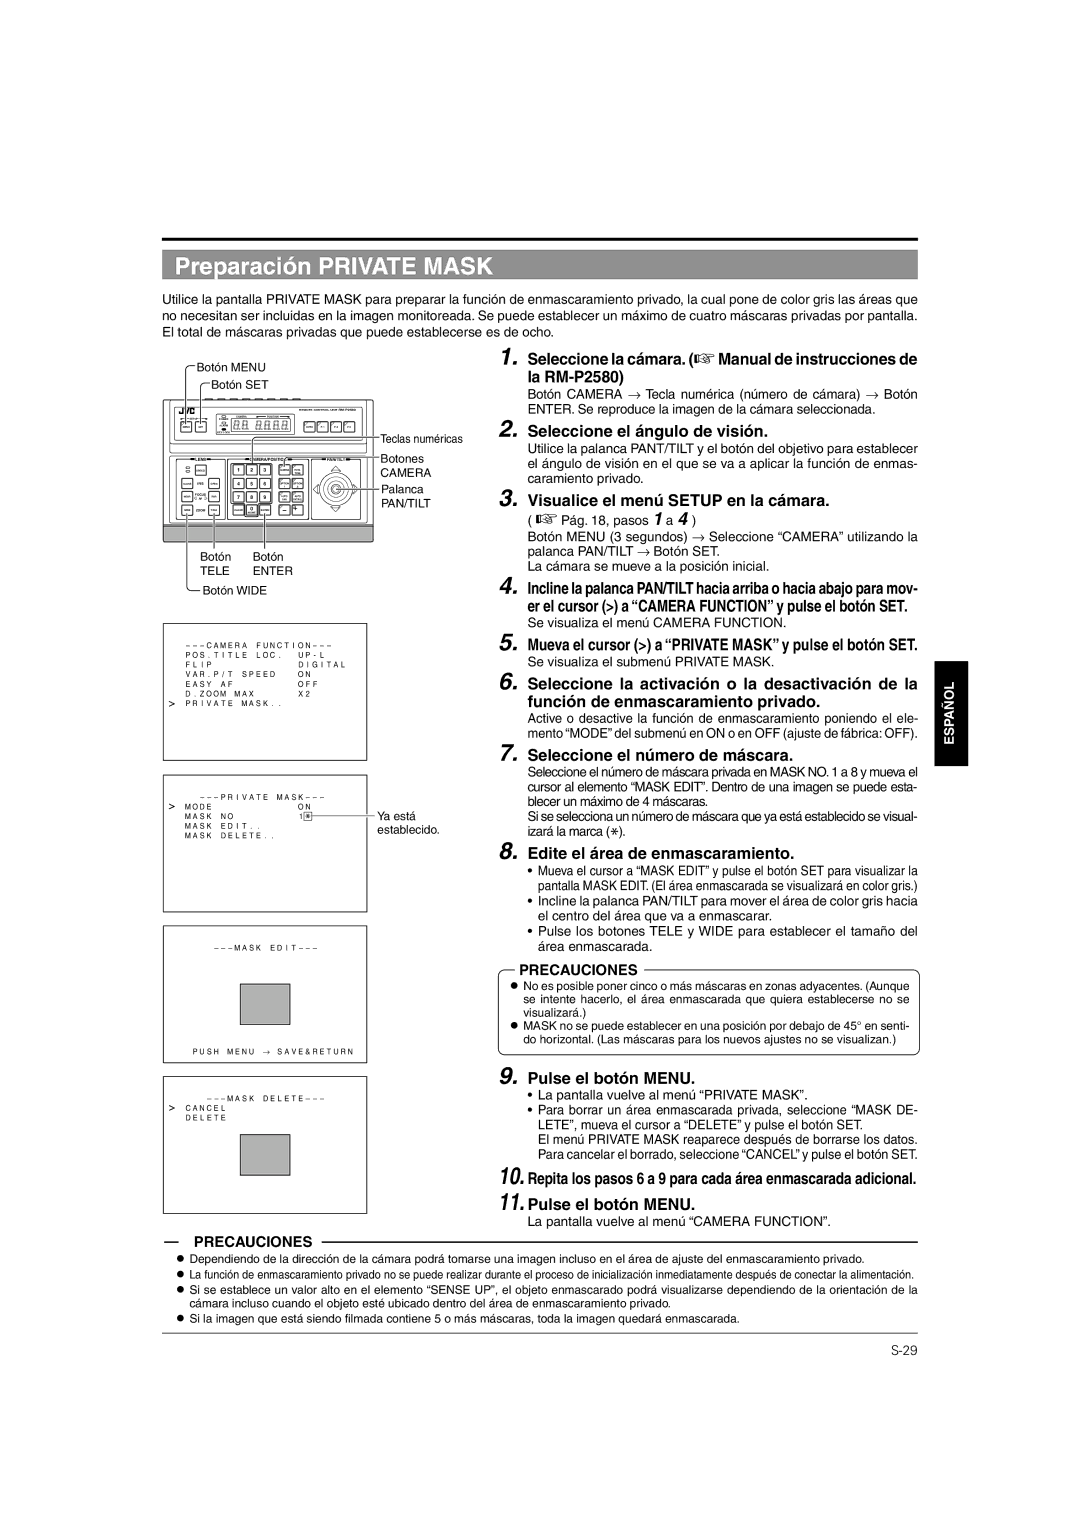
Utilice la pantalla PRIVATE MASK para preparar la función de enmascaramiento privado, la cual pone de color gris las áreas que no necesitan ser incluidas en la imagen monitoreada. Se puede establecer un máximo de cuatro máscaras privadas por pantalla. El total de máscaras privadas que puede establecerse es de ocho.

Botón MENU

Botón SET


REMOTE CONTROL UNIT RM-P2580

SETUP


CAMERA

POSITION


POWER


MENU

SET

ALARM

AUTO

F-1

F-2

F-3

KEY LOCK

Teclas numéricas


LENS


CAMERA/POSITION


PAN/TILT

Botones


SPEED


1

2

3

CAMERA

POSI-


CAMERA


TION


IRIS


4

5

6

1

2


CLOSE

OPEN


OPTION

OPTION


Palanca

NEAR

FOCUS

FAR

7

8

9

AUTO

AUTO


AF


PAN

PATROL


PAN/TILT

WIDE

ZOOM

TELECLEAR

0

ENTER


/HOME

1. Seleccione la cámara. (Manual de instrucciones de la RM-P2580)

Botón CAMERA Tecla numérica (número de cámara) Botón ENTER. Se reproduce la imagen de la cámara seleccionada.

2. Seleccione el ángulo de visión.

Utilice la palanca PANT/TILT y el botón del objetivo para establecer el ángulo de visión en el que se va a aplicar la función de enmas- caramiento privado.

3. Visualice el menú SETUP en la cámara.

( Pág. 18, pasos 1 a 4 )

Botón Botón

TELE ENTER

Botón WIDE

– – – C A M E R A F U N C T I O N – – –

P O S . T I T L E L O C .

U P - L

F L I P

D I G I T A L

V A R . P / T S P E E D

O N

E A S Y A F

O F F

D . Z O O M M A X

X 2

P R I V A T E M A S K . .


– – – P R I V A T E M A S K – – –

M O D E


O N


M A S K

N O

1

*


M A S K

E D

I T . .


M A S K D E L E T E . .

– – – M A S K E D I T – – –

P U S H M E N U S A V E & R E T U R N

Ya está establecido.

Botón MENU (3 segundos) Seleccione “CAMERA” utilizando la palanca PAN/TILT Botón SET.

La cámara se mueve a la posición inicial.

4. Incline la palanca PAN/TILT hacia arriba o hacia abajo para mov- er el cursor (>) a “CAMERA FUNCTION” y pulse el botón SET.

Se visualiza el menú CAMERA FUNCTION.

5. Mueva el cursor (>) a “PRIVATE MASK” y pulse el botón SET. Se visualiza el submenú PRIVATE MASK.

6. Seleccione la activación o la desactivación de la función de enmascaramiento privado.

Active o desactive la función de enmascaramiento poniendo el ele- mento “MODE” del submenú en ON o en OFF (ajuste de fábrica: OFF).

7. Seleccione el número de máscara.

Seleccione el número de máscara privada en MASK NO. 1 a 8 y mueva el cursor al elemento “MASK EDIT”. Dentro de una imagen se puede esta- blecer un máximo de 4 máscaras.

Si se selecciona un número de máscara que ya está establecido se visual- izará la marca (*).

8. Edite el área de enmascaramiento.

Mueva el cursor a “MASK EDIT” y pulse el botón SET para visualizar la pantalla MASK EDIT. (El área enmascarada se visualizará en color gris.)

Incline la palanca PAN/TILT para mover el área de color gris hacia el centro del área que va a enmascarar.

Pulse los botones TELE y WIDE para establecer el tamaño del área enmascarada.

PRECAUCIONES

No es posible poner cinco o más máscaras en zonas adyacentes. (Aunque se intente hacerlo, el área enmascarada que quiera establecerse no se visualizará.)

MASK no se puede establecer en una posición por debajo de 45° en senti- do horizontal. (Las máscaras para los nuevos ajustes no se visualizan.)

ESPAÑOL

– – – M A S K D E L E T E – – –

C A N C E L

D E L E T E

PRECAUCIONES

9. Pulse el botón MENU.

La pantalla vuelve al menú “PRIVATE MASK”.

Para borrar un área enmascarada privada, seleccione “MASK DE- LETE”, mueva el cursor a “DELETE” y pulse el botón SET.

El menú PRIVATE MASK reaparece después de borrarse los datos. Para cancelar el borrado, seleccione “CANCEL” y pulse el botón SET.

10.Repita los pasos 6 a 9 para cada área enmascarada adicional.

11.Pulse el botón MENU.

La pantalla vuelve al menú “CAMERA FUNCTION”.

Dependiendo de la dirección de la cámara podrá tomarse una imagen incluso en el área de ajuste del enmascaramiento privado.

La función de enmascaramiento privado no se puede realizar durante el proceso de inicialización inmediatamente después de conectar la alimentación.

Si se establece un valor alto en el elemento “SENSE UP”, el objeto enmascarado podrá visualizarse dependiendo de la orientación de la cámara incluso cuando el objeto esté ubicado dentro del área de enmascaramiento privado.

Si la imagen que está siendo filmada contiene 5 o más máscaras, toda la imagen quedará enmascarada.

S-29

Page 158
Image 158
JVC TK-C676 manual Preparación Private Mask, Seleccione el ángulo de visión, Visualice el menú Setup en la cámara

TK-C676 specifications

The JVC TK-C676 is a professional-grade CCTV camera renowned for its impressive image quality and reliable performance in various surveillance applications. As part of JVC's reputable line of security products, the TK-C676 incorporates advanced technologies that make it a popular choice among security professionals and businesses alike.

One of the standout features of the TK-C676 is its high-resolution imaging capability. With a 1/3-inch CCD sensor, this camera delivers crisp and clear images, ensuring optimal visibility even in challenging lighting conditions. The camera offers a resolution of 540 TV lines, which allows for detailed surveillance footage that can be crucial for identifying individuals or activities in monitored areas.

Another notable characteristic of the TK-C676 is its robust low-light performance. Thanks to its sense-up technology, the camera can automatically adjust its sensitivity in low-light environments, providing better image quality without the need for external lighting. This feature is particularly valuable for nighttime surveillance or in dimly lit indoor settings, enhancing the overall effectiveness of security measures.

The TK-C676 also excels in flexibility and adaptability with its mechanical IR cut filter. This technology allows for seamless switching between day and night modes, ensuring consistent image quality during both daytime and nighttime operation. This adaptability makes the camera suitable for various applications, including retail stores, parking lots, and public spaces.

Additionally, the JVC TK-C676 features a varifocal lens with a focal length of 3.5mm to 8mm, providing users with the ability to adjust the field of view based on specific surveillance needs. This versatility enables the camera to cover wide areas or focus on particular subjects, making it ideal for both indoor and outdoor placements.

In terms of durability, the TK-C676 is built to withstand harsh environmental conditions. With a sturdy housing that resists both water and dust, this camera can be installed in various locations without compromising on performance. This reliability is essential for continuous operation in demanding environments.

Overall, the JVC TK-C676 is a well-rounded CCTV camera that offers high-resolution imaging, excellent low-light performance, and adaptable features. Its combination of advanced technology, durable construction, and flexible camera options makes it a strong choice for anyone seeking a reliable surveillance solution. Whether for commercial, industrial, or residential applications, the TK-C676 proves to be a valuable asset in enhancing security measures.