For turning off the demonstration display, refer to
UX-QD70W
Important for Laser Products / 镭射产品的重要说明
Side view
Front view
Table of Contents
MDs
Listening to Other Equipment
Suitable Locations for the Main Unit
Cleaning the Main Unit
Condensation
Listeners Etiquette
Region code of DVD Video
Playable DVD/CD Types
Discs that cannot be played back
About MP3/WMA/JPEG discs
Disc Structure
MP3/WMA Jpeg discs
Safety precautions
Supplied Accessories
When condensation or water drops adhere to the lens
Special Cautions
PUSH-OPEN
Remote control operation
Remote Control
Inserting Batteries into
Setting the manufacturers code
Operating the TV Using the Remote Control
For TV operation
Press Release Press number buttons
Connecting the AM antenna
Connecting the Antennas
Set up the AM antenna supplied
Connections
Connecting the FM antenna
Connecting the Speakers
Connecting with digital equipment
Connecting Other Equipment
Audio cord not supplied
Connecting by using the S-video cord
Connecting with a TV When a Clearer Picture Is Desired
Connecting by using the component video cord
Disabling the Demonstration Display
Connecting the Power Plug
AC outlet
Basic Operations
Setting the Clock
Adjusting the Sound Quality
Adjusting the Volume
Turning On/Off the Main Unit
Changing the Display Brightness Dimmer
Emphasizing Heavy Bass Sound AHB PRO
Changing the Color Patterns
While the selected system is dis- played, press
Press To select the desired System
Listening to Radio Broadcasts
Setting the AM Tuner Spacing
Selecting a Radio Station
Press to select FM or AM
Changing the Display in the Display Window
Storing Radio Stations Preset
Entering radio station names
Playback
Basic Operations of the DVD Player
Press on the main unit
Place a disc on the disc tray
Display for CD
Display for a DVD VR
Display for DVD Audio
Display for VCD/SVCD
While a disc is being played back or stopped
One Touch Replay
While a disc is being played back
Stopping Playback
Pausing Playback
Resuming Playback Resume
Advancing Picture Frame by Frame
Slow Motion Playback
Refer to Using the number buttons
Skipping to the Beginning of a Track
Set the remote control mode selector to Audio Press or
Using the Menu Screen for DVD VRs
Selecting a Track from the Menu Screen
Press to select the desired title
Selecting the Audio Language
Convenient Functions of the DVD Player
Example For DVD Video
Is not pressed
Selecting the Subtitle Language
Canceling the subtitle
Selecting a View Angle
Magnifying the Picture Zoom
Press To select VFP mode
Adjusting the Picture Quality VFP
Press to select an item you want to adjust
Press to change the value Press
Two speakers produce an effect resembling surround-sound
Creating Realistic Sound Adjusting Playback Level
Each time you press Display Changes as follows
Select the level while listening to the sound played back
Press the number buttons to enter the pin code 4 digits
Playing Back the Bonus Browsable Still Pictures Group
Press the number buttons or to program chapters Tracks
Playing Back the Disc Desired Order Program Playback
While a disc is stopped
Display for CD/VCD/SVCD
Canceling program playback
Confirming programmed content
Canceling random playback
Random Playback
Repeat types
Repeat Playback
Status Bar and Menu Bar
Using the Status Bar and Menu Bar
Function list
Information displayed on the status bar
Set the remote control mode selector to Audio Press Twice
Canceling A-B repeat playback
Press to select Enter the time using the number buttons
Playing Back the Designated Part Repeatedly Repeat Playback
Press to select a group Press to move to the track list
Playing Back MP3/WMA and Jpeg Discs
Insert a disc. Example For MP3
Example For MP3
Slide-show playback
Press to select a track Press or
Example For MP3 during playback
Basic Operations
Preferences
Audio
Language Codes
Listening to Cassette Tapes
Press repeatedly to select the reverse mode
Insert a cassette tape
Listening to Cassette Tapes English
Listening to Other Equipment
Adjusting the sound input level
Tions
Each time you hold down , the display changes as follows
Listening to MDs
Listening to MDs
Insert an MD
Group Playback of an MD
Canceling group playback
Press repeatedly to select Group
Press or to select a group
Program Playback of an MD
Canceling the program playback
Confirming the programmed track order
Erasing all the programmed tracks
Random Playback of an MD
Canceling the random playback
Repeat Playback of an MD
Example Display while MD random playback is selected
Searching another track or group title
Searching Titles of an MD
Quitting the title search
Enter the title you want to find
Recording All Tracks from a Disc to an MD
Recording Sound to MDs
Quitting Recording
When recording DVD AUDIOs/MP3s/ WMAs
Recording Only One Track from a Disc
Program Recording from a Disc
Changing the display in the display window during recording
LP indicator setting
While recording is being paused, press
CD-R/CD-RW Recording
Insert an MD for recording
Select a sound source
Example Display while FM radio broadcast is recorded
You can change the reverse mode during recording
Press to select the reverse mode
Recording Sound to Cassette Tapes
Preventing recorded sound from being erased
Program Recording from a Disc or MD
Recording Only One Track from a Disc or MD
Recording with No Blank Time between Tracks
While a radio broadcast FM/AM is Being recorded
While tracks from a disc or MD are being recorded
Giving Editing Titles
Enter a title using the number buttons
Things You Should Know about Editing
Giving Editing Titles
Available Characters
Entering Titles
Press on the main unit to eject the MD
Dividing a Track into Two Tracks Divide
Editing Tracks
Press repeatedly to select DIVIDE? Press or
Press to specify the dividing point
Moving a Track Move
Joining Tracks Join
Press repeatedly to select JOIN?
Press repeatedly to select MOVE?
Press repeatedly to select ERASE?
Erasing a Track Erase
Example Erasing tune B
Forming a Group Form GR
Editing Tracks by Group
Press repeatedly to select Form GR?
Example Forming tune A, tune B and tune C into a group
Dividing a Group into Two Groups Divide GR
Adding a Track to a Group Entry GR
Press repeatedly to select Entry GR?
Press repeatedly to select Divide GR?
Moving a Group Move GR
Joining Groups Join GR
Press repeatedly to select Join GR?
Press repeatedly to select Move GR?
Canceling a specified group Canceling all groups Ungr ALL
Canceling a Group
Press repeatedly to select UNGROUP?
Press repeatedly to select Ungr ALL?
Press repeatedly to select Erase GR?
Erasing a Group Erase GR
You can erase a group including all tracks in the group
Example Erasing group
Sleep Timer
Using the Timers
Recording Timer
Changing the sleep timer setting
When you want to record an FM/AM radio broadcast
Mdlp mode Press
Press Press , and to set the starting time and ending time
Press Press or to select the desired day of the week
Canceling the recording timer
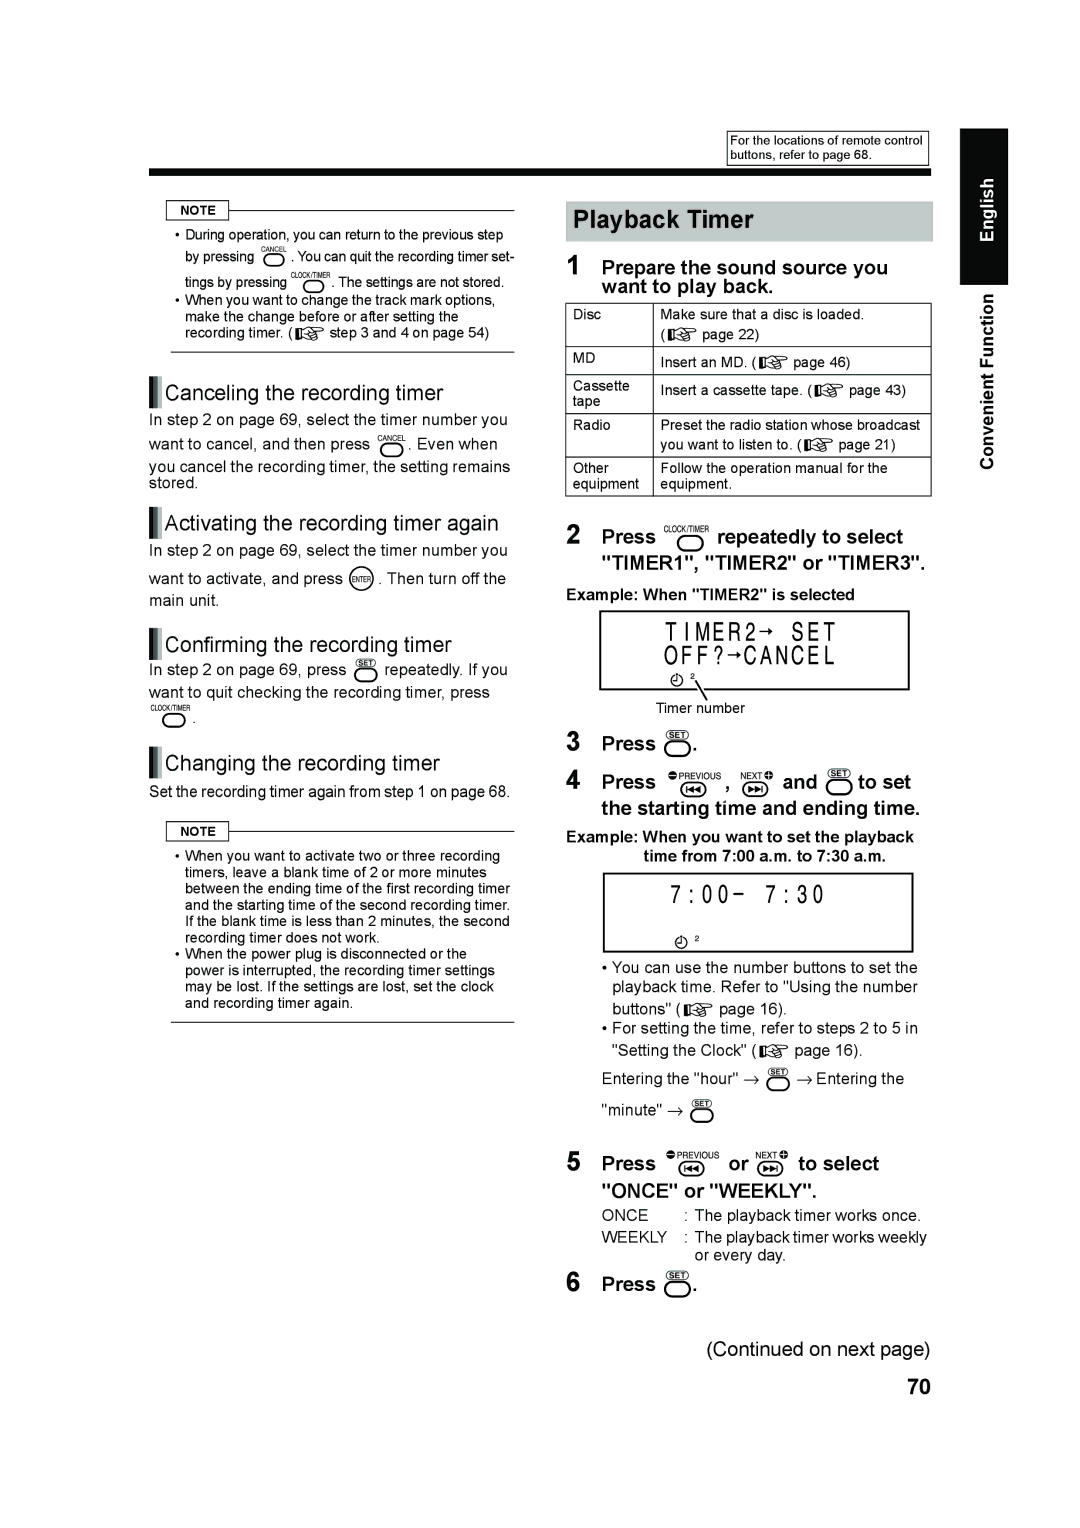
Playback Timer
Activating the recording timer again
Confirming the recording timer
When you want to play back a DVD VIDEO, DVD Audio or DVD VR
Press Press or to adjust the playback volume
When you want to listen to an FM/AM radio broadcast
When you want to play back a CD, VCD, Svcd or MD
Auto Standby
Connection and Setting
Using AV Compu Link
Canceling the disc/MD ejection lock
Operations
Serial Copy Management System Scms
Restrictions on MDs
High Speed Copy Management System Hcms
Handling Discs/MDs/Cassette Tapes
MD/Disc Messages
MD message Meaning Possible solution
Problem Possible cause Possible solution Reference
Troubleshooting
MD/DVD receiver CA-UXQD70S/CA-UXQD70W
Specifications
Speaker SP-UXK30S/SP-UXK30W
Micro component MD system UX-QD70S/UX-QD70W
Victor Company of Japan, Limited


 Canceling the recording timer


 Confirming the recording timer


 Changing the recording timer
 .
.