Sears.com
Sears, Roebuck and Co,, Hoffman Estates, IL 60179 U.S.A
744-800-072
Save TH ESE Instructions
Instrucciones DE Seguridad Importantes
IMPORTANTES CONSiGNES DE S¢CURITI
Faites
Full 90-DAY Warranty on ALL Parts and Mechanical Adjustments
Caractdristiques De la machine
Specification
Especificaciones De la mdquina
Contents
Aplicaciones
Indice
IlL Costura
SECClON V, Puntadas Utiles Y Puntadas
Table DES Matiires
Partie I. Identification DES PIf=CES DE LA Machine
Section I. Names of Parts
Names of Parts
Partie I. Identification DES Piices DE LA Machine
Mallette et sac de transport
Available Accessories and Attachments
29*3031
DESCRIPClON DE LA Parte
Accessoires disponibles
Accesorios y refacciones disponibles
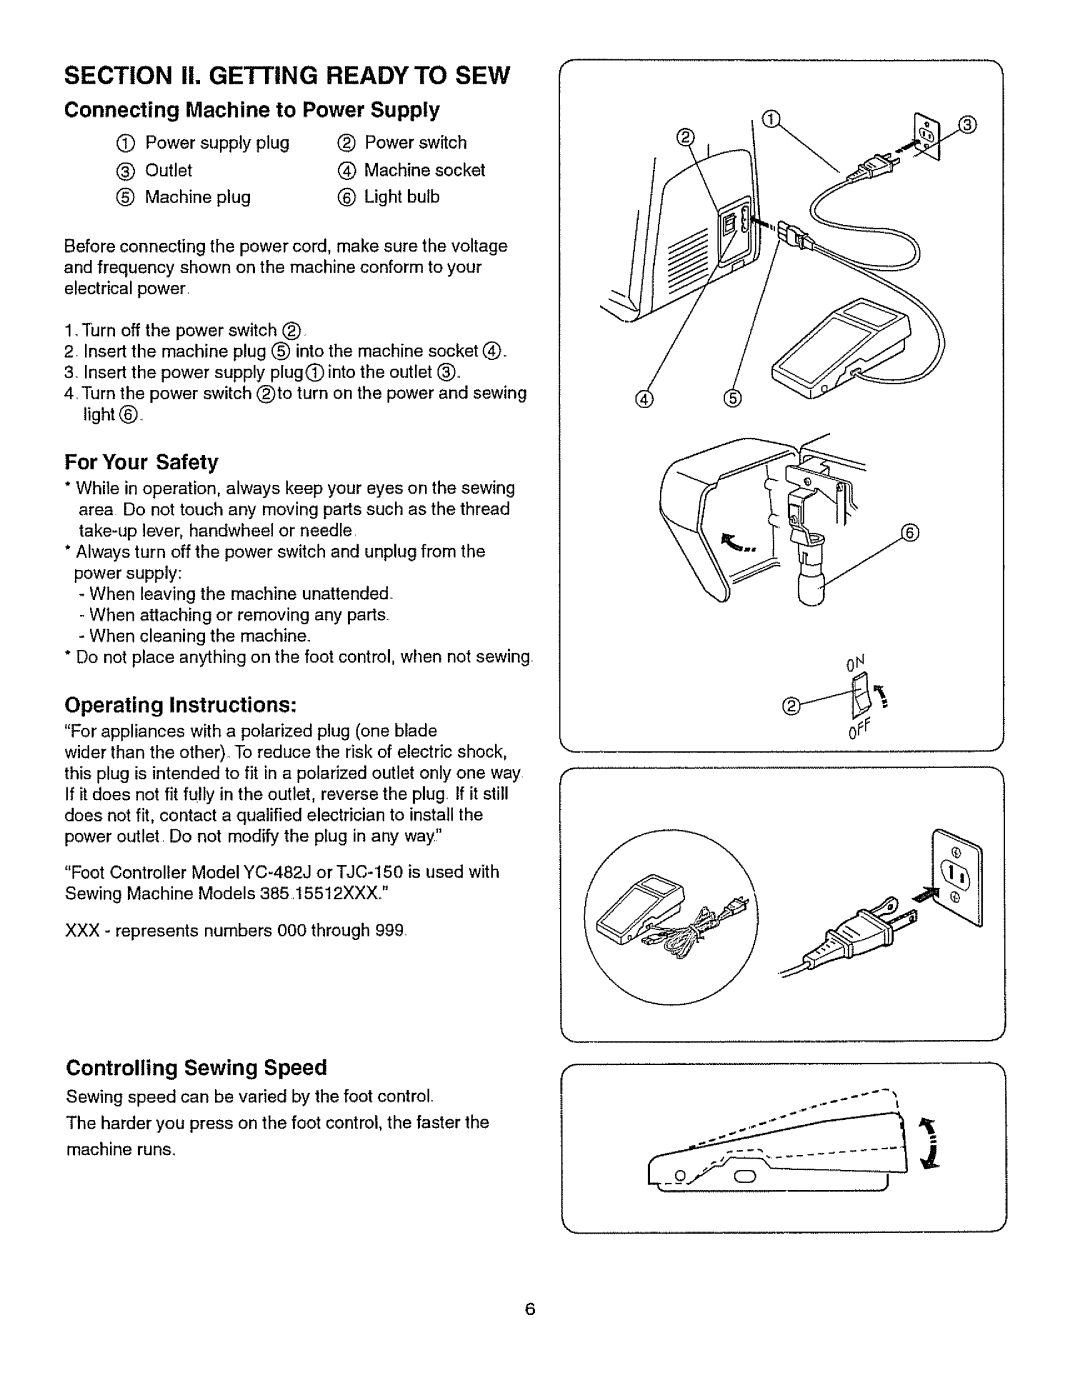
Section II. Getting Ready to SEW
Connecting Machine to Power Supply
For Your Safety
Operating Instructions
Conexi6n de la mquina a la red elctrica
Seccion IL Preparacion DE LA Maquina Para Coser
Partie II. PRIPAREZ-VOUS ..COtJDRE
Para su seguridad
Presser Foot Lifter
Accessory Box
Thread Cutter
Palanca de elevaci6n del prensatelas
Boite accessoires
Ajuste de los porta-carretes Portacarrete
Pose de la broche b bobine
For free-arm sewing
Free-arm Sewing
Changing Needle
For flat-bed sewing
Changement de pied presseur
Braze para costura tubular Utilisation du bras libre
Cambio de prensatelas
Levier Encoche Broche
Straight stitch foot
Presser Foot Types
Zigzag foot
Tipos de prensatelas Diffdrents pieds presseurs
For Special Finish Topstitching
Selecting Needle and Fabric
Green 110
Gasa,Gasa delgada, Encaje fine,Organdi, MallaOrgandi, Tul
1490
Muy ligera
Azul Punta de bola
Daiauine
Choix de Iaiguille et tissu
Diambre
Blankpage Ginablanca Pageblanche
Bobbin Winding
Bobbin winding
C6mo sacar el portacanillas
Embobinado de la canilla Remplir la canette
Embobinado de la canilla
Retrait de la porte-canette
Bobbin winding
Embobinado de la canilla Continuaci6n
Remplir la canette suite
Inserting bobbin
Colocaci6n de la canilla
OInsertion de la canette
Drawing up bobbin thread
Threading the machine
Enhebrado Del hilo de la aguja Enfilage De la machine
Adjust the Needle Thread Tension for Straight Stitch
Correct tension
El hilo estd demasiado tenso
El hilo estd demasiado flojo
Correcta
Si la tension est trop dlev6e
Adjust the Needle Thread Tension for Zigzag Stitch
Si la tension est trop dlevde Endroit du tissu
Parte de abajo de la tela
Hilo estd demasiado tenso
Envers du tissu
Reverse Stitch Control
Adjusting Stretch Stitch Balance
Stitch Selector
Control de puntada reversa Bouton de marche arribre
Equilibrio de los patrones distorsionados
Comment r6gler Iquilibre dunmotif extensible
La m&quina coser& hacia atrds hasta que suelte el bot6n
Turn a Square Corner
Section II1. Straight Stitch Sewing
Use the Seam Guides
Straight
Use de las gufas de costura Guia para esquinas
Puntada recta Point Droit
Para terminar la costura
Utilisation de guides de couture
Needle Thread tension 2 to Stitch length Red zone
Topstitching
Stitch selector
Presser foot Straight stitch foot
Glissire
Preparaci6n de la tela Preparation du tissu
Zipper Sewing
Costura de cremalleras continuaci6n Para empezar a coser
Couture des fermetures b glissibre suite
Feed dog Dropped
Darning
To Drop or Raise the Feed Dogs
Comment descendre ou monter les griffes dentrainement
C6mo bajar / subir los dientes del transporte
Zurcido
Reprisage
Stitch Selector Length Top thread tension
Section
Basic Zigzag
Puntada en satfn
Seccion IV. Puntadas DE ZIG-ZAG
Partie IV. Points ZIG-ZAG
Decorativa
Applique
Monogramming
Stitch selector Stitch length Needle thread tension
Appliques
Monogramas
Aplicaciones
Stitch selector Stitch length Needle thread tension 1 to
Bar Tacking
Button Sewing
Length
Longueur du point
Dientes de transporte Bajados
Brides De renfort
Pose Des Boutons
Stitch Selector Length
Lightweight fabric
Overcasting Stitch
Dobladillo invisible
Seccion V. Puntadas Utiles Y
Puntadas Decorativas
Puntada de sobrehilado Remate
Lace Work
Multiple Zigzag
Point Zig-zag multiple
Trabajos con encajes
Puntada de mttltiple zig-zag
Shell Stitch
Direction
Du point
Puntada en forma de concha
Coquille
Rick-rack Stretch
Section VI. Stretch Stitches
Straight
Gold stretch stitch position
Point droit extensible
Puntada recta triple
Overcast Stretch Stitching
Feather Stitch
Point Ddpines
Puntada eldstica de sobrehilado
Puntada de pluma
Serging
Puntada de Dobladillo Point De surjet
Starting to sew
Section VII. Buttonhole
Buonhole
Carefully mark buttonhole length on fabric
Ojal incorporado
Seccion VII. Ojales
Partie VII, Boutonniere
Boutonniere
Buttonhole
Page
Replacing the Light Bulb
Cleaning the Feed Dogs
Section VIII. Care of Your Machine
Partie VIII. Entretien DE Votre Machine
Remplacement de rampoule
Seccion VIII. Mantenimiento DE LA Maquina
Iaiguile
Cleaning the Shuttle Race
Cleaning the shuttle area 0 Bobbin case Levers
Navette
Limpie el rea De la lanzadera Nettoyage La navette
Patte de retenue
Coloque nuevamente el conjunto de la lanzadera Palanca
Oiling the Machine
Lubrifiez autour de fa navette
Lubricaci6n de la mdquina Huilage de la machine
Lubrique la drea de la lanzadera
Machine doesnt work Patterns are distorted
Troubleshooting
Feeding smoothly
Noisy operation
Ginas 27 Pzgina25
Se rompe el hilo de la canilla
Pgina
En cas de problme Problems Le fil daiguillese casse Cause
Page11 Page15
LE-FOYER
Au Canada pour service En frangais
SU-HOGAR SM