Lower Oven General Care & Cleaning

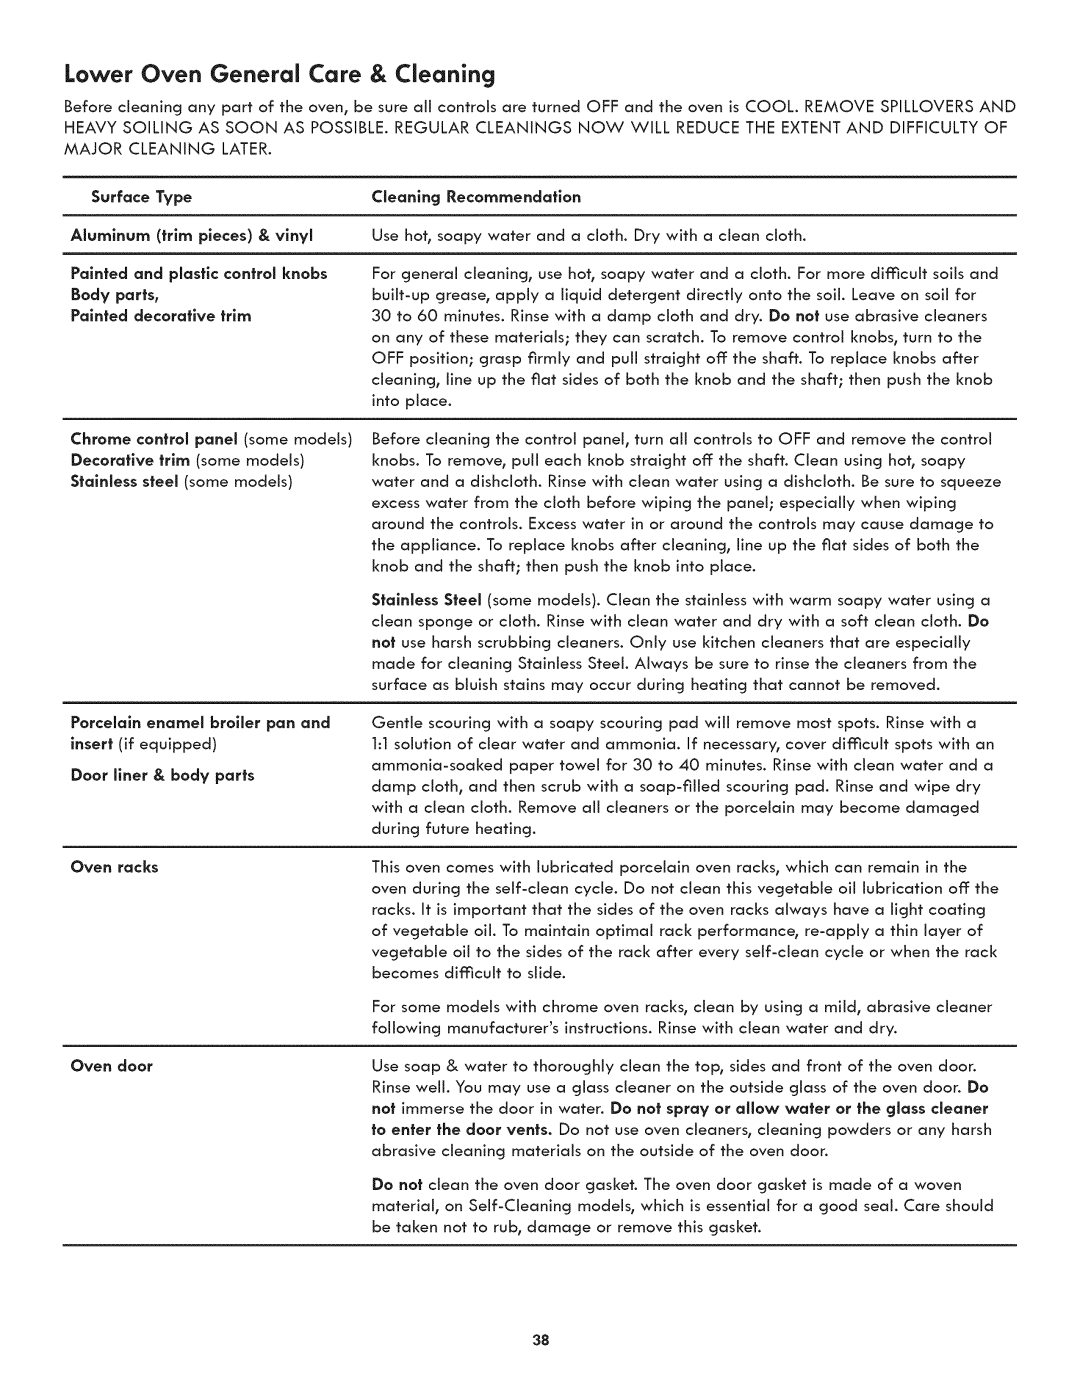
Before cleaning any part of the oven, be sure all controls are turned OFF and the oven is COOL. REMOVE SPILLOVERS AND HEAVY SOILING AS SOON AS POSSIBLE. REGULAR CLEANINGS NOW WILL REDUCE THE EXTENT AND DIFFICULTY OF MAJOR CLEANING LATER.

Surface Type

Aluminum (trim pieces) & vinyl

Painted and plastic control knobs Body parts,

Painted decorative trim

Chrome control panel (some models) Decorative trim (some models) Stalnless steel (some models)

Porcelain enamel broiler pan and insert (if equipped)

Door liner & body parts

Cleaning Recommendation

Use hot, soapy water and a cloth. Dry with a clean cloth.

For general cleaning, use hot, soapy water and a cloth. For more difficult soils and built-up grease, apply a liquid detergent directly onto the soil. Leave on soil for

30 to 60 minutes. Rinse with a damp cloth and dry. Do not use abrasive cleaners on any of these materials; they can scratch. To remove control knobs, turn to the OFF position; grasp firmly and puii straight off: the shaft. To replace knobs after cleaning, line up the fiat sides of both the knob and the shaft; then push the knob into place.

Before cleaning the control panel, turn all controls to OFF and remove the control knobs. To remove, pull each knob straight off: the shaft. Clean using hot, soapy water and a dishcloth. Rinse with clean water using a dishcloth. Be sure to squeeze excess water from the cloth before wiping the panel; especially when wiping around the controls. Excess water in or around the controls may cause damage to the appliance. To replace knobs after cleaning, line up the fiat sides of both the knob and the shaft; then push the knob into place.

Stainless Steel (some models). Clean the stainless with warm soapy water using a clean sponge or cloth. Rinse with clean water and dry with a soft clean cloth. Do not use harsh scrubbing cleaners. Only use kitchen cleaners that are especially made for cleaning Stainless Steel. Always be sure to rinse the cleaners from the surface as bluish stains may occur during heating that cannot be removed.

Gentle scouring with a soapy scouring pad will remove most spots. Rinse with a 1:1 solution of clear water and ammonia. If necessary, cover dimcuit spots with an

ammonia-soaked paper towel for 30 to 40 minutes. Rinse with clean water and a damp cloth, and then scrub with a soap-filled scouring pad. Rinse and wipe dry with a clean cloth. Remove aii cleaners or the porcelain may become damaged during future heating.

Oven racks

Oven door

This oven comes with lubricated porcelain oven racks, which can remain in the oven during the self-clean cycle. Do not clean this vegetable oil lubrication off: the racks. It is important that the sides of the oven racks always have a light coating of vegetable oil. To maintain optimal rack performance, re-apply a thin layer of vegetable oil to the sides of the rack after every self-clean cycle or when the rack becomes dimcuJt to slide.

For some models with chrome oven racks, clean by using a mild, abrasive cleaner following manufacturer's instructions. Rinse with dean water and dry.

Use soap & water to thoroughly clean the top, sides and front of the oven door. Rinse well. You may use a glass cleaner on the outside glass of the oven door. Do not immerse the door in water. Do not spray or affow water or the glass cleaner to enter the door vents. Do not use oven cleaners, cleaning powders or any harsh abrasive cleaning materials on the outside of the oven door.

Do not clean the oven door gasket. The oven door gasket is made of a woven material, on Self-Cleaning models, which is essential for a good seal. Care should be taken not to rub, damage or remove this gasket.

38

Page 38
Image 38
Kenmore 790.489, 790.488 manual Lower Oven General Care & Cleaning, Surface Type, Oven door

790.488, 790.489 specifications

The Kenmore 790.489 and 790.488 are notable models in the realm of kitchen appliances, specifically designed to enhance the cooking experience in home kitchens. Renowned for their reliability and innovative features, these ranges provide a blend of convenience, performance, and style.

One of the standout features of the Kenmore 790.489 and 790.488 models is their powerful cooking capabilities. With multiple burners available, these ranges equip home chefs with the flexibility to prepare various dishes simultaneously. The burners offer different BTU outputs, ensuring that users can achieve precise heating for delicate sauces as well as intense heat for searing meats.

Moreover, both models come with an intuitive self-cleaning option, ensuring that upkeep remains hassle-free. This time-saving technology allows users to choose between several cleaning cycles, whether they require a light clean or a more intense scrubbing of the interior, helping maintain the oven's pristine condition with minimal effort.

The convection oven feature is another highlight of the Kenmore 790.489 and 790.488. This technology promotes even cooking by circulating hot air throughout the oven cavity, reducing cook times and eliminating hotspots. With this feature, users can bake multiple dishes at once without worrying about uneven results, making it especially useful when preparing large meals or holiday feasts.

In terms of design, both models embody a sleek and modern aesthetic that can easily complement any kitchen decor. Available in classic finishes, the ranges are not only functional but also an attractive addition to any culinary space. The controls are designed to be user-friendly, providing straightforward access to temperature settings and cooking modes.

Another significant characteristic is the availability of advanced safety features. These include automatic shut-off, which provides peace of mind for busy cooks who may be preoccupied while simmering or baking.

In summary, the Kenmore 790.489 and 790.488 models stand out in the competitive landscape of kitchen ranges. With their versatile cooking options, self-cleaning technology, and convection capabilities, they cater to both novice cooks and seasoned chefs alike, making them an excellent investment for any kitchen. Their stylish appearance, combined with practical features, ensures they meet the demands of modern-day cooking while enhancing the user experience.