AUTO-RECORDING MODE - ADVANCEDOPERATION
NAVIGATING THE AUTO-RECORDING MODE MENU
In
(2)are used to move the cursor in the menu. Pressing the center of the controller will enter a setting.
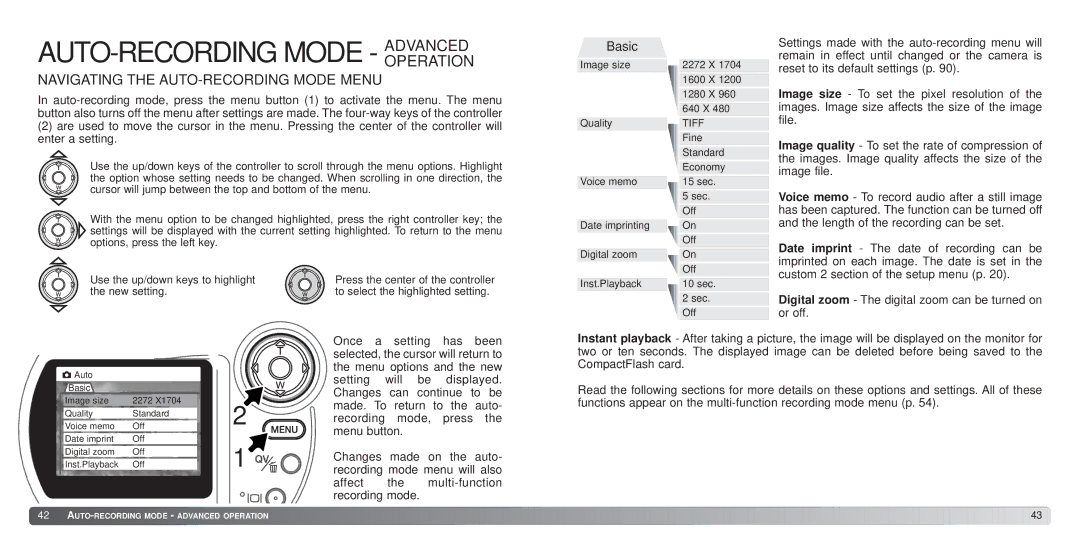
Use the up/down keys of the controller to scroll through the menu options. Highlight the option whose setting needs to be changed. When scrolling in one direction, the cursor will jump between the top and bottom of the menu.
With the menu option to be changed highlighted, press the right controller key; the settings will be displayed with the current setting highlighted. To return to the menu options, press the left key.
Basic
Image size
Quality
Voice memo
Date imprinting
Digital zoom
2272 X 1704
1600 X 1200
1280 X 960
640 X 480
TIFF
Fine
Standard
Economy
15 sec. |
5 sec. |
Off |
On |
Off |
On |
Off |
Settings made with the
Image size - To set the pixel resolution of the images. Image size affects the size of the image file.
Image quality - To set the rate of compression of the images. Image quality affects the size of the image file.
Voice memo - To record audio after a still image has been captured. The function can be turned off and the length of the recording can be set.
Date imprint - The date of recording can be imprinted on each image. The date is set in the custom 2 section of the setup menu (p. 20).
Use the up/down keys to highlight the new setting.
Press the center of the controller to select the highlighted setting.
Inst.Playback
10 sec. |
2 sec. |
Off |
Digital zoom - The digital zoom can be turned on or off.
Auto |
|
|
Basic |
|
|
Image size | 2272 X1704 | 2 |
Quality | Standard | |
Voice memo | Off | |
Date imprint | Off | 1 |
Digital zoom | Off | |
Inst.Playback | Off |
Once a setting has been selected, the cursor will return to the menu options and the new setting will be displayed. Changes can continue to be made. To return to the auto- recording mode, press the menu button.
Changes made on the auto- recording mode menu will also
affect the
Instant playback - After taking a picture, the image will be displayed on the monitor for two or ten seconds. The displayed image can be deleted before being saved to the CompactFlash card.
Read the following sections for more details on these options and settings. All of these functions appear on the
![]() 42
42 ![]()
![]()
![]()
![]()
![]()
![]()
![]()
![]()
![]()
![]()
![]()
![]()
![]()
![]()
![]()
![]()
![]()
![]()
![]()
![]()
![]()
![]()
![]()
![]()
![]()
![]()
![]()
![]()
![]()
![]()
![]()
![]()
![]()
![]()
![]()
![]()
![]()
![]()
![]()
![]()
![]()
![]()
![]()
![]()
![]()
![]()
![]()
![]()
![]()
![]()
![]()
![]()
![]()
![]()
![]()
![]()
![]()
![]()
![]()
![]()
![]()
![]()
![]()
![]()
![]()
![]()
![]()
![]()
![]()
![]()
![]()
![]()
![]()
![]()
![]()
![]()
![]()
![]() 43
43![]()
