If you choose the Scan Set setting, your choices include: SCAN MOD, SC SPEED, SC DELAY and LOCK BACK. (Scan Mode, Scan Speed, Scan Delay and Lookback). You can toggle between these settings with the up or down buttons. When the desired setting appears on screen, press the MODE button to select. If you select SCAN MODE, your choices will include: NSCAN TX, PSCAN TX, PSL SCAN and P-CH TX. (Normal Scan Transmit, Priority Scan Transmit, Priority Select Scan and Priority Only TX Scan). You can toggle between these settings with the up or down buttons. When the desired setting appears on screen, press the MODE button to select. The radio will save your selection, and return to standby mode.
If you select the Scan Speed setting, you will need to choose the scan speed time, from 50 milliseconds to 500 milliseconds. Use the up or down buttons to select the desired speed, then the MODE button to select. The radio will save your selection and return to standby mode. Example of display: SCP 50 .
NOTE: Scan speed time is the amount of time that scan stays on a channel (when there is no signal) before moving to the next channel on the scan list.
If you select the Scan Delay setting, you will need to choose the scan delay time, from 1 seconds to 30 seconds. Use the up or down buttons to select the desired time, then the MODE button to select. The radio will save your selection and return to standby mode. Example of display: SCD 30 .
NOTE: Scan delay time is the standby time to remain on the channel after the receiving signal stops or after transmitting.
If you select the Lookback setting, you will need to choose the desired lookback frequency time, from 1 second to 10 seconds. Use the up or down buttons to select the desired time, then the MODE button to select. The radio will save your selection and return to standby mode. Example of display: LCT10 .
NOTE: In Priority Scan mode, Lookback time is the interval time to check the Priority Channel when the radio receives a signal on a non-priority channel.
If you choose the Priority Scan setting, your choices include Priority Scan On or Off settings. You can toggle between these settings with the up or down buttons. When the desired setting appears on the display, press the MODE button to select. If you choose the On setting, use the up or down buttons to select your desired Priority Scan channel, then the MODE button to select. The radio will save your On or Off setting, and return to standby mode.
Example of display: PRICH-32.
NOTE: In the Priority Scan setting mode, if the MODE or P-T-T buttons are pressed, Priority Scan will be disabled and the radio will return to standby mode.
If you choose the TX Delay setting, your choices include On or Off settings. You can toggle between these settings with the up or down buttons. When the desired setting appears on the display, press the MODE button to select. The radio will save your selection and return to standby mode. Example of display: TDLY ON.
If you choose the 2 Tone Alarm setting, your choices include On or Off settings. You can toggle between these settings with the up or down buttons. When the desired setting appears on the display, press the MODE button to select. The radio will save your selection and return to standby mode.
An example of the 2 Tone Alarm display: ALM ON .
NOTE: If you select On, the radio issues an alarm tone after a 2 tone signal is decoded and RX carrier is no longer present if a call is received during the alarm. The alarm will stop until the call is gone. Once the RX signal is no longer present, the alarm will continue until the 2 tone decode is reset by pressing the AUX button for 3 seconds.
If you choose the Microphone Hook setting, your choices include On or Off settings. You can toggle between these settings with the up or down buttons. When the desired setting appears on the display, press the MODE button to select. The radio will save your selection and return to standby mode.
An example of the Microphone Hook display: HOOK ON .
NOTE: If you select On, the Microphone hub will not require ground to activate privacy tones.
If you choose the Microphone Hook setting Off, the Hook Scan setting will appear, your choices include On or Off settings. You can toggle between these settings with the up or down buttons. When the desired setting appears on the display, press the MODE button to select. The radio will save your selection and return to standby mode.
An example of the Hook Scan display: HSCN ON .
NOTE: If you select Microphone Hook setting Off, the Microphone hub will require ground to activate privacy tones if microphone hub is removed from ground privacy tones are defeated and the radio will operate in carrier squelch mode. If you select Hook scan On, your radio will continue to scan with the microphone hub not grounded in carrier squelch mode.
If you choose the Audio Compander setting, your choices include On or Off settings. You can toggle between these settings with the up or down buttons. When the desired setting appears on the display, press the MODE button to select. The radio will save your selection and return to standby mode.
An example of the Audio Compander display: A-C ON .
NOTE: If you select On, the audio quality between wide and narrow band channels will be the same.
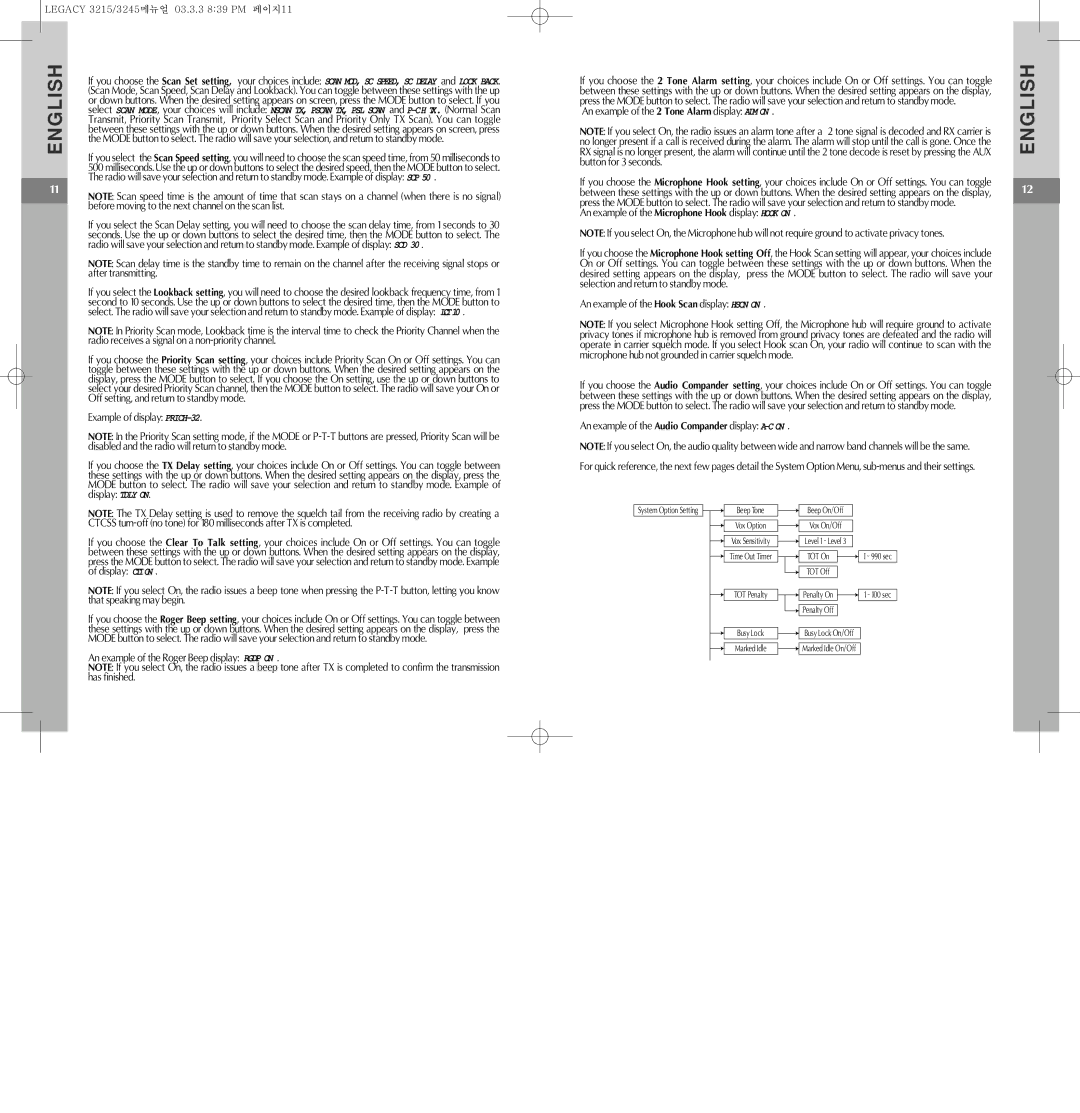
For quick reference, the next few pages detail the System Option Menu, sub-menus and their settings.