Users Guide
X54x Series
Contents
Loading paper and specialty media
Copying
Mailing
Faxing
108
114
110
122
176
162
204
206
Troubleshooting
252
234
Page
Safety information
Safety information
Safety information
Help
Setup information
Learning about the printer
Finding information about the printer
Click Technical Support
Selecting a location for the printer
102 mm 4 508 mm 20 152 mm 6 76 mm 3 254 mm 10
Basic functions of the scanner
Printer configurations
Basic models
Understanding the printer control panel
Using the ADF
Using the scanner glass
Understanding the ADF and scanner glass
Description
Learning about the printer
Learning about the printer
Left arrow Press to scroll left
Keypad Enter numbers, letters, or symbols on the display
Available options
Additional printer setup
Installing internal options
Installing a memory card
Use the illustration below to locate the connector
Open the memory card connector latches
Notches Ridges
Installing a flash memory or font card
Unpack the flash memory or font card
Plastic pins Metal pins
Installing an optional tray or drawer
Installing hardware options
Additional printer setup
Attaching cables
Verifying printer setup
Installing printer software
Setting up the printer software
Printing menu settings pages
Printing a network setup
For Macintosh users
Setting up wireless printing
Using the World Wide Web
Updating available options in the printer driver
Installing the printer on a wireless network Windows
Click Install Printer and Software
Mac OS X version 10.5 or later
Installing the printer on a wireless network Macintosh
Prepare to configure the printer
Enter the printer information
Configure your computer to use the printer wirelessly
Configure the printer for wireless access
Mac OS X version
Installing the printer on a wired network
For Macintosh users
Double-clickPrint Center or Printer Setup Utility
Minimizing your printers environmental impact
Using recycled paper and other office papers
Saving paper and toner
Unacceptable paper examples
Conserving supplies
Use both sides of the paper
Check your first draft for accuracy
Using Eco-Mode
Saving energy
Place multiple pages on one sheet of paper
Reducing printer noise
Adjusting Power Saver
Returning Lexmark cartridges for reuse or recycling
Recycling
Recycling Lexmark products
Recycling Lexmark packaging
Unlinking trays
Loading paper and specialty media
Linking and unlinking trays
Linking trays
Configuring Universal paper settings
Setting the Paper Size and Paper Type
Specify a unit of measurement
Specify the paper height and width
Loading paper and specialty media
Loading paper and specialty media
Loading the 650-sheet duo drawer
Using the multipurpose feeder
Tab Stack height limiter Width guide Size indicators
For Windows users
Using the manual feeder
For Macintosh users
Loading paper and specialty media
Paper and specialty media guide
Paper characteristics
Paper guidelines
Selecting preprinted forms and letterhead
Fiber content
Unacceptable paper
Selecting paper
Storing paper
Supported paper sizes, types, and weights
Paper sizes supported by the printer
Paper types supported by the printer
Optional 550-sheet tray
Paper types and weights supported by the printer
Paper type
Sheet tray
Index Bristol
Multipurpose tray
Paper capacities
Input capacities
Output capacity
Printing a document
Printing
Print side and paper orientation
Tips on using letterhead
Printing on specialty media
Source or process
Tips on using envelopes
Tips on using transparencies
Tips on using paper labels
Tips on using card stock
Printing from a flash drive
File type
Printing photos from a PictBridge-enabled digital camera
Supported flash drives and file types
Flash drive
Printing the print quality test pages
Printing information pages
Printing a font sample list
Printing a directory list
Canceling a print job from the printer control panel
Canceling a print job
Canceling a print job from the computer
Printing
Making a quick copy
Copying using the ADF
Copying
Making copies
Copying to transparencies
Copying using the scanner glass
Copying photos
Copying on specialty media
Copying to letterhead
Customizing copy settings
Copying from one size to another
Page
Making a copy lighter or darker
Reducing or enlarging copies
Adjusting copy quality
Copying multiple pages onto a single sheet
Placing separator sheets between copies
Tip
Canceling a copy job
Improving copy quality
Question
Mailing
Setting up the e-mail function
Getting ready to e-mail
Setting up the address book
Creating an e-mail shortcut using the Embedded Web Server
Using the address book
Sending an e-mail using a shortcut number
Manually entering an e-mail address
Sending an e-mail using the address book
Canceling an e-mail
Getting the printer ready to fax
Faxing
Using the printer control panel for fax setup
Initial fax setup
Choosing a fax connection
Using the Embedded Web Server for fax setup
Equipment and service options
Fax connection setup
Connecting to a DSL service
Connecting to an analog telephone line
Connecting to a Distinctive Ring Service
Connecting to a PBX or Isdn system
Faxing
Countries or regions except Germany
Connecting to an adapter for your country or region
Faxing
Connect the answering machine or telephone to the adapter
Germany
Faxing
Connecting to a computer with a modem
Faxing
100
Setting the outgoing fax name and number
Setting the date and time
Turning daylight saving time on or off
For Mac OS X version 10.2 and 10.3 users
Sending a fax using the printer control panel
Sending a fax using the computer
Sending a fax
For Mac OS X version 10.4 or later users
Creating shortcuts
102
Using fax destination shortcuts
Using shortcuts and the address book
103
Making a fax lighter or darker
Customizing fax settings
Using the address book
Changing the fax resolution
105
Canceling an outgoing fax
Sending a fax at a scheduled time
Viewing a fax log
Understanding fax options
Forwarding a fax
Improving fax quality
107
108
Scanning to an FTP address using the keypad
Scanning to an FTP address
Scanning to an FTP address
Scanning to an FTP address using a shortcut number
Creating an FTP shortcut using the Embedded Web Server
109
Scanning to a computer
Scanning to a computer or USB flash memory device
110
111
Scanning to a USB flash memory device
Improving scan quality
Using the Scan Center software
Understanding the Scan Center features
Understanding scan to computer options
Using the ScanBack Utility
Using the ScanBack utility
113
Paper recommendations
Clearing jams
Avoiding jams
Paper tray recommendations
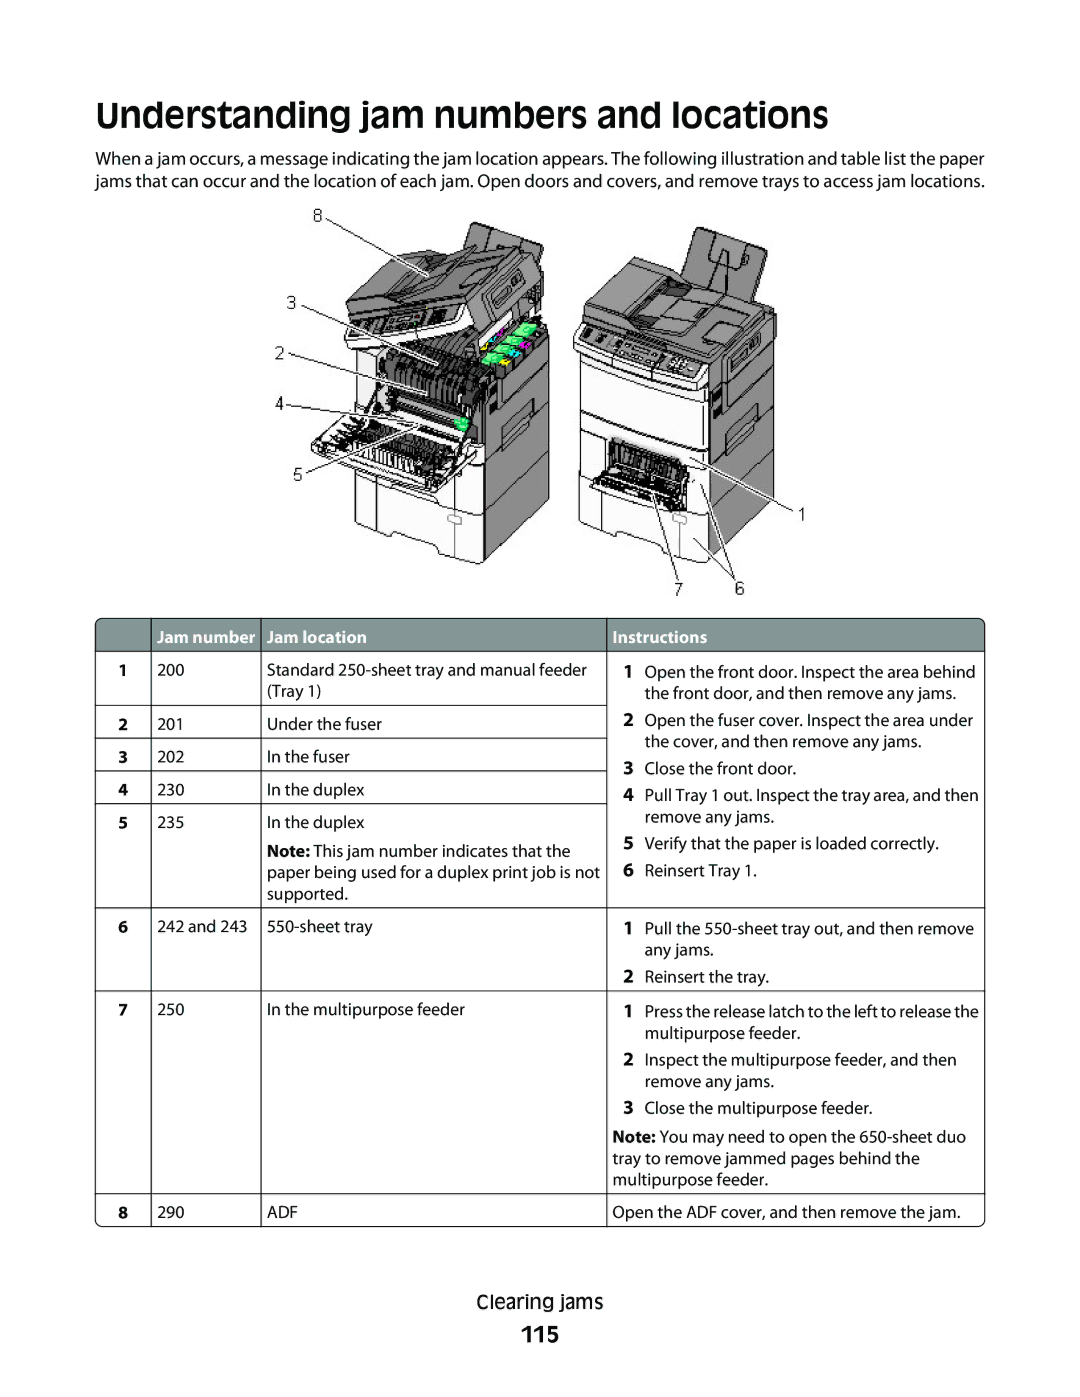
Instructions
Understanding jam numbers and locations
115
Jam number Jam location
116
Paper jam
117
118
119
243 paper jams
120
121
Menus list
Understanding printer menus
122
123
Default Source menu
Supplies menu
Paper menu
Tray x Type
Size/Type menu
124
Tray x Size
MP Feeder Type
125
Manual Paper Type
MP Feeder Size
126
Paper Texture menu
127
128
Paper Weight menu
129
Paper Loading menu
130
Custom Types menu
Custom Scan Sizes menu
Universal Setup menu
131
Portrait Width
Reports menu
Reports menu
132
133
Network/Ports
Active NIC menu
Network menu
Network Buffer
Wireless menu
NPA Mode
134
135
USB menu
USB Buffer
136
ENA Address ENA Netmask ENA Gateway
General Settings menu
Settings menu
137
138
139
Print Recovery
140
Copy Settings menu
141
General Fax Settings
Fax Settings menu
142
143
Fax Send Settings
Automatic Redial Redial Frequency
144
Duplex
Dial Prefix
145
146
Fax Receive Settings
Speaker Settings
Fax Log Settings
147
148
Scan Settings
Flash Drive menu
Flash Drive menu
Color
149
Orientation
Copies
Print Settings
150
Scan bit Depth
151
Print Settings
Setup menu
Finishing menu
Blank Pages
152
Up Ordering
153
Quality menu
Manual Color RGB
154
RGB Contrast RGB Saturation Color Balance
Color Samples
155
Utilities menu
PCL Emul menu
PostScript menu
156
157
Auto Fit
Image menu
158
Tray Renumber
Photo Size
PictBridge menu
159
Scaling
View Date/Time Set Date/Time
Set Date and Time
160
Quality
161
Understanding printer messages
List of status and error messages
Fax failed
Color Low
Dialing
Fax complete
Invalid Network Code
Ladp connection error
Maintenance
Invalid Engine Code
No answer
Menus disabled
Power Saver
No analog phone line
Reading data
Printing error
Reading error Remove drive
Programming Code
Scan to USB failed
Replace color cartridge
Replace PC Kit
Scan Document Too Long
Unsupported USB device, please remove
Unsupported Mode
USB drive disabled
Tray x Missing
Short paper
Insufficient memory to support Resource Save feature
Ppds Font Error
Yy Replace Unsupported color Cartridge
Defective flash detected
Network x Software Error
Standard USB Port Disabled
Too many flash options installed
Replace waste toner box
Input config error
Too many trays attached
Incompatible tray
Yy Paper jam area name
Yy color Cartridge is low
Yy Replace color Cartridge
Displayed
Flatbed Cover Open
24x Paper Jam Check Tray
ADF Scanning Jams
Paper Missing
940.01
Scanner Disabled
Scanner Auto Disabled
ADF Jam
942.02
Service message
940.02
941.02
Checking the status of supplies from a network computer
Maintaining the printer
Storing supplies
Checking the status of supplies
Ordering toner cartridges
Ordering supplies
177
Ordering a waste toner bottle
Ordering imaging kits
178
Replacing the waste toner bottle
Replacing supplies
179
180
181
182
Replacing a black imaging kit
183
184
185
186
187
188
Replacing a black and color imaging kit
189
190
191
192
193
Replacing a toner cartridge
194
195
Replacing a developer unit
196
197
198
199
200
201
Cleaning the exterior of the printer
202
Cleaning the scanner glass
Moving the printer
Before moving the printer
Shipping the printer
Moving the printer to another location
203
Using the Embedded Web Server
Administrative support
204
Viewing reports
Setting up e-mail alerts
205
Error message about reading USB drive appears
Troubleshooting
Solving basic printer problems
Solving printing problems
Job takes longer than expected to print
Jobs do not print
207
Large jobs do not collate
Job prints from the wrong tray or on the wrong paper
Incorrect or strange characters print
Tray linking does not work
Scanner unit does not close
Solving copy problems
Unexpected page breaks occur
Copier does not respond
210
Poor copy quality
211
Solving scanner problems
Partial document or photo copies
Checking an unresponsive scanner
212
Scan was not successful
Scanning takes too long or freezes the computer
Poor scanned image quality
Caller ID is not shown
Solving fax problems
Partial document or photo scans
Cannot scan from a computer
214
Cannot send or receive a fax
215
Can send but not receive faxes
Received fax has poor print quality
Can receive but not send faxes
216
Blocking junk faxes
Solving option problems
217
Multipurpose feeder
Drawers
218
Paper jam message remains after jam is cleared
Solving paper feed problems
Memory card
Paper frequently jams
220
Solving print quality problems
Blank pages
Characters have jagged or uneven edges
221
Clipped images
Dark lines
Gray background
Toner Cartridge MAY be Defective
Incorrect margins
Light colored line, white line, or incorrectly colored line
222
Has the Paper Absorbed Moisture DUE to High HUMIDITY?
Paper curl
Print irregularities
223
224
Repeating defects
Skewed print
Print is too light
Toner Cartridge MAY be LOW
Check the DARKNESS, BRIGHTNESS, and Contrast Settings
225
Make Sure Color Saver is SET to OFF
226
Print is too dark
227
Solid color pages
Toner fog or background shading appears on
Toner rubs off
Transparency print quality is poor
Toner specks
228
229
Solving color quality problems
Uneven print density
Color misregistration
230
FAQ about color printing
Color conversion tables
231
Manual Color menu
Object type
232
What are detailed Color Samples and how do I access them?
Contacting Customer Support
Embedded Web Server does not open
233
Edition notice
Product information
234
235
Trademarks
Meter average sound pressure, dBA
Modular component notice
Noise emission levels
236
237
Mercury statement Temperature information
Static sensitivity notice
Laser notice
Laser advisory label
Power consumption
Product power consumption
Power Saver
239
Off mode
Industry Canada compliance statement
Avis de conformité aux normes de l’industrie du Canada
240
241
Verwendung dieses Produkts in der Schweiz
Using this product in Switzerland
South Africa telecommunications notice
Utilisation de ce produit en Suisse
243
Regulatory notices for wireless products
Exposure to radio frequency radiation
Industry Canada Canada
Ελληνική English
244
245
Statement of Limited Warranty
Lexmark International, Inc., Lexington, KY
246
Limited warranty
Limited warranty service
Extent of limited warranty
Limitation of liability
247
Additional rights
248
Lexmark Software Limited Warranty and License Agreement
249
250
251
Adobe Systems Incorporated Notice
Numerics
Index
252
253
254
255
256
257
258