C770, C772
Edition March
Safety information
Trademarks
Contents
Contents
Output options
Input options
Internal options
Installing and removing options
Installing a 2000-sheet drawer
Continue with Installing a 500-sheet drawer
Installing a 500-sheet drawer
Installing a duplex unit
Installing an output expander
Installing the printer
Installing an output expander
Installing a 5-bin mailbox
Installing a StapleSmart finisher
Removing the system board access cover
Installing memory and option cards
Installing a memory card
Installing a firmware card
Installing a hard disk
Card Function
Installing an option card
Connector
Removing memory and option cards
Accessing the printer system board
Removing an option card
Removing memory cards
Installing and removing options
Removing a hard disk
Removing a firmware card
Reinstalling the system board access cover
Understanding the printer operator panel
Printing
Printing
Operator panel buttons
Status Indicates
Button Function
Sending a job to print
Printing from a USB flash memory device
Canceling a job from the printer operator panel
Canceling a print job
Canceling a job from a computer running Windows
Printing a network setup
Printing a menu settings
Canceling a job from a Macintosh computer
Canceling a job from a Macintosh computer running Mac OS
Printing a directory list
Printing a font sample list
Loading the trays
Loading 500-sheet trays
Printing
Loading the 2000-sheet tray
Printing
Loading the multipurpose feeder
Printing
Windows
Printing on specialty media transparencies, labels, other
Mac OS
Loading the trays Loading the multipurpose feeder
Select File Print
Linking trays
Holding a job in the printer
Linking output bins
Printing and deleting held jobs
Value Description
Windows
Printing confidential jobs
Macintosh
Print Time Filters
Entering a personal identification number PIN
At the printer
Enter PIN
Reserve Print
Verify Print
Repeat Print
Copies & Pages or General pop-up menu, choose Job Routing
Print All Delete All JobName1 JobName2
Storing paper
Tips for successful printing
Storing supplies
Avoiding jams
Media guidelines
Paper characteristics
Paper
Media specifications
Storing paper
Media specifications Unacceptable paper
Selecting paper
Selecting preprinted forms and letterhead
Transparencies
Printing on letterhead
Media source or process Print side Top
Envelopes
Media specifications Selecting transparencies
Labels
Storing media
Identifying media sources and specifications
Card stock
Media sizes and support
Dimensions
Media support by type for optional features
Media types and weights input options
Maximum
Media types and weights output options
Maximum2,4
Paper labels
Media capacities
Vinyl labels
Banner paper
Ready. Tray 1 Low, Tray
Determining the status of supplies
Status / Supplies
View supplies Y K
Conserving supplies
Supply Menu selection item What the setting does
Ordering supplies Print cartridges
Maintaining the printer
Fuser and ITU
Toner waste container
Ordering a fuser
Type of fuser Printer voltage Part number
Ordering an image transfer unit and transfer roller
Recycling Lexmark products
Ordering staple cartridges
Identifying jams
Clearing paper jams
Clearing paper jams
Access doors and trays
Paper jam messages
Understanding jam messages
Message Check Areas What to do
Expander jams Area M
Area a
Clearing the entire paper path
Area B
Area D
Area C
Area E
Area T1
Area Tx
Area K
Area J
Area L
Clearing fuser jams
Clearing mailbox, finisher, or output expander jams Area M
Clearing fuser jams
Clearing image transfer unit jams
Clearing paper jams
Clearing paper jams
Clearing paper jams
Clearing paper jams
Clearing paper jams
If you still need help
Disabling operator panel menus
Adjusting operator panel brightness and contrast
Administrative support
Restoring factory default settings
Enabling operator panel menus
Encrypting the disk
Adjusting Power Saver
Setting the system password
Setting security using the Embedded Web Server EWS
Using the secure Embedded Web Server
Click Configuration
Click TCP/IP Port Access
Using Secure mode
Supporting IPSec Internet Protocol Security
Click 802.1x Authentication
Using 802.1x Authenticating
Click Menu Lockout Setup
Locking the operator panel menus
Confidential Print Setup
Black only mode
Click Confidential Print Setup
Printing Lockout
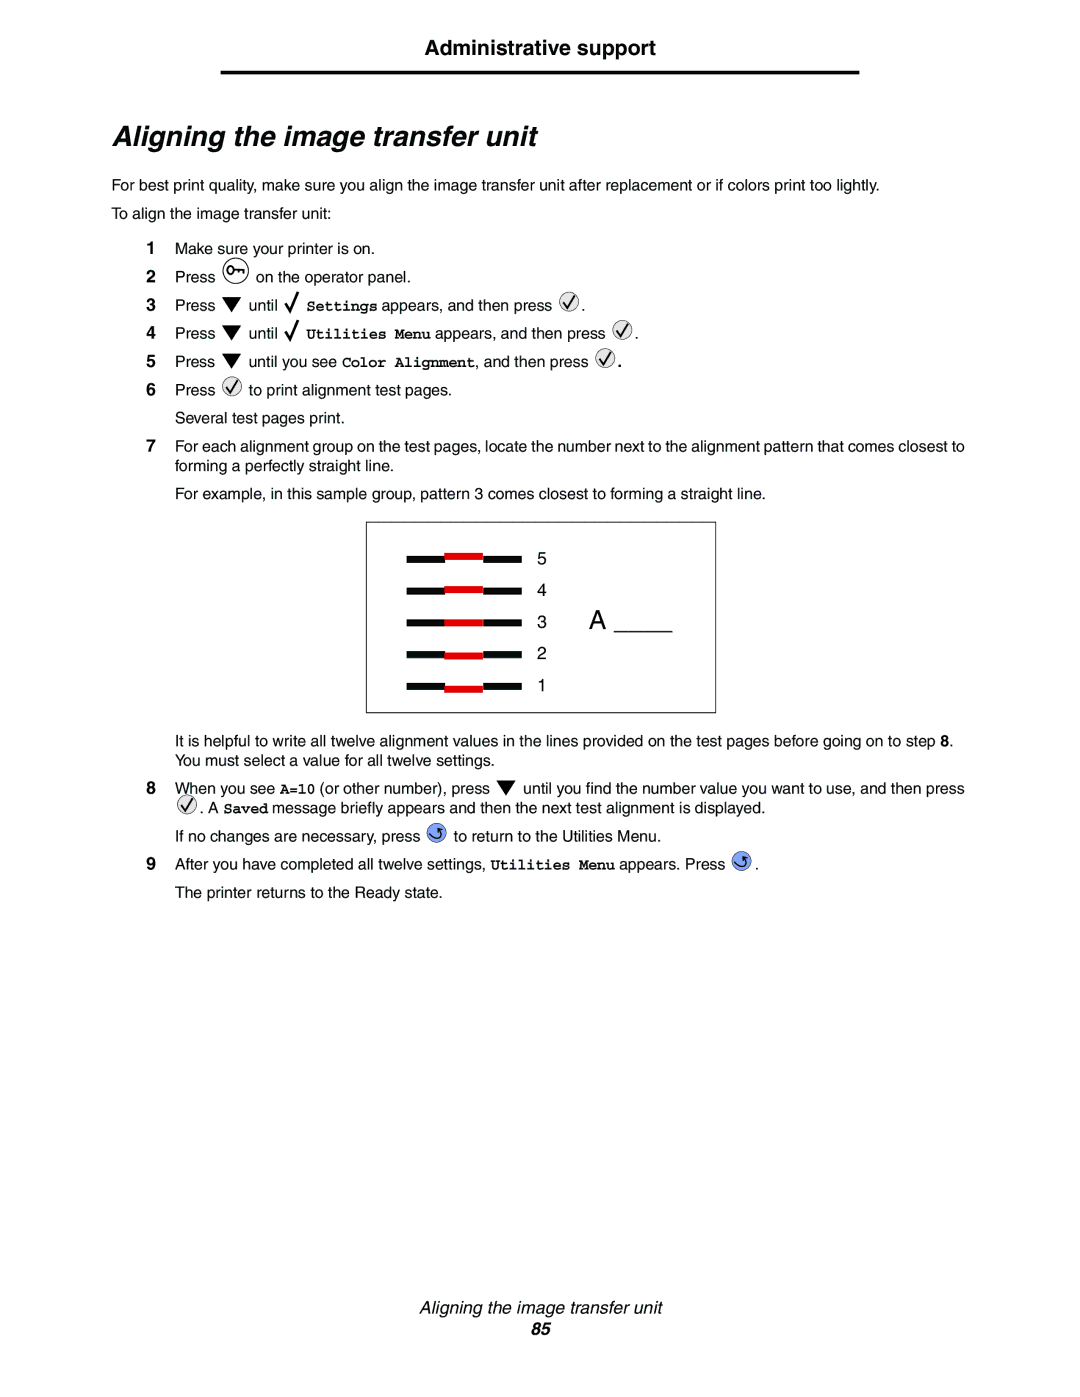
Aligning the image transfer unit
Size sensing
Using the Coverage Estimator
Disabling size sensing
Using the Setup Menu
Configuring printer alerts
Using MarkVision Professional
Using MarkVision Messenger
Symptom Cause Solution
Online customer support Calling for service
Checking an unresponsive printer
Check the Print as image box
Troubleshooting
Solving printing problems
Set Page Protect to Off from Print Recovery
For more informations, see Clearing mailbox, finisher, or
Solving mailbox problems
Output expander jams Area M
See Solving high capacity feeder problems
Solving option problems
Option Action
Problem Solution
Solving high capacity feeder problems
Solving print quality problems
Solving paper feed problems
See Loading the trays or Loading
Paper path
Multiple times on a
Marks occur repeatedly only in one color
Marks occur down the page repeatedly in all
Colors
To be replaced
Cartridges
BCD E
Frequently asked questions FAQ about color printing
Solving color quality problems
What is RGB color?
How does the printer know what color to print?
Is it possible to increase the gloss in the printed output?
What is Manual Color Correction?
RGB
What are Detailed Color Samples and how do I access them?
101
Electronic emission notices
With a network cable installed
Industry Canada compliance statement
Avis de conformité aux normes de l’industrie du Canada
Korean MIC statement
Without a network cable installed
104
German GS mark notice
Noise emission levels
Hinweis zum GS-Zeichen
Durchschnittlicher Schallpegel dBA in 1 m Umkrei
Mode Description Power consumption
Power Saver
Product energy consumption
Total energy usage
Laser notice
Laser advisory label
Lexmark International, Inc. Lexington, KY
Statement of Limited Warranty
109
Index
PIN
Index
112