Setting up the printer to fax

40

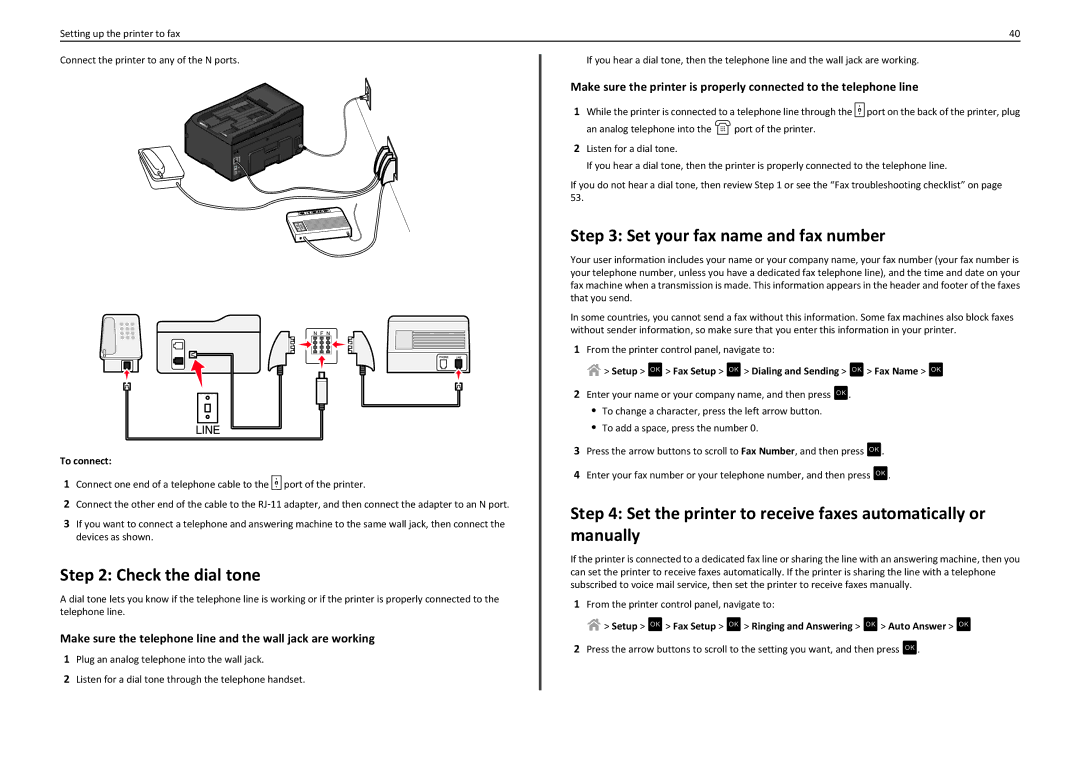
Connect the printer to any of the N ports.

To connect:

1Connect one end of a telephone cable to the port of the printer.

2Connect the other end of the cable to the RJ11 adapter, and then connect the adapter to an N port.

3If you want to connect a telephone and answering machine to the same wall jack, then connect the devices as shown.

Step 2: Check the dial tone

A dial tone lets you know if the telephone line is working or if the printer is properly connected to the telephone line.

Make sure the telephone line and the wall jack are working

1Plug an analog telephone into the wall jack.

2Listen for a dial tone through the telephone handset.

If you hear a dial tone, then the telephone line and the wall jack are working.

Make sure the printer is properly connected to the telephone line

1While the printer is connected to a telephone line through the port on the back of the printer, plug

an analog telephone into the port of the printer.

2Listen for a dial tone.

If you hear a dial tone, then the printer is properly connected to the telephone line.

If you do not hear a dial tone, then review Step 1 or see the “Fax troubleshooting checklist” on page 53.

Step 3: Set your fax name and fax number

Your user information includes your name or your company name, your fax number (your fax number is your telephone number, unless you have a dedicated fax telephone line), and the time and date on your fax machine when a transmission is made. This information appears in the header and footer of the faxes that you send.

In some countries, you cannot send a fax without this information. Some fax machines also block faxes without sender information, so make sure that you enter this information in your printer.

1From the printer control panel, navigate to:

> Setup > OK > Fax Setup > OK > Dialing and Sending > OK > Fax Name > OK

2Enter your name or your company name, and then press OK .

To change a character, press the left arrow button.

To add a space, press the number 0.

3Press the arrow buttons to scroll to Fax Number, and then press OK .

4Enter your fax number or your telephone number, and then press OK .

Step 4: Set the printer to receive faxes automatically or manually

If the printer is connected to a dedicated fax line or sharing the line with an answering machine, then you can set the printer to receive faxes automatically. If the printer is sharing the line with a telephone subscribed to voice mail service, then set the printer to receive faxes manually.

1From the printer control panel, navigate to:

> Setup > OK > Fax Setup > OK > Ringing and Answering > OK > Auto Answer > OK 2 Press the arrow buttons to scroll to the setting you want, and then press OK .

Page 40
Image 40
Lexmark PRO4000C manual Check the dial tone, Set your fax name and fax number

PRO4000, PRO4000C specifications

The Lexmark PRO4000 and PRO4000C are innovative printers designed primarily for small to medium-sized businesses, offering a blend of high-quality printing and advanced technology. These models are well-known for their superior performance, efficiency, and the durability required in today’s fast-paced work environments.

One of the standout features of the Lexmark PRO4000 series is its speed. The printers can deliver up to 40 pages per minute for monochrome documents, ensuring that large print jobs are completed without unnecessary delays. The PRO4000C, being a color version, also performs impressively, providing vibrant color output while maintaining a fast print speed.

Image quality is paramount in any business setting, and both models excel in this area. They utilize Lexmark’s advanced print technology to produce sharp text and vivid graphics. With a resolution of up to 1200 x 1200 dpi, the PRO4000 and PRO4000C ensure that every document, from reports to marketing materials, is rendered with exceptional clarity and detail.

Another significant technology integrated into these printers is Lexmark’s Unison toner system. This system not only promotes consistent print quality but also simplifies the replacement process. The toners are designed to yield a high number of pages, reducing the frequency of changes and, consequently, the overall cost of ownership.

In terms of connectivity, both models provide a versatile range of options. They support USB, Ethernet, and wireless connectivity, enabling seamless integration into any office network. Additionally, mobile printing capabilities are supported, allowing users to print directly from smartphones and tablets, enhancing convenience and flexibility.

Security is another critical consideration for businesses, and Lexmark has incorporated robust features to protect sensitive information. These printers come equipped with secure print management solutions that require user authentication before jobs can be retrieved, ensuring that confidential documents remain private.

Moreover, the Lexmark PRO4000 series is designed with ease of use in mind. An intuitive touchscreen interface simplifies navigation through various settings and functionalities, allowing users to operate the printer effectively without extensive training.

In summary, the Lexmark PRO4000 and PRO4000C are exceptional printers that combine speed, quality, and advanced technologies to cater to the diverse needs of modern businesses. Their impressive features make them valuable assets for any office setting, promoting productivity and enhancing overall workflow efficiency.