TROUBLESHOOTING | ||
|
|
|
| Observe all Safety Guidelines detailed throughout this manual |
|
|
|
|
PROBLEMS
(SYMPTOMS)
POSSIBLE AREAS OF MISADJUSTMENTS(S)
RECOMMENDED
COURSE OF ACTION
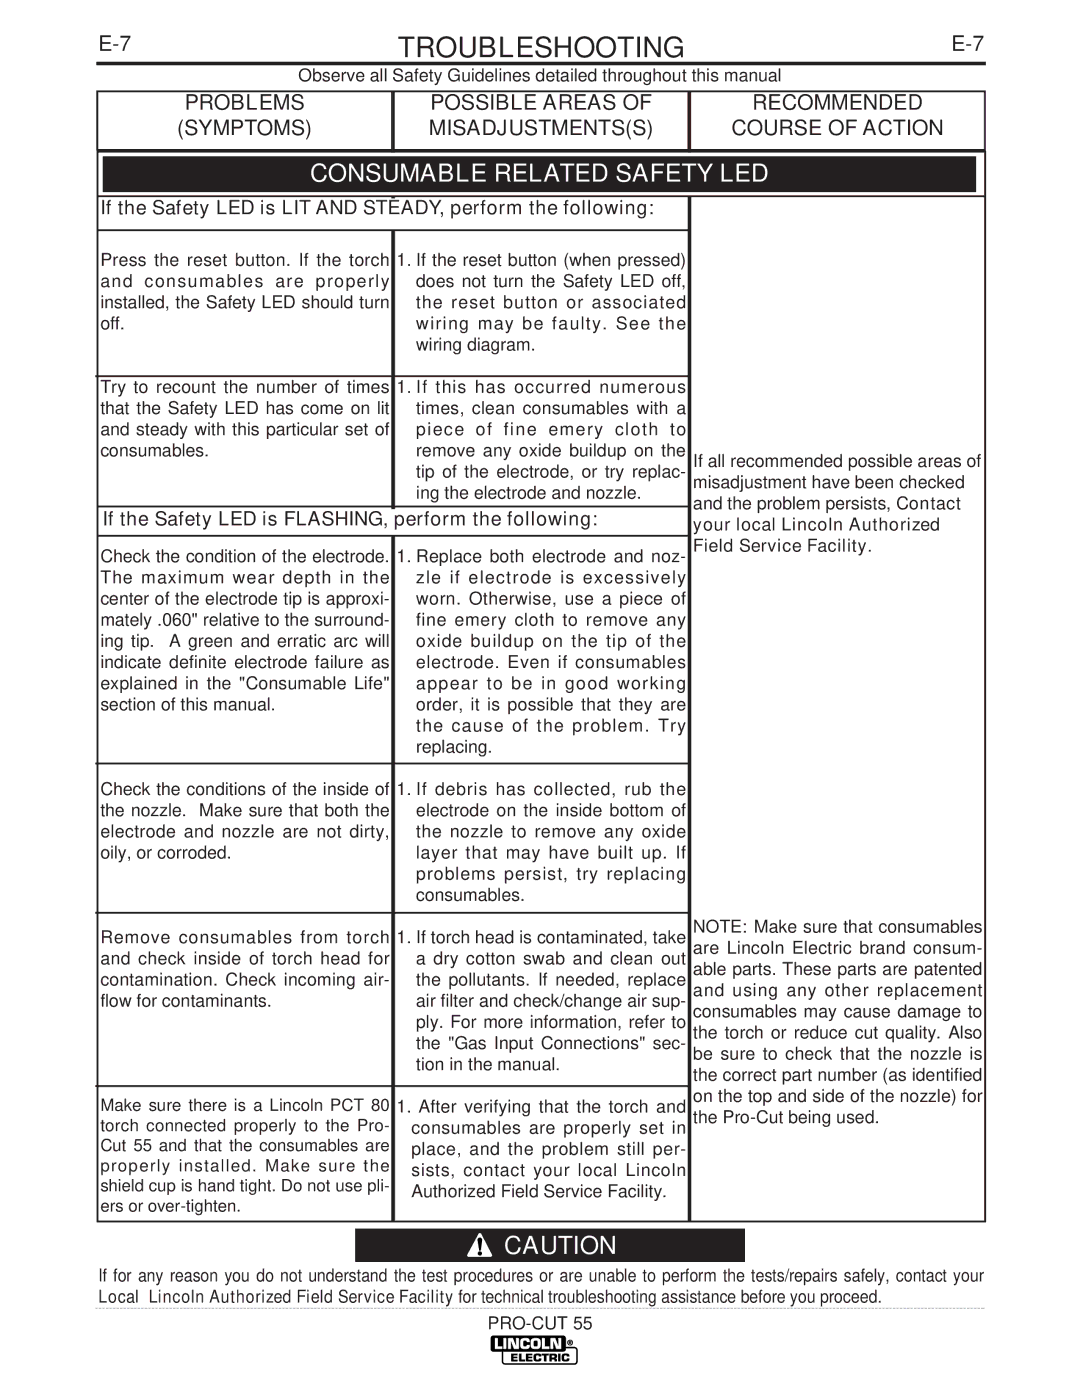
CONSUMABLE RELATED SAFETY LED
If the Safety LED is LIT AND STEADY, perform the following:
Press the reset button. If the torch | 1. | If the reset button (when pressed) |
| |
and consumables are properly |
| does not turn the Safety LED off, |
| |
installed, the Safety LED should turn |
| the reset button or associated |
| |
off. |
| wiring may be faulty. See the |
| |
|
| wiring diagram. |
| |
|
|
|
| |
Try to recount the number of times | 1. | If this has occurred numerous |
| |
that the Safety LED has come on lit |
| times, clean consumables with a |
| |
and steady with this particular set of |
| piece of fine emery cloth to |
| |
consumables. |
| remove any oxide buildup on the | If all recommended possible areas of | |
|
| tip of the electrode, or try replac- | misadjustment have been checked | |
|
| ing the electrode and nozzle. | and the problem persists, Contact | |
If the Safety LED is FLASHING, perform the following: | ||||
your local Lincoln Authorized | ||||
Check the condition of the electrode. | 1. | Replace both electrode and noz- | Field Service Facility. | |
The maximum wear depth in the |
| zle if electrode is excessively |
| |
center of the electrode tip is approxi- |
| worn. Otherwise, use a piece of |
| |
mately .060" relative to the surround- |
| fine emery cloth to remove any |
| |
ing tip. A green and erratic arc will |
| oxide buildup on the tip of the |
| |
indicate definite electrode failure as |
| electrode. Even if consumables |
| |
explained in the "Consumable Life" |
| appear to be in good working |
| |
section of this manual. |
| order, it is possible that they are |
| |
|
| the cause of the problem. Try |
| |
|
| replacing. |
| |
|
|
|
| |
Check the conditions of the inside of | 1. | If debris has collected, rub the |
| |
the nozzle. Make sure that both the |
| electrode on the inside bottom of |
| |
electrode and nozzle are not dirty, |
| the nozzle to remove any oxide |
| |
oily, or corroded. |
| layer that may have built up. If |
| |
|
| problems persist, try replacing |
| |
|
| consumables. |
| |
|
|
| NOTE: Make sure that consumables | |
Remove consumables from torch | 1. | If torch head is contaminated, take | ||
are Lincoln Electric brand consum- | ||||
and check inside of torch head for |
| a dry cotton swab and clean out | able parts. These parts are patented | |
contamination. Check incoming air- |
| the pollutants. If needed, replace | and using any other replacement | |
flow for contaminants. |
| air filter and check/change air sup- | consumables may cause damage to | |
|
| ply. For more information, refer to | the torch or reduce cut quality. Also | |
|
| the "Gas Input Connections" sec- | be sure to check that the nozzle is | |
|
| tion in the manual. | the correct part number (as identified | |
|
|
| ||
Make sure there is a Lincoln PCT 80 | 1. After verifying that the torch and | on the top and side of the nozzle) for | ||
torch connected properly to the Pro- |
| consumables are properly set in | the | |
Cut 55 and that the consumables are |
| place, and the problem still per- |
| |
properly installed. Make sure the |
| sists, contact your local Lincoln |
| |
shield cup is hand tight. Do not use pli- |
| Authorized Field Service Facility. |
| |
ers or |
|
|
| |
![]() CAUTION
CAUTION
If for any reason you do not understand the test procedures or are unable to perform the tests/repairs safely, contact your Local Lincoln Authorized Field Service Facility for technical troubleshooting assistance before you proceed.
