5
6
11
MIC 1
LINE
(BAL/UNBAL)
INSERT
MIC 2
LINE
(BAL/UNBAL)
INSERT
MIC 3
LINE
(BAL/UNBAL)
INSERT
MIC 4
LINE
(BAL/UNBAL)
INSERT
MIC 5
LINE
(BAL/UNBAL)
INSERT
MIC 6
LINE
(BAL/UNBAL)
INSERT
7 | MIC 7 |
LINE |
(BAL/UNBAL)
INSERT
MIC 8
7
(BAL/UNBAL)
INSERT
10 |
| 11 | 13 | 14 |
| |
|
|
| L |
| 15 |
|
1 |
| 1 |
|
| L | |
2 |
| 2 | R |
|
| R |
| IN | OUT |
| |||
MON SEND | FX SEND | TAPE |
| MAIN INSERT | ||
L |
| L |
| L |
| L |
8 (MONO) 8 | (MONO) 12 | (MONO) 12 | (MONO) | |||
R |
| R |
| R |
| R |
INPUT 9/10 | INPUT 11/12 | FX RTN 1 | FX RTN 2 | |||
L
16 ![]() 16 L
16 L
R
R
![]() 17
17![]()
M
MAIN OUT | M |
|
21
LAMP
12V 0.5A
FX
FOOTSWITCH
TIP:FX1
RING:FX2
PHONES
OO | MAX |
LEVEL
20
18
19
Owner’s Manual
Connection Section
This is where you plug in things such as: microphones,
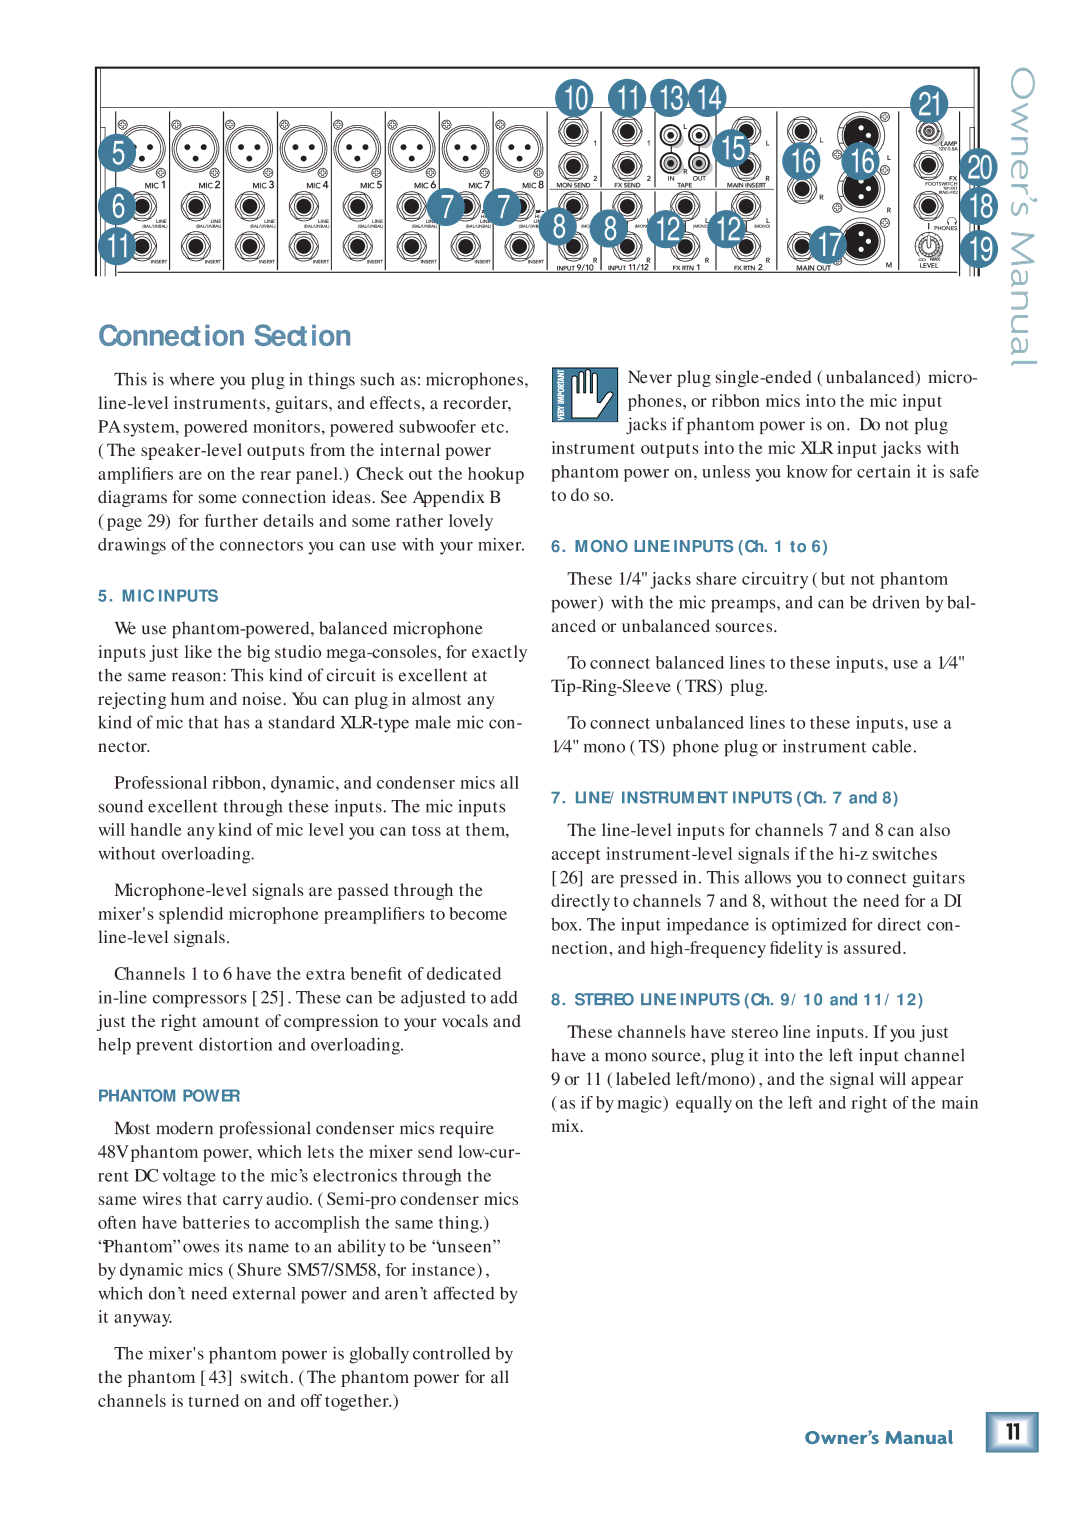
5. MIC INPUTS
We use
Professional ribbon, dynamic, and condenser mics all sound excellent through these inputs. The mic inputs will handle any kind of mic level you can toss at them, without overloading.
Channels 1 to 6 have the extra benefit of dedicated
PHANTOM POWER
Most modern professional condenser mics require 48V phantom power, which lets the mixer send
The mixer's phantom power is globally controlled by the phantom [43] switch. (The phantom power for all channels is turned on and off together.)
Never plug
phones, or ribbon mics into the mic input jacks if phantom power is on. Do not plug
instrument outputs into the mic XLR input jacks with phantom power on, unless you know for certain it is safe to do so.
6. MONO LINE INPUTS (Ch. 1 to 6)
These 1/4" jacks share circuitry (but not phantom power) with the mic preamps, and can be driven by bal- anced or unbalanced sources.
To connect balanced lines to these inputs, use a 1⁄4"
To connect unbalanced lines to these inputs, use a 1⁄4" mono (TS) phone plug or instrument cable.
7. LINE/INSTRUMENT INPUTS (Ch. 7 and 8)
The
[26]are pressed in. This allows you to connect guitars directly to channels 7 and 8, without the need for a DI box. The input impedance is optimized for direct con- nection, and
8. STEREO LINE INPUTS (Ch. 9/10 and 11/12)
These channels have stereo line inputs. If you just have a mono source, plug it into the left input channel 9 or 11 (labeled left/mono), and the signal will appear (as if by magic) equally on the left and right of the main mix.
Owner’s Manual
![]()
![]()
![]()
![]()
![]()
![]()
![]()
![]()
![]()
![]()
![]()
![]()
![]()
![]()
![]()
![]()
![]()
![]()
![]()
![]()
![]()
![]()
![]()
![]()
![]()
![]() 11
11 ![]()
![]()
![]()
![]()
![]()
![]()
![]()
![]()
![]()
![]()
![]()
![]()
![]()
![]()
![]()
![]()
![]()
![]()
![]()
![]()
![]()
![]()
![]()
![]()
![]()
![]()
