OTHER FUNCTION

DISPLAY MODE

ER SR5002

LEARN SEND

SOURCE

SET

OFF

ON

l/


SLEEP

DISPLAY

P.DIRECT

SURROUND


LIP SYNC/

AUTO


dts

INPUT

1

2

3


CS

EX/ES

VIRTUAL

T.MODE

4

5

6


M-CH ST

STEREO

NIGHT

P.SCAN

7

8

9


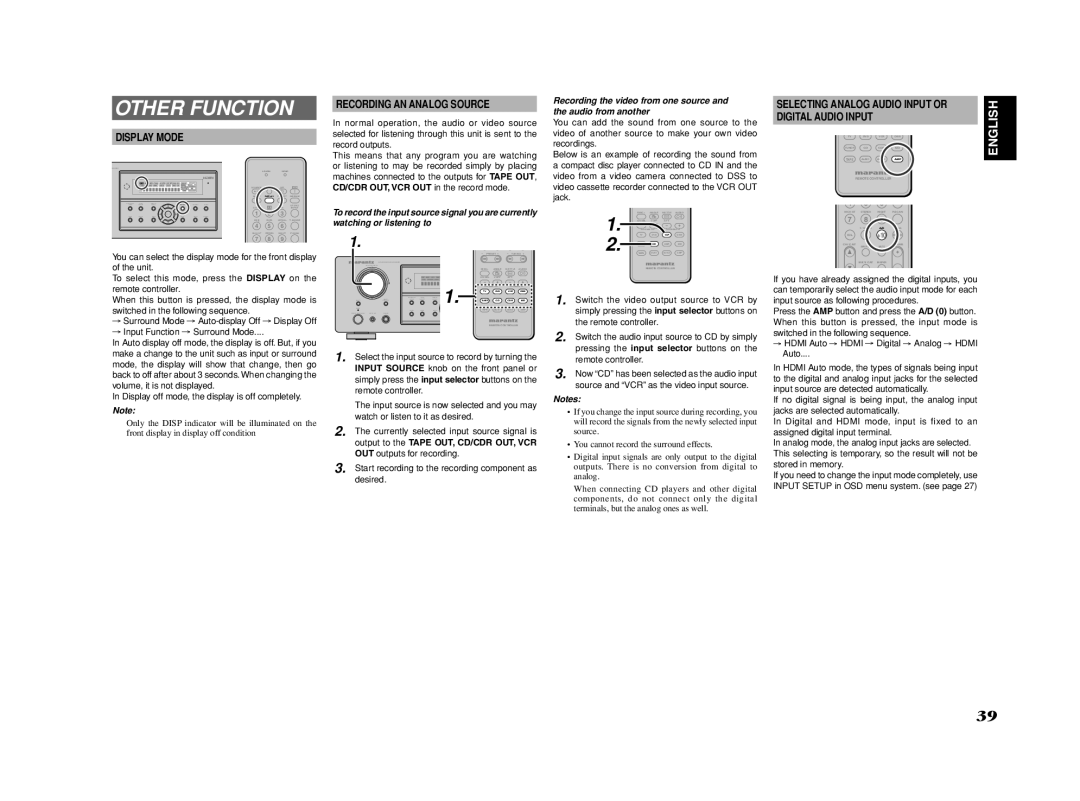
You can select the display mode for the front display of the unit.

To select this mode, press the DISPLAY on the remote controller.

When this button is pressed, the display mode is switched in the following sequence.

Surround Mode Auto-display Off Display Off

Input Function Surround Mode....

In Auto display off mode, the display is off. But, if you make a change to the unit such as input or surround mode, the display will show that change, then go back to off after about 3 seconds. When changing the volume, it is not displayed.

In Display off mode, the display is off completely.

Note:

Only the DISP indicator will be illuminated on the front display in display off condition

RECORDING AN ANALOG SOURCE

In normal operation, the audio or video source selected for listening through this unit is sent to the record outputs.

This means that any program you are watching or listening to may be recorded simply by placing machines connected to the outputs for TAPE OUT, CD/CDR OUT, VCR OUT in the record mode.

To record the input source signal you are currently watching or listening to

1.


- PRESET +

- TUNING +

AV SURROUND RECEIVER SR5002


DISC+

ANGLE

SUB TITLE

AUDIO


CH-SEL V-OFF

ATT.


1.


BASS

TREBLE

TV

DVD

VCR

DSS


TUNER

CD

CDR

MD


TAPE

AUX1

AUX2

AMP

REMOTE CONTROLLER

1. Select the input source to record by turning the INPUT SOURCE knob on the front panel or simply press the input selector buttons on the remote controller.

The input source is now selected and you may watch or listen to it as desired.

2. The currently selected input source signal is output to the TAPE OUT, CD/CDR OUT, VCR OUT outputs for recording.

3. Start recording to the recording component as desired.

Recording the video from one source and the audio from another

You can add the sound from one source to the video of another source to make your own video recordings.

Below is an example of recording the sound from a compact disc player connected to CD IN and the video from a video camera connected to DSS to video cassette recorder connected to the VCR OUT jack.

1.

DISC+

ANGLE

SUB TITLE

AUDIO

CH-SEL V-OFF

ATT.


BASS

TREBLE

TV

DVD

VCR

DSS

2.

TUNER

CD

CDR

MD

TAPE

AUX1

AUX2

AMP

REMOTE CONTROLLER

1. Switch the video output source to VCR by simply pressing the input selector buttons on the remote controller.

2. Switch the audio input source to CD by simply pressing the input selector buttons on the remote controller.

3. Now “CD” has been selected as the audio input source and “VCR” as the video input source.

Notes:

If you change the input source during recording, you will record the signals from the newly selected input source.

You cannot record the surround effects.

Digital input signals are only output to the digital outputs. There is no conversion from digital to analog.

When connecting CD players and other digital components, do not connect only the digital terminals, but the analog ones as well.

SELECTING ANALOG AUDIO INPUT OR

DIGITAL AUDIO INPUT

TV DVD VCR DSS

TUNER CD CDR MD

TAPE AUX1 AUX2 AMP

REMOTE CONTROLLER

4

5

6


M-CH ST

STEREO

NIGHT

P.SCAN

7

8

9


7.1CH IN

A/D

HT-EQ

CL

0

+10

MEMO

CH/ CAT

SPKR A/B

MUTE

VOLUME


MULTI/ CAT

M-SPKR


If you have already assigned the digital inputs, you can temporarily select the audio input mode for each input source as following procedures.

Press the AMP button and press the A/D (0) button. When this button is pressed, the input mode is switched in the following sequence.

HDMI Auto HDMI Digital Analog HDMI Auto....

In HDMI Auto mode, the types of signals being input to the digital and analog input jacks for the selected input source are detected automatically.

If no digital signal is being input, the analog input jacks are selected automatically.

In Digital and HDMI mode, input is fixed to an assigned digital input terminal.

In analog mode, the analog input jacks are selected. This selecting is temporary, so the result will not be stored in memory.

If you need to change the input mode completely, use INPUT SETUP in OSD menu system. (see page 27)

ENGLISH

39

Page 42
Image 42
Marantz SR4002/SR5002 manual Other Function, Display Mode, Recording AN Analog Source

SR4002/SR5002 specifications

The Marantz SR4002 and SR5002 are two remarkable home theater receivers that deliver exceptional audio performance, making them stand out in the crowded market of AV receivers. Both models are designed for audiophiles and home theater enthusiasts who demand superior sound quality, versatility, and advanced features.

The SR4002, known for its robust build and high-quality components, provides 100 watts of power per channel, ensuring dynamic sound reproduction for a variety of media. This model supports a wide range of audio formats, including Dolby Digital, DTS, and PCM, enabling an immersive surround sound experience. It features multiple inputs and outputs, including HDMI, allowing seamless connectivity to a multitude of devices such as Blu-ray players, gaming consoles, and streaming devices. The SR4002 also includes a built-in AM/FM tuner, giving users the flexibility to enjoy their favorite radio stations.

On the other hand, the SR5002 takes it a step further with its enhanced specifications and features. With 110 watts of power per channel, it caters to larger home theaters without sacrificing sound quality. One of the standout features of the SR5002 is its advanced audio processing technology, which ensures precise sound staging and clarity in complex audio environments. The addition of Audyssey MultEQ room calibration technology helps automatically adjust the receiver's settings based on the acoustic characteristics of the room, optimizing audio performance for an unparalleled experience.

Both models boast a sleek design that fits seamlessly into any home entertainment setup. They feature an intuitive on-screen display that simplifies navigation through menus and settings. The user-friendly remote control provides easy access to all functionalities, making it simple to switch between inputs or adjust audio settings.

In terms of connectivity, both the SR4002 and SR5002 are equipped with multiple HDMI inputs, including support for 1080p video, ensuring compatibility with the latest high-definition content. They also feature legacy connections, such as composite and component video inputs, making them suitable for older equipment.

Overall, the Marantz SR4002 and SR5002 are solid choices for anyone looking to elevate their home entertainment experience. With their combination of robust power, advanced processing technologies, and versatile connectivity options, these receivers deliver rich, immersive sound that brings movies, music, and games to life. Whether you choose the SR4002 for its excellent features or the SR5002 for its enhanced capabilities, both models promise to transform your audio experience.