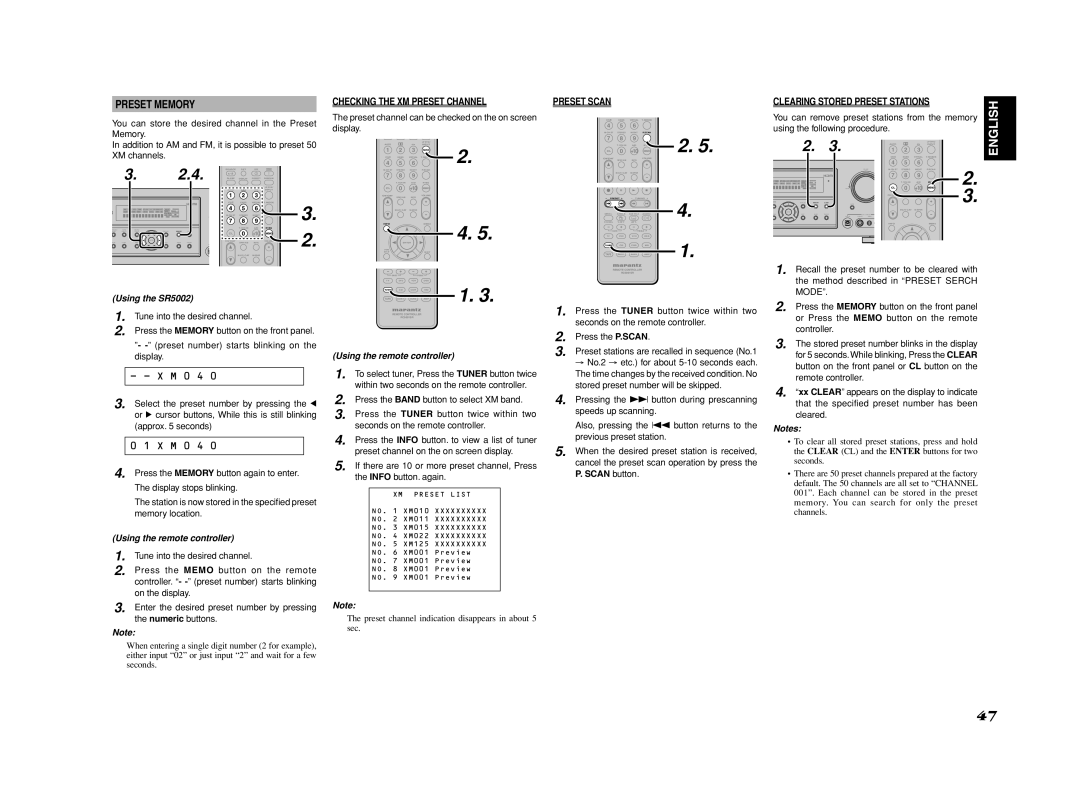
PRESET MEMORY

You can store the desired channel in the Preset Memory.

In addition to AM and FM, it is possible to preset 50 XM channels.

3.

2.4.

SOURCE

SET

OFF

ON


l/


SLEEP

DISPLAY

P.DIRECT

SURROUND


LIP SYNC/


AUTO


dts

INPUT


1

2

3


CS

EX/ES

VIRTUAL

T.MODE

3.


4

5

6


7

8

9

P.SCAN


M-CH ST

STEREO

NIGHT


7.1CH IN

A/D

HT-EQ

2.


CL

0

+10

MEMO


CH/ CAT

SPKR A/B

MUTE

VOLUME


MULTI/ CAT

M-SPKR


(Using the SR5002)

1. Tune into the desired channel.

2. Press the MEMORY button on the front panel.

- - (preset number) starts blinking on the dispIay.

-- X M 0 4 0

3.Select the preset number by pressing the 1 or 2 cursor buttons, While this is still blinking (approx. 5 seconds)

0 1 X M 0 4 0

4. Press the MEMORY button again to enter. The display stops blinking.

The station is now stored in the specified preset memory location.

(Using the remote controller)

1. Tune into the desired channel.

2. Press the MEMO button on the remote controller. “- - (preset number) starts blinking on the display.

3. Enter the desired preset number by pressing the numeric buttons.

Note:

When entering a single digit number (2 for example), either input “02” or just input “2” and wait for a few seconds.

CHECKING THE XM PRESET CHANNEL

The preset channel can be checked on the on screen display.


LIP SYNC/

AUTO

dts

INPUT

1

2

3

BAND

2.

4

5

6

T.MODE

CS

EX/ES

VIRTUAL


M-CH ST

STEREO

NIGHT

P.SCAN


7

8

9


7.1CH IN

A/D

HT-EQ


CL

0

+10

MEMO


CH/ CAT

SPKR A/B

MUTE

VOLUME


MULTI/ CAT

M-SPKR


INFO


MENU

4. 5.


ENTER


T.TONE


/SET UP


EXIT


BASS

TREBLE


TV

DVD

VCR

DSS

1. 3.

TUNER

CD

CDR

MD

TAPE

AUX1

AUX2

AMP


REMOTE CONTROLLER

RC5001SR

(Using the remote controller)

1. To select tuner, Press the TUNER button twice within two seconds on the remote controller.

2. Press the BAND button to select XM band.

3. Press the TUNER button twice within two seconds on the remote controller.

4. Press the INFO button. to view a list of tuner preset channeI on the on screen display.

5. If there are 10 or more preset channel, Press the INFO button. again.

XM PRESET LIST

NO. 1 XM010 XXXXXXXXXX

NO. 2

XM011 XXXXXXXXXX

NO. 3

XM015 XXXXXXXXXX

NO.

4

XM022

XXXXXXXXXX

NO.

5

XM125

XXXXXXXXXX

NO. 6 XM001 Preview


NO. 7

XM001 Preview


NO.

8

XM001

Preview


NO.

9

XM001

Preview


MAIN

RETURN

EXIT

Note:

The preset channel indication disappears in about 5 sec.

PRESET SCAN

CS

EX/ES

VIRTUAL

T.MODE


4

5

6


M-CH ST

STEREO

NIGHT

P.SCAN


7

8

9


2. 5.


7.1CH IN

A/D

HT-EQ

CL

0

+10

MEMO

CH/ CAT

SPKR A/B

MUTE

VOLUME


MULTI/ CAT

M-SPKR


- PRESET +

- TUNING +

4.

DISC+

ANGLE

SUB TITLE

AUDIO

CH-SEL V-OFF

ATT.


BASS

TREBLE


TV

DVD

VCR

DSS

1.

TUNER

CD

CDR

MD

TAPE

AUX1

AUX2

AMP


REMOTE CONTROLLER

RC5001SR

1. Press the TUNER button twice within two seconds on the remote controller.

2. Press the P.SCAN.

3. Preset stations are recalled in sequence (No.1

No.2 etc.) for about 5-10 seconds each. The time changes by the received condition. No stored preset number will be skipped.

4.Pressing the T button during prescanning speeds up scanning.

Also, pressing the S button returns to the previous preset station.

5.When the desired preset station is received, cancel the preset scan operation by press the P. SCAN button.

CLEARING STORED PRESET STATIONS


ENGLISH

You can remove preset stations from the memory


using the following procedure.


2.

3.

1

2

3

LIP SYNC/


AUTO


dts

INPUT


CS

EX/ES

VIRTUAL

T.MODE


4

5

6


M-CH ST

STEREO

NIGHT

P.SCAN

2.


7

8

9


7.1CH IN

A/D

HT-EQ


CL

0

+10

MEMO


CH/ CAT

SPKR A/B

MUTE

VOLUME

3.


MULTI/ CAT

M-SPKR


INFO


MENU


1. Recall the preset number to be cleared with the method described in “PRESET SERCH MODE”.

2. Press the MEMORY button on the front panel or Press the MEMO button on the remote controller.

3. The stored preset number blinks in the display for 5 seconds.WhiIe blinking, Press the CLEAR button on the front panel or CL button on the remote controller.

4. xx CLEAR” appears on the dispIay to indicate that the specified preset number has been cleared.

Notes:

To clear all stored preset stations, press and hold the CLEAR (CL) and the ENTER buttons for two seconds.

There are 50 preset channels prepared at the factory default. The 50 channels are all set to “CHANNEL 001”. Each channel can be stored in the preset memory. You can search for only the preset channels.

47

Page 50
Image 50
Marantz SR4002/SR5002 manual Checking the XM Preset Channel, Preset channel can be checked on the on screen display

SR4002/SR5002 specifications

The Marantz SR4002 and SR5002 are two remarkable home theater receivers that deliver exceptional audio performance, making them stand out in the crowded market of AV receivers. Both models are designed for audiophiles and home theater enthusiasts who demand superior sound quality, versatility, and advanced features.

The SR4002, known for its robust build and high-quality components, provides 100 watts of power per channel, ensuring dynamic sound reproduction for a variety of media. This model supports a wide range of audio formats, including Dolby Digital, DTS, and PCM, enabling an immersive surround sound experience. It features multiple inputs and outputs, including HDMI, allowing seamless connectivity to a multitude of devices such as Blu-ray players, gaming consoles, and streaming devices. The SR4002 also includes a built-in AM/FM tuner, giving users the flexibility to enjoy their favorite radio stations.

On the other hand, the SR5002 takes it a step further with its enhanced specifications and features. With 110 watts of power per channel, it caters to larger home theaters without sacrificing sound quality. One of the standout features of the SR5002 is its advanced audio processing technology, which ensures precise sound staging and clarity in complex audio environments. The addition of Audyssey MultEQ room calibration technology helps automatically adjust the receiver's settings based on the acoustic characteristics of the room, optimizing audio performance for an unparalleled experience.

Both models boast a sleek design that fits seamlessly into any home entertainment setup. They feature an intuitive on-screen display that simplifies navigation through menus and settings. The user-friendly remote control provides easy access to all functionalities, making it simple to switch between inputs or adjust audio settings.

In terms of connectivity, both the SR4002 and SR5002 are equipped with multiple HDMI inputs, including support for 1080p video, ensuring compatibility with the latest high-definition content. They also feature legacy connections, such as composite and component video inputs, making them suitable for older equipment.

Overall, the Marantz SR4002 and SR5002 are solid choices for anyone looking to elevate their home entertainment experience. With their combination of robust power, advanced processing technologies, and versatile connectivity options, these receivers deliver rich, immersive sound that brings movies, music, and games to life. Whether you choose the SR4002 for its excellent features or the SR5002 for its enhanced capabilities, both models promise to transform your audio experience.