Owners Airstream Manual
Introduction MODEL
Table of Contents
Care and Maintenance
Warranty Coverage
Basic Warranty Period
Items Covered
If Repairs are Needed
Installations not Covered
AIRSTREAM, INC
Dealer Representation Excluded
Warranty Transfer
Explanation of Airstream Limited Warranty
Consequential and Incidental Damages
Exposure
Abuse
Overload
Service
Reporting Safety Defects
Every 1,000 Miles or 60 Days
Maintenance Schedule Every 5,000 Miles or 90 Days
That MAY be Hazardous
Torque aluminm wheels to110-120 ft. lbs
Every 10, 000 Miles or 6 Months Every Year
BULBS, Interior
Suggested Maintenance Parts and Lubricants
BULBS, Exterior
Miscellaneous
Maintenance Record Date Dealer Service Performed
Warranty and Service
Towing Your Airstream
TOW Vehicle Equipment
Electric Brakes
Loading
Weighing Your Trailer
Equalizing Hitch Load Distribution
Hitching UP
Sway Control Device
Steps for Hitching Up
Level tow vehicle and trailer after hitching up
Towing Tips
Use trailer brakes as parking brakes Tracking
Passing
Backing Up
Interior
Suggested PRE-TRAVEL Check List
Exterior
Trailer Equipment and Accessories Motoring Essentials
Towing Your Airstream
Safety
Camping
Overnight Stop
Plies the 12 volt current
Extended Stay
Waste Water System
Shoreline Power Supply
City Water HOOK-UP
Things not to PUT Into Toilet or Drains
Winter Traveling
Effects of Prolonged Occupancy
Tips to Controlling Condensation
Effects of Prolonged Occupancy
Excess moisture
What factors contribute to mold growth?
What are molds ?
How can mold growth be inhibited?
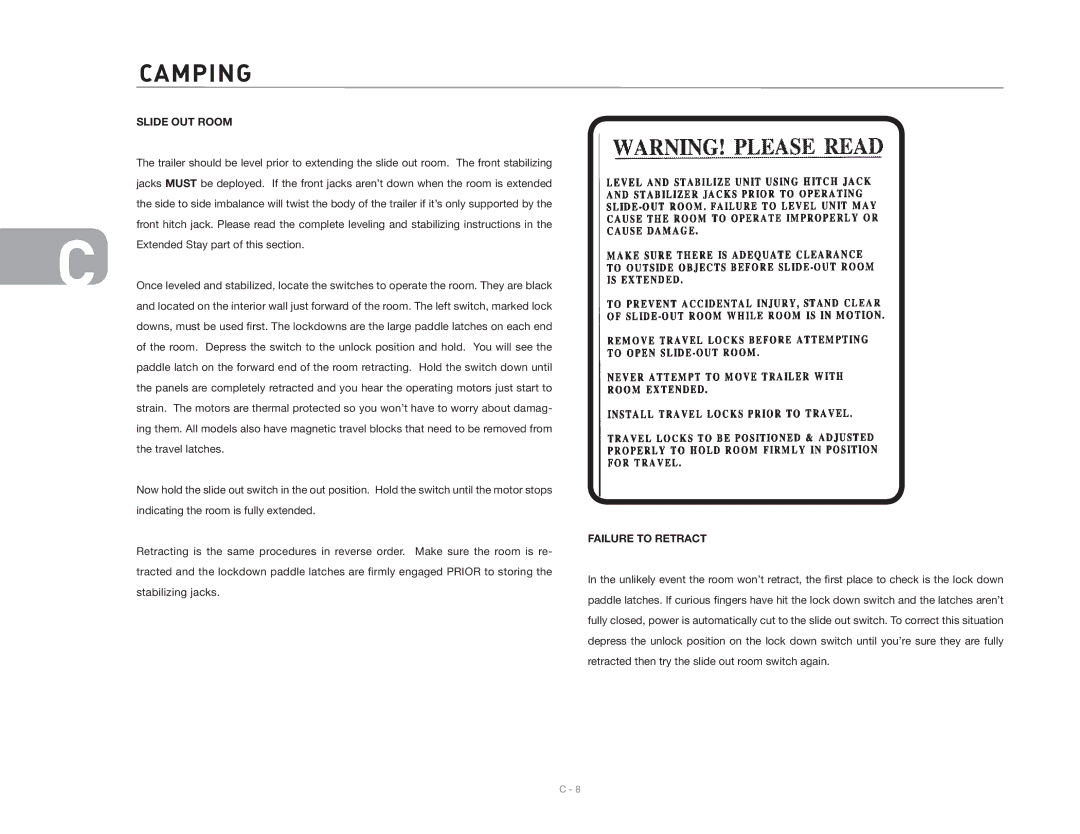
Slide OUT Room
Failure to Retract
Camping
Camping
Cleaning
Exterior
Screen Door
Main Door
Possible damage
Step
Chassis
Operation Instructions
Tires
Tips on Tire Care
Spare Tire
Tire Rotation
Tire Inflation PSI Cold
Axle and Running Gear Assembly
Install washer and spindle nut
HOW to USE Your Electric Brakes Properly
Typical Electronic Controller
Replacing Power Head
Power Jack Option
Maintenance
Under Inflation
Load/Inflation Information for Your Tires
Proper Tire Inflation
HOW Overloading Affects Your Tires
Weighing Your Travel Trailer Or Towed Vehicle
Tire Care
Proper Inspection and Storage of Tires
Replacing Your Tires
Interior
Bunk BED
Monitor Panel
Water Pump Switch
Dinette Table
Aquajet water pump Optionial Equipment
Linoleum
Bath Area Remote Switches
Smoke Alarm Firex Model B
Ceiling Light/Directional Lighting
Weekly Testing of Your Smoke Alarm
Taking Care of Your Smoke Alarm
Replacing the Battery
To Remove
Using the Tamper Resist Locking Mechanism
Special Smoke Alarm Features
LP GAS Detector
LOW Voltage
Detector Test
Fire Extinguisher
Carbon Monoxide Alarm
Normal Operation
Cleaning Your Detector
Fill Valve
Operation only
To Install
LPG Bottles
Basic Rules for Safety
Vent if the trailer has not been used regularly
Plumbing
Sanitizing
Water SYSTEM-SELF Contained
Water Pump and Filter
While hooked to city water Aquajet Pump Optional
Drain Valves Safari
Water Heater Draining
To Empty Fresh Water Tank
Winterizing and Storage
Plumbing
Water Heater Bypass
Plumbing
Deodorizers
Drain and Waste System
Emptying Tanks
When Parked and Connected to Sewer Outlet
Black Tank Flush Optional
Toilet
Water Filtration Safeguards
Microtech Filter INSTALLATION/REPLACEMENT
Operating Instructions
Electronic Indicator
Battery Replacement
Controlling The Water
Lavatory FAUCET, Standard
Battery Disconnect Switch
Electrical System
Battery
265 71.3 F 250 62 F 200 16 F 100 +5 F 150 +19 F
12V Power Circuits
Volt AC Panel Board
Converter Testing
Converter Operation
Converter Cooling System
Back UP Camera PRE-WIRE
Invertor option
Electrical System
TV Antenna
DO’S
Maintenance Lubrication
Lubricating Rotating Gear Housing
Satellite Antenna Wiring
Solar Panel PRE-WIRE
Yellow like the sun positive and Green like
Coaxial Cable Wiring Schematic
External Radio Jack Optional
Volt Electrical System City Power
Ground Fault Circuit Interrupter Gfci
Other circuit
Occupant
AIR Conditioner
Furnace
Range
Microwave Ovens
Refrigerator
Electronic Ignition
Water Heater
Relieve the pressure without even realizing it
When Equipped with Thermostat
High Volume Roof Vent Optional
When Equipped with Reverse Switch
Cleaning Instructions
Monitor Wire Connections
Monitor Panel
To Obtain Exact Reading
Specifications
Hitch Ball Height
Index
C-1, E-8, F-3, H-4