D. Secure Dishwasher

WARNING

Tip Over Hazard

Do not use dishwasher until completely installed. Do not push down on open door.

Doing so can result in serious injury or cuts.

Fixation du

lave-vaisselle

AVERTISSEMENT

Risque de basculement

Ne pas utiliser le lave-vaisselle jusqu’à ce qu’il soit complètement installé.

Ne pas appuyer sur la porte ouverte.

Le non-respect de ces instructions peut causer des blessures graves ou des coupures.

1.

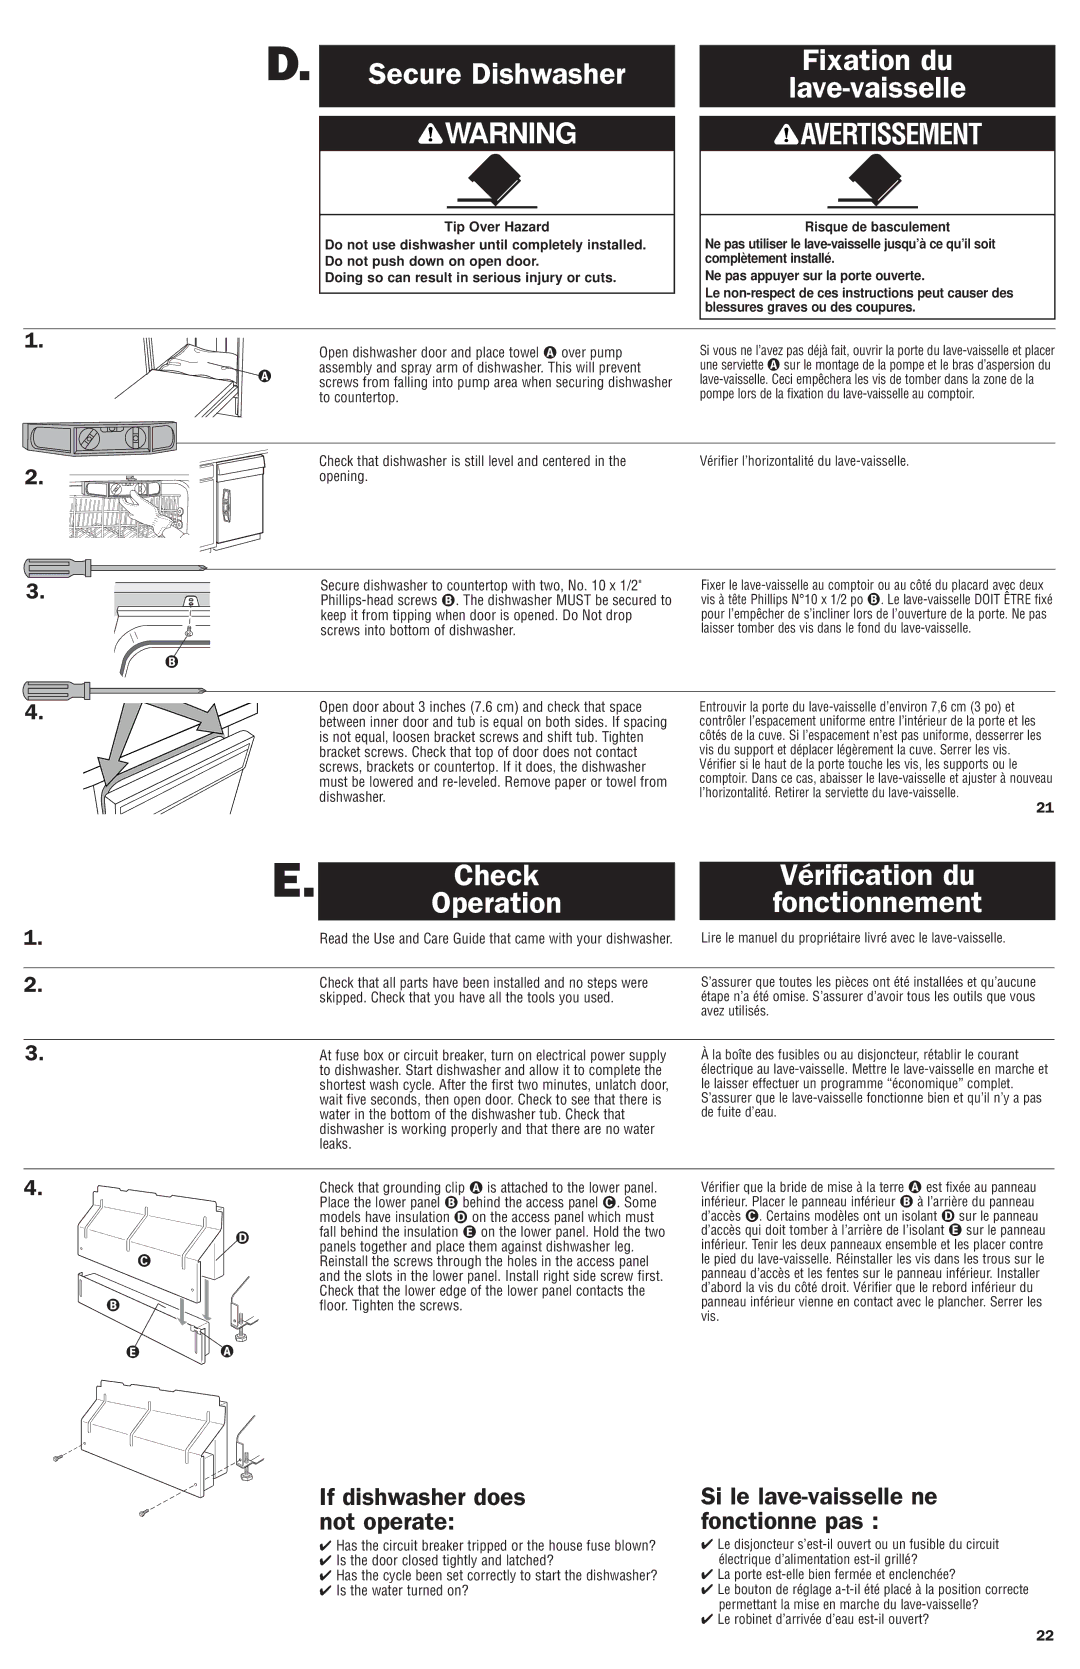
Open dishwasher door and place towel over pump assembly and spray arm of dishwasher. This will prevent screws from falling into pump area when securing dishwasher to countertop.

Si vous ne l’avez pas déjà fait, ouvrir la porte du lave-vaisselle et placer une serviette sur le montage de la pompe et le bras d’aspersion du lave-vaisselle. Ceci empêchera les vis de tomber dans la zone de la pompe lors de la fixation du lave-vaisselle au comptoir.

2.

3.

4.

Check that dishwasher is still level and centered in the

Vérifier l’horizontalité du lave-vaisselle.

opening.


Secure dishwasher to countertop with two, No. 10 x 1/2"

Fixer le lave-vaisselle au comptoir ou au côté du placard avec deux

Phillips-head screws . The dishwasher MUST be secured to

vis à tête Phillips N°10 x 1/2 po . Le lave-vaisselle DOIT ÊTRE fixé

keep it from tipping when door is opened. Do Not drop

pour l’empêcher de s’incliner lors de l’ouverture de la porte. Ne pas

screws into bottom of dishwasher.

laisser tomber des vis dans le fond du lave-vaisselle.

Open door about 3 inches (7.6 cm) and check that space

Entrouvir la porte du lave-vaisselle d’environ 7,6 cm (3 po) et

between inner door and tub is equal on both sides. If spacing

contrôler l’espacement uniforme entre l’intérieur de la porte et les

is not equal, loosen bracket screws and shift tub. Tighten

côtés de la cuve. Si l’espacement n’est pas uniforme, desserrer les

bracket screws. Check that top of door does not contact

vis du support et déplacer légèrement la cuve. Serrer les vis.

screws, brackets or countertop. If it does, the dishwasher

Vérifier si le haut de la porte touche les vis, les supports ou le

must be lowered and re-leveled. Remove paper or towel from

comptoir. Dans ce cas, abaisser le lave-vaisselle et ajuster à nouveau

dishwasher.

l’horizontalité. Retirer la serviette du lave-vaisselle.


21

E.

Check


Vérification du


Operation


fonctionnement

1.

2.

3.

4.

Read the Use and Care Guide that came with your dishwasher.

Lire le manuel du propriétaire livré avec le lave-vaisselle.

Check that all parts have been installed and no steps were

S’assurer que toutes les pièces ont été installées et qu’aucune

skipped. Check that you have all the tools you used.

étape n’a été omise. S’assurer d’avoir tous les outils que vous


avez utilisés.


At fuse box or circuit breaker, turn on electrical power supply

À la boîte des fusibles ou au disjoncteur, rétablir le courant

to dishwasher. Start dishwasher and allow it to complete the

électrique au lave-vaisselle. Mettre le lave-vaisselle en marche et

shortest wash cycle. After the first two minutes, unlatch door,

le laisser effectuer un programme “économique” complet.

wait five seconds, then open door. Check to see that there is

S’assurer que le lave-vaisselle fonctionne bien et qu’il n’y a pas

water in the bottom of the dishwasher tub. Check that

de fuite d’eau.


dishwasher is working properly and that there are no water


leaks.


Check that grounding clip

is attached to the lower panel.

Vérifier que la bride de mise à la terre

est fixée au panneau

Place the lower panel

behind the access panel . Some

inférieur. Placer le panneau inférieur

à l’arrière du panneau

models have insulation


on the access panel which must

d’accès . Certains modèles ont un isolant

sur le panneau

fall behind the insulation


on the lower panel. Hold the two

d’accès qui doit tomber à l’arrière de l’isolant

sur le panneau

panels together and place them against dishwasher leg.

inférieur. Tenir les deux panneaux ensemble et les placer contre

Reinstall the screws through the holes in the access panel

le pied du lave-vaisselle. Réinstaller les vis dans les trous sur le

and the slots in the lower panel. Install right side screw first.

panneau d’accès et les fentes sur le panneau inférieur. Installer

Check that the lower edge of the lower panel contacts the

d’abord la vis du côté droit. Vérifier que le rebord inférieur du

floor. Tighten the screws.


panneau inférieur vienne en contact avec le plancher. Serrer les


vis.


If dishwasher does not operate:

Has the circuit breaker tripped or the house fuse blown?

Is the door closed tightly and latched?

Has the cycle been set correctly to start the dishwasher?

Is the water turned on?

Si le lave-vaisselle ne fonctionne pas :

Le disjoncteur s’est-il ouvert ou un fusible du circuit électrique d’alimentation est-il grillé?

La porte est-elle bien fermée et enclenchée?

Le bouton de réglage a-t-il été placé à la position correcte permettant la mise en marche du lave-vaisselle?

Le robinet d’arrivée d’eau est-il ouvert?

22

Page 12
Image 12
Maytag 8269550 Secure Dishwasher, Fixation du Lave-vaisselle, Check Vérification du Operation Fonctionnement

8269550 specifications

The Maytag 8269550 is a highly regarded appliance in the world of home laundry, known for its durability, performance, and array of modern features. Designed to deliver outstanding cleaning results, this washer emphasizes convenience and efficiency, making it a popular choice for households seeking reliability.

One of the standout characteristics of the Maytag 8269550 is its robust construction. This washer boasts a heavy-duty design that is well-suited for tackling large loads without compromising on performance. The solid build not only ensures longevity but also reduces noise and vibration during operation, creating a quieter laundry experience.

The washer incorporates powerful cleaning technologies that set it apart from its competitors. Its high-efficiency motor helps optimize water and energy usage, making it an environmentally friendly option while keeping utility costs at bay. Additionally, the washer features a large capacity drum, allowing users to wash more clothes in a single cycle. This not only saves time but also provides flexibility for handling bulky items like comforters or towels.

In terms of cleaning performance, the Maytag 8269550 employs advanced wash cycles, including specialized settings for delicate fabrics and heavily soiled garments. The innovative PowerWash cycle is particularly noteworthy, as it uses increased agitation and optimized wash motion to remove tough stains effectively. This cycle guarantees that users can achieve the clean they desire, even with challenging loads.

The washer is also equipped with a convenient control panel that features user-friendly settings. Intuitive dials and digital displays allow users to easily select the desired wash cycle, rinse options, and water temperature. This ease of use is enhanced by amenities such as the delay start feature, which permits users to schedule washes at their convenience.

In conclusion, the Maytag 8269550 stands out in the realm of laundry appliances due to its sturdy build, efficient performance, and user-friendly features. With its blend of advanced technologies and thoughtful design, it addresses the needs of modern households, ensuring that laundry day is both effective and manageable. Whether tackling everyday garments or special fabrics, this washer provides the functionality and reliability that consumers expect from a trusted brand like Maytag.