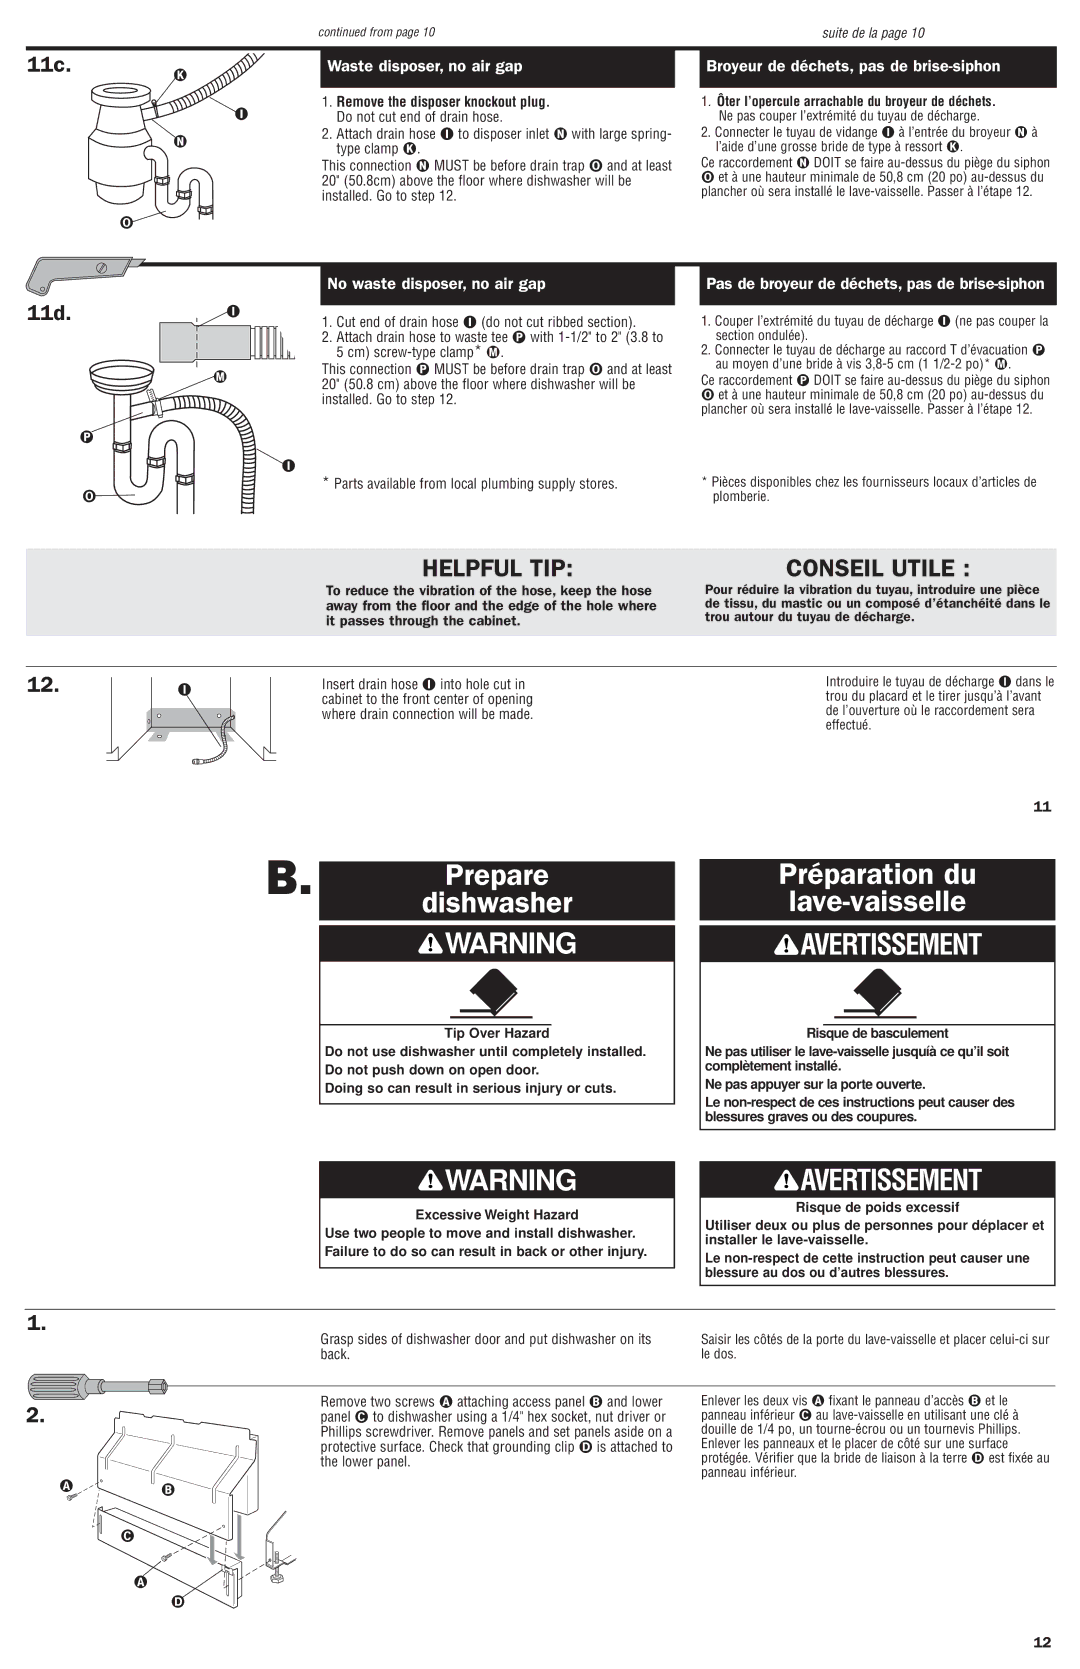
11c.

continued from page 10


suite de la page 10


Waste disposer, no air gap


Broyeur de déchets, pas de brise-siphon


1.

Remove the disposer knockout plug.


1. Ôter l’opercule arrachable du broyeur de déchets.


Do not cut end of drain hose.


Ne pas couper l’extrémité du tuyau de décharge.

2.

Attach drain hose

to disposer inlet

with large spring-

2. Connecter le tuyau de vidange à l’entrée du broyeur à


type clamp .


l’aide d’une grosse bride de type à ressort .


This connection

MUST be before drain trap

and at least

Ce raccordement DOIT se faire au-dessus du piège du siphon


20" (50.8cm) above the floor where dishwasher will be

et à une hauteur minimale de 50,8 cm (20 po) au-dessus du


installed. Go to step 12.


plancher où sera installé le lave-vaisselle. Passer à l’étape 12.

11d.

No waste disposer, no air gap

1.

Cut end of drain hose

(do not cut ribbed section).

2.

Attach drain hose to waste tee

with 1-1/2" to 2" (3.8 to


5 cm) screw-type clamp* .


This connection MUST be before drain trap and at least 20" (50.8 cm) above the floor where dishwasher will be installed. Go to step 12.

*Parts available from local plumbing supply stores.

Pas de broyeur de déchets, pas de brise-siphon

1.

Couper l’extrémité du tuyau de décharge

(ne pas couper la


section ondulée).


2.

Connecter le tuyau de décharge au raccord T d’évacuation


au moyen d’une bride à vis 3,8-5 cm (1 1/2-2 po)* .

Ce raccordement

DOIT se faire au-dessus du piège du siphon


et à une hauteur minimale de 50,8 cm (20 po) au-dessus du

plancher où sera installé le lave-vaisselle. Passer à l’étape 12.

*Pièces disponibles chez les fournisseurs locaux d’articles de plomberie.

12.

HELPFUL TIP:

CONSEIL UTILE :

To reduce the vibration of the hose, keep the hose

Pour réduire la vibration du tuyau, introduire une pièce

away from the floor and the edge of the hole where

de tissu, du mastic ou un composé d’étanchéité dans le

it passes through the cabinet.

trou autour du tuyau de décharge.

Insert drain hose into hole cut in

Introduire le tuyau de décharge dans le

cabinet to the front center of opening

trou du placard et le tirer jusqu’à l’avant

where drain connection will be made.

de l’ouverture où le raccordement sera


effectué.

B. Prepare dishwasher

WARNING

Tip Over Hazard

Do not use dishwasher until completely installed. Do not push down on open door.

Doing so can result in serious injury or cuts.

11

Préparation du

lave-vaisselle

AVERTISSEMENT

Risque de basculement

Ne pas utiliser le lave-vaisselle jusquíà ce qu’il soit complètement installé.

Ne pas appuyer sur la porte ouverte.

Le non-respect de ces instructions peut causer des blessures graves ou des coupures.

1.

2.

WARNING


AVERTISSEMENT

Excessive Weight Hazard


Risque de poids excessif


Utiliser deux ou plus de personnes pour déplacer et

Use two people to move and install dishwasher.


installer le lave-vaisselle.

Failure to do so can result in back or other injury.


Le non-respect de cette instruction peut causer une


blessure au dos ou d’autres blessures.


Grasp sides of dishwasher door and put dishwasher on its

Saisir les côtés de la porte du lave-vaisselle et placer celui-ci sur


back.


le dos.


Remove two screws

attaching access panel

and lower

Enlever les deux vis

fixant le panneau d’accès

et le


panel

to dishwasher using a 1/4" hex socket, nut driver or

panneau inférieur

au lave-vaisselle en utilisant une clé à


Phillips screwdriver. Remove panels and set panels aside on a

douille de 1/4 po, un tourne-écrou ou un tournevis Phillips.


protective surface. Check that grounding clip

is attached to

Enlever les panneaux et le placer de côté sur une surface


the lower panel.


protégée. Vérifier que la bride de liaison à la terre

est fixée au


panneau inférieur.


12

Page 7
Image 7
Maytag 8269550 installation instructions Prepare dishwasher, Préparation du Lave-vaisselle, No waste disposer, no air gap

8269550 specifications

The Maytag 8269550 is a highly regarded appliance in the world of home laundry, known for its durability, performance, and array of modern features. Designed to deliver outstanding cleaning results, this washer emphasizes convenience and efficiency, making it a popular choice for households seeking reliability.

One of the standout characteristics of the Maytag 8269550 is its robust construction. This washer boasts a heavy-duty design that is well-suited for tackling large loads without compromising on performance. The solid build not only ensures longevity but also reduces noise and vibration during operation, creating a quieter laundry experience.

The washer incorporates powerful cleaning technologies that set it apart from its competitors. Its high-efficiency motor helps optimize water and energy usage, making it an environmentally friendly option while keeping utility costs at bay. Additionally, the washer features a large capacity drum, allowing users to wash more clothes in a single cycle. This not only saves time but also provides flexibility for handling bulky items like comforters or towels.

In terms of cleaning performance, the Maytag 8269550 employs advanced wash cycles, including specialized settings for delicate fabrics and heavily soiled garments. The innovative PowerWash cycle is particularly noteworthy, as it uses increased agitation and optimized wash motion to remove tough stains effectively. This cycle guarantees that users can achieve the clean they desire, even with challenging loads.

The washer is also equipped with a convenient control panel that features user-friendly settings. Intuitive dials and digital displays allow users to easily select the desired wash cycle, rinse options, and water temperature. This ease of use is enhanced by amenities such as the delay start feature, which permits users to schedule washes at their convenience.

In conclusion, the Maytag 8269550 stands out in the realm of laundry appliances due to its sturdy build, efficient performance, and user-friendly features. With its blend of advanced technologies and thoughtful design, it addresses the needs of modern households, ensuring that laundry day is both effective and manageable. Whether tackling everyday garments or special fabrics, this washer provides the functionality and reliability that consumers expect from a trusted brand like Maytag.