7.

8.

9.

10.

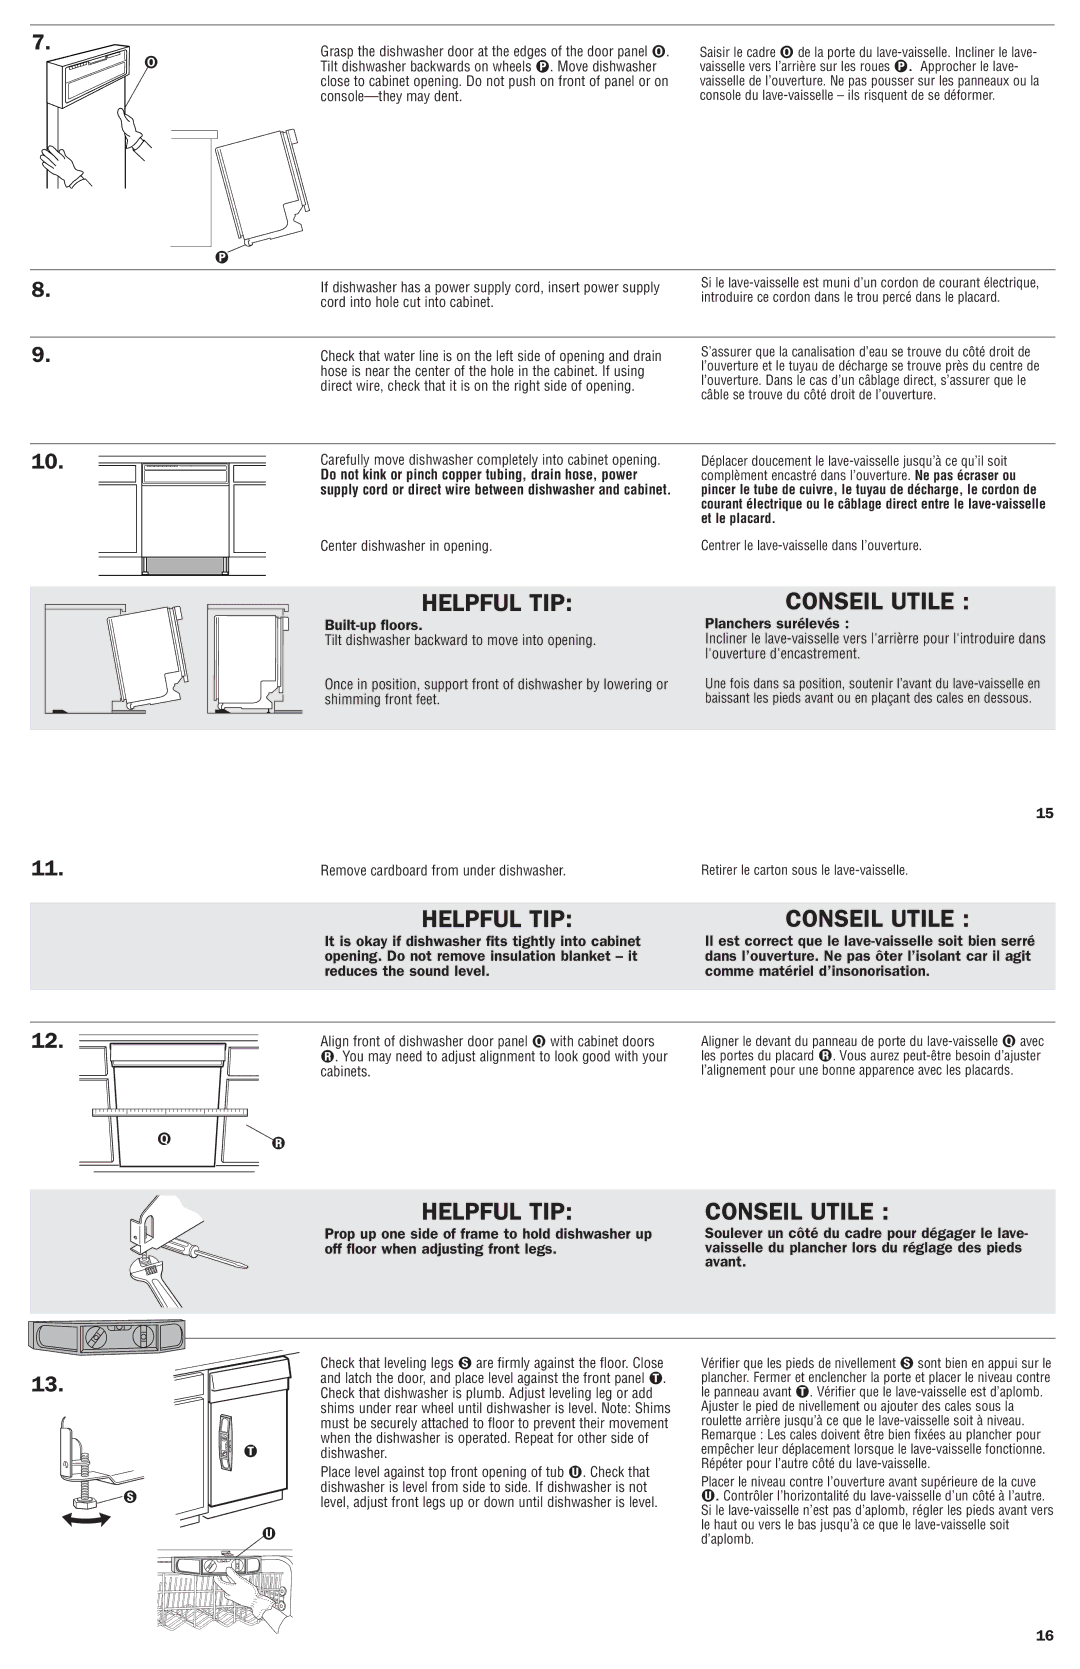
Grasp the dishwasher door at the edges of the door panel .

Saisir le cadre

de la porte du lave-vaisselle. Incliner le lave-

Tilt dishwasher backwards on wheels . Move dishwasher

vaisselle vers l’arrière sur les roues . Approcher le lave-

close to cabinet opening. Do not push on front of panel or on

vaisselle de l’ouverture. Ne pas pousser sur les panneaux ou la

console—they may dent.

console du lave-vaisselle – ils risquent de se déformer.

If dishwasher has a power supply cord, insert power supply

Si le lave-vaisselle est muni d’un cordon de courant électrique,

cord into hole cut into cabinet.

introduire ce cordon dans le trou percé dans le placard.


Check that water line is on the left side of opening and drain

S’assurer que la canalisation d’eau se trouve du côté droit de

hose is near the center of the hole in the cabinet. If using

l’ouverture et le tuyau de décharge se trouve près du centre de

l’ouverture. Dans le cas d’un câblage direct, s’assurer que le

direct wire, check that it is on the right side of opening.

câble se trouve du côté droit de l’ouverture.


Carefully move dishwasher completely into cabinet opening.

Déplacer doucement le lave-vaisselle jusqu’à ce qu’il soit

Do not kink or pinch copper tubing, drain hose, power

complèment encastré dans l’ouverture. Ne pas écraser ou

supply cord or direct wire between dishwasher and cabinet.

pincer le tube de cuivre, le tuyau de décharge, le cordon de


courant électrique ou le câblage direct entre le lave-vaisselle


et le placard.

Center dishwasher in opening.

Centrer le lave-vaisselle dans l’ouverture.

11.

HELPFUL TIP:

Built-up floors.

Tilt dishwasher backward to move into opening.

Once in position, support front of dishwasher by lowering or shimming front feet.

Remove cardboard from under dishwasher.

CONSEIL UTILE :

Planchers surélevés :

Incliner le lave-vaisselle vers l'arrièrre pour l'introduire dans l'ouverture d'encastrement.

Une fois dans sa position, soutenir l’avant du lave-vaisselle en baissant les pieds avant ou en plaçant des cales en dessous.

15

Retirer le carton sous le lave-vaisselle.

12.

HELPFUL TIP:

CONSEIL UTILE :

It is okay if dishwasher fits tightly into cabinet

Il est correct que le lave-vaisselle soit bien serré

opening. Do not remove insulation blanket – it

dans l’ouverture. Ne pas ôter l’isolant car il agit

reduces the sound level.

comme matériel d’insonorisation.

Align front of dishwasher door panel

with cabinet doors

Aligner le devant du panneau de porte du lave-vaisselle

avec

. You may need to adjust alignment to look good with your

les portes du placard . Vous aurez peut-être besoin d’ajuster

cabinets.


l’alignement pour une bonne apparence avec les placards.


HELPFUL TIP:

CONSEIL UTILE :

Prop up one side of frame to hold dishwasher up

Soulever un côté du cadre pour dégager le lave-

off floor when adjusting front legs.

vaisselle du plancher lors du réglage des pieds


avant.

13.

Check that leveling legs are firmly against the floor. Close and latch the door, and place level against the front panel . Check that dishwasher is plumb. Adjust leveling leg or add shims under rear wheel until dishwasher is level. Note: Shims must be securely attached to floor to prevent their movement when the dishwasher is operated. Repeat for other side of dishwasher.

Place level against top front opening of tub . Check that dishwasher is level from side to side. If dishwasher is not level, adjust front legs up or down until dishwasher is level.

Vérifier que les pieds de nivellement sont bien en appui sur le plancher. Fermer et enclencher la porte et placer le niveau contre le panneau avant . Vérifier que le lave-vaisselle est d’aplomb.

Ajuster le pied de nivellement ou ajouter des cales sous la roulette arrière jusqu’à ce que le lave-vaisselle soit à niveau. Remarque : Les cales doivent être bien fixées au plancher pour empêcher leur déplacement lorsque le lave-vaisselle fonctionne. Répéter pour l’autre côté du lave-vaisselle.

Placer le niveau contre l’ouverture avant supérieure de la cuve

. Contrôler l’horizontalité du lave-vaisselle d’un côté à l’autre. Si le lave-vaisselle n’est pas d’aplomb, régler les pieds avant vers le haut ou vers le bas jusqu’à ce que le lave-vaisselle soit d’aplomb.

16

Page 9
Image 9
Maytag 8269550 installation instructions Planchers surélevés

8269550 specifications

The Maytag 8269550 is a highly regarded appliance in the world of home laundry, known for its durability, performance, and array of modern features. Designed to deliver outstanding cleaning results, this washer emphasizes convenience and efficiency, making it a popular choice for households seeking reliability.

One of the standout characteristics of the Maytag 8269550 is its robust construction. This washer boasts a heavy-duty design that is well-suited for tackling large loads without compromising on performance. The solid build not only ensures longevity but also reduces noise and vibration during operation, creating a quieter laundry experience.

The washer incorporates powerful cleaning technologies that set it apart from its competitors. Its high-efficiency motor helps optimize water and energy usage, making it an environmentally friendly option while keeping utility costs at bay. Additionally, the washer features a large capacity drum, allowing users to wash more clothes in a single cycle. This not only saves time but also provides flexibility for handling bulky items like comforters or towels.

In terms of cleaning performance, the Maytag 8269550 employs advanced wash cycles, including specialized settings for delicate fabrics and heavily soiled garments. The innovative PowerWash cycle is particularly noteworthy, as it uses increased agitation and optimized wash motion to remove tough stains effectively. This cycle guarantees that users can achieve the clean they desire, even with challenging loads.

The washer is also equipped with a convenient control panel that features user-friendly settings. Intuitive dials and digital displays allow users to easily select the desired wash cycle, rinse options, and water temperature. This ease of use is enhanced by amenities such as the delay start feature, which permits users to schedule washes at their convenience.

In conclusion, the Maytag 8269550 stands out in the realm of laundry appliances due to its sturdy build, efficient performance, and user-friendly features. With its blend of advanced technologies and thoughtful design, it addresses the needs of modern households, ensuring that laundry day is both effective and manageable. Whether tackling everyday garments or special fabrics, this washer provides the functionality and reliability that consumers expect from a trusted brand like Maytag.