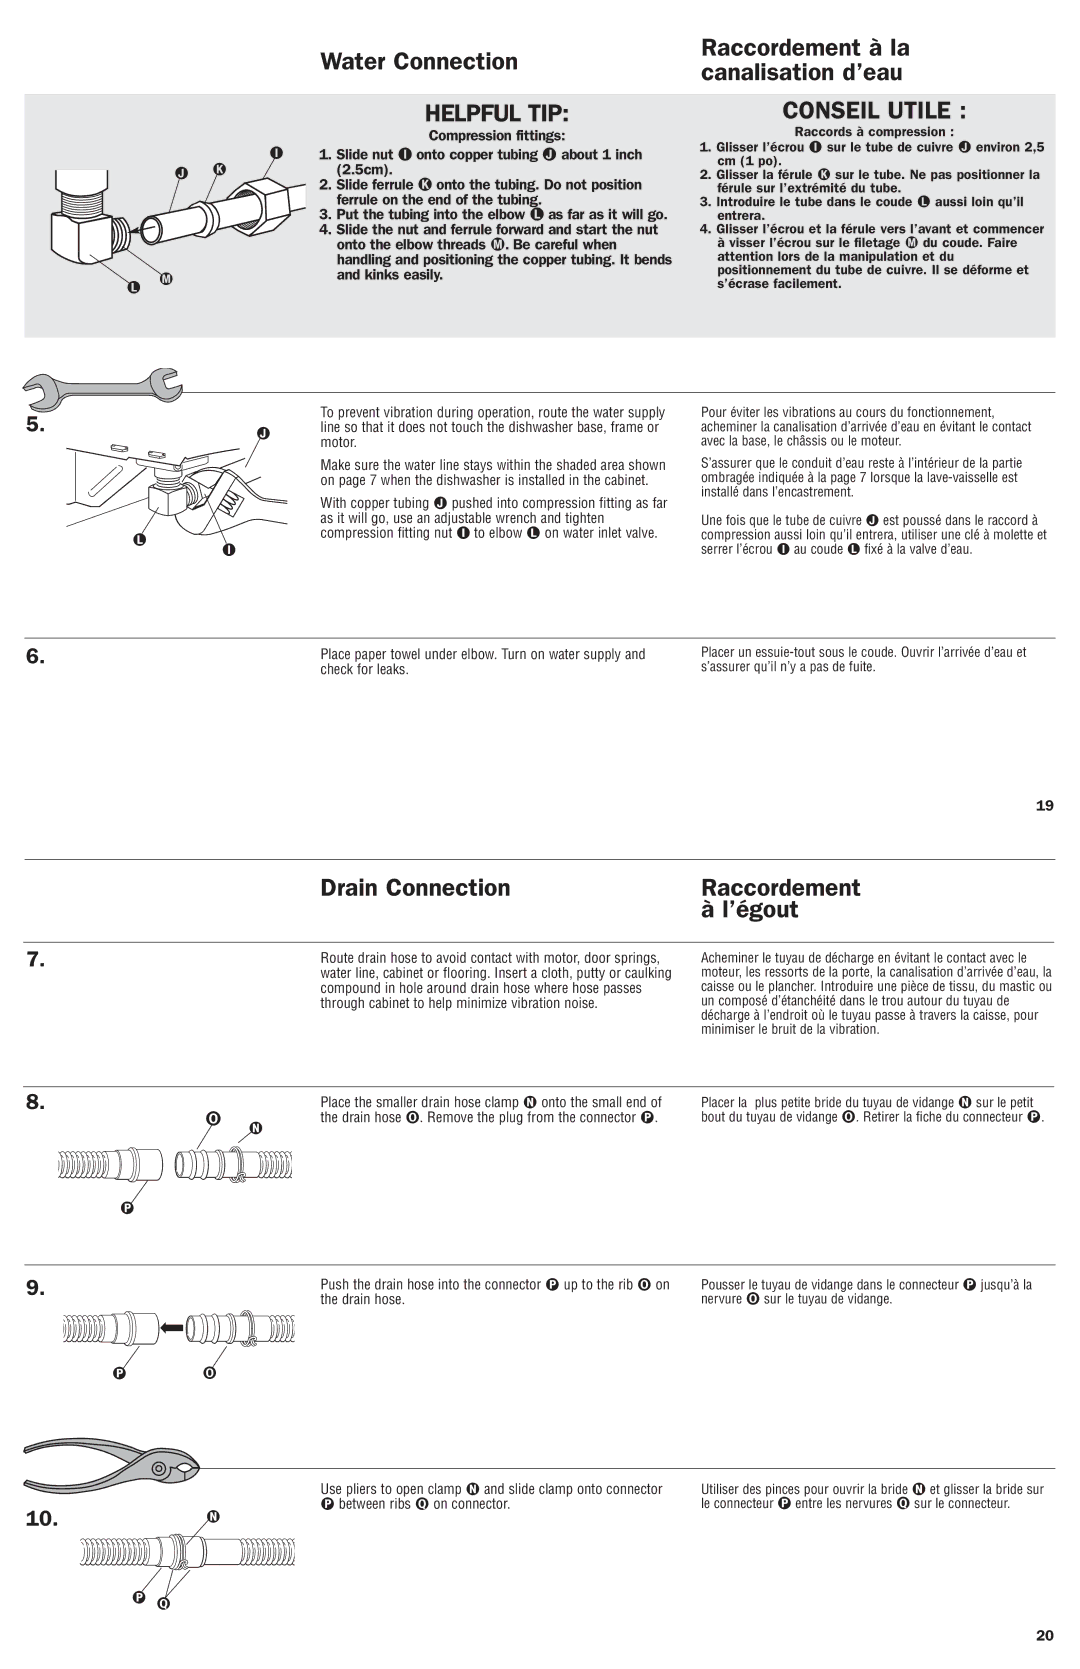
Water Connection

HELPFUL TIP:


Compression fittings:

1.

Slide nut

onto copper tubing

about 1 inch


(2.5cm).


2.

Slide ferrule

onto the tubing. Do not position


ferrule on the end of the tubing.


3.

Put the tubing into the elbow

as far as it will go.

4.

Slide the nut and ferrule forward and start the nut


onto the elbow threads . Be careful when


handling and positioning the copper tubing. It bends


and kinks easily.


Raccordement à la canalisation d’eau

CONSEIL UTILE :


Raccords à compression :


1.

Glisser l’écrou

sur le tube de cuivre

environ 2,5


cm (1 po).


2.

Glisser la férule

sur le tube. Ne pas positionner la


férule sur l’extrémité du tube.


3.

Introduire le tube dans le coude

aussi loin qu’il


entrera.


4.

Glisser l’écrou et la férule vers l’avant et commencer


à visser l’écrou sur le filetage

du coude. Faire


attention lors de la manipulation et du


positionnement du tube de cuivre. Il se déforme et


s’écrase facilement.


To prevent vibration during operation, route the water supply

5.line so that it does not touch the dishwasher base, frame or

motor.

Make sure the water line stays within the shaded area shown on page 7 when the dishwasher is installed in the cabinet.

With copper tubing

pushed into compression fitting as far

as it will go, use an adjustable wrench and tighten

compression fitting nut

to elbow

on water inlet valve.

Pour éviter les vibrations au cours du fonctionnement, acheminer la canalisation d’arrivée d’eau en évitant le contact avec la base, le châssis ou le moteur.

S’assurer que le conduit d’eau reste à l’intérieur de la partie ombragée indiquée à la page 7 lorsque la lave-vaisselle est installé dans l’encastrement.

Une fois que le tube de cuivre est poussé dans le raccord à compression aussi loin qu’il entrera, utiliser une clé à molette et

serrer l’écrou

au coude

fixé à la valve d’eau.

6.

Place paper towel under elbow. Turn on water supply and


check for leaks.

Placer un essuie-tout sous le coude. Ouvrir l’arrivée d’eau et s’assurer qu’il n’y a pas de fuite.

19

Drain Connection

Raccordement


à l’égout

7.

Route drain hose to avoid contact with motor, door springs,


water line, cabinet or flooring. Insert a cloth, putty or caulking

compound in hole around drain hose where hose passes through cabinet to help minimize vibration noise.

Acheminer le tuyau de décharge en évitant le contact avec le moteur, les ressorts de la porte, la canalisation d’arrivée d’eau, la caisse ou le plancher. Introduire une pièce de tissu, du mastic ou un composé d’étanchéité dans le trou autour du tuyau de décharge à l’endroit où le tuyau passe à travers la caisse, pour minimiser le bruit de la vibration.

8.

Place the smaller drain hose clamp

onto the small end of


the drain hose . Remove the plug from the connector .

Placer la plus petite bride du tuyau de vidange sur le petit bout du tuyau de vidange . Retirer la fiche du connecteur .

9.

Push the drain hose into the connector

up to the rib

on

Pousser le tuyau de vidange dans le connecteur

jusqu’à la


the drain hose.


nervure

sur le tuyau de vidange.


Use pliers to open clamp

and slide clamp onto connector

between ribs

on connector.

10.

Utiliser des pinces pour ouvrir la bride

le connecteur

entre les nervures

et glisser la bride sur sur le connecteur.

20

Page 11
Image 11
Maytag 8269550 Water Connection, Raccordement à la canalisation d’eau, Drain Connection Raccordement ’égout

8269550 specifications

The Maytag 8269550 is a highly regarded appliance in the world of home laundry, known for its durability, performance, and array of modern features. Designed to deliver outstanding cleaning results, this washer emphasizes convenience and efficiency, making it a popular choice for households seeking reliability.

One of the standout characteristics of the Maytag 8269550 is its robust construction. This washer boasts a heavy-duty design that is well-suited for tackling large loads without compromising on performance. The solid build not only ensures longevity but also reduces noise and vibration during operation, creating a quieter laundry experience.

The washer incorporates powerful cleaning technologies that set it apart from its competitors. Its high-efficiency motor helps optimize water and energy usage, making it an environmentally friendly option while keeping utility costs at bay. Additionally, the washer features a large capacity drum, allowing users to wash more clothes in a single cycle. This not only saves time but also provides flexibility for handling bulky items like comforters or towels.

In terms of cleaning performance, the Maytag 8269550 employs advanced wash cycles, including specialized settings for delicate fabrics and heavily soiled garments. The innovative PowerWash cycle is particularly noteworthy, as it uses increased agitation and optimized wash motion to remove tough stains effectively. This cycle guarantees that users can achieve the clean they desire, even with challenging loads.

The washer is also equipped with a convenient control panel that features user-friendly settings. Intuitive dials and digital displays allow users to easily select the desired wash cycle, rinse options, and water temperature. This ease of use is enhanced by amenities such as the delay start feature, which permits users to schedule washes at their convenience.

In conclusion, the Maytag 8269550 stands out in the realm of laundry appliances due to its sturdy build, efficient performance, and user-friendly features. With its blend of advanced technologies and thoughtful design, it addresses the needs of modern households, ensuring that laundry day is both effective and manageable. Whether tackling everyday garments or special fabrics, this washer provides the functionality and reliability that consumers expect from a trusted brand like Maytag.