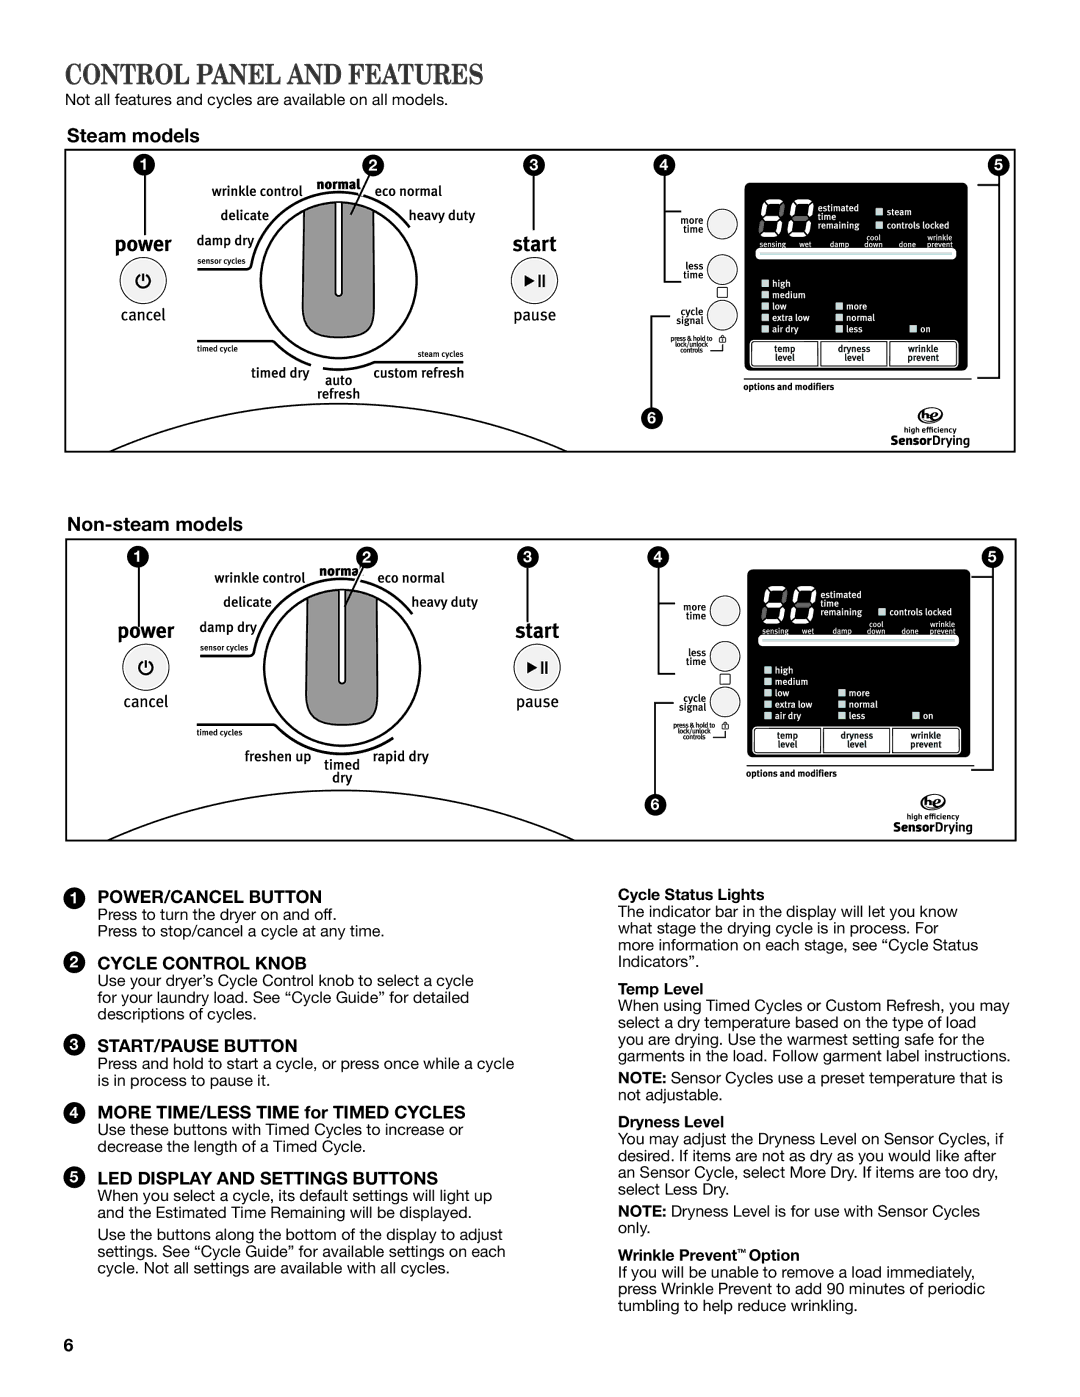
CONTROL PANEL AND FEATURES
Not all features and cycles are available on all models.
Steam models
1 | 2 | 3 | 4 | 5 |
|
|
| 6 |
|
Non-steam models
1 | 2 | 3 | 4 | 5 | |||||||||
|
|
|
|
|
|
|
|
|
|
|
|
|
|
|
|
|
|
|
|
|
|
|
|
|
|
|
|
|
|
|
|
|
|
|
|
|
|
|
|
|
|
|
|
|
|
|
|
|
|
|
|
|
|
|
|
|
|
|
|
|
|
|
|
|
|
|
|
|
|
|
|
|
|
|
|
|
|
|
|
|
|
|
|
|
|
|
|
|
|
|
|
|
|
|
|
|
|
|
|
|
|
|
|
|
|
|
|
|
|
|
|
|
|
|
|
|
|
|
|
|
|
|
|
|
|
|
|
|
|
|
|
|
|
|
|
|
|
|
|
|
|
|
|
|
|
|
|
|
|
|
|
|
|
|
| 6 | |
|
|
| |
1 | POWER/CANCEL BUTTON | Cycle Status Lights | |
| Press to turn the dryer on and off. | The indicator bar in the display will let you know | |
| Press to stop/cancel a cycle at any time. | what stage the drying cycle is in process. For | |
2 |
| more information on each stage, see “Cycle Status | |
CYCLE CONTROL KNOB | Indicators”. | ||
| Use your dryer’s Cycle Control knob to select a cycle | Temp Level | |
| for your laundry load. See “Cycle Guide” for detailed | ||
| When using Timed Cycles or Custom Refresh, you may | ||
| descriptions of cycles. | ||
| select a dry temperature based on the type of load | ||
|
| ||
3 | START/PAUSE BUTTON | you are drying. Use the warmest setting safe for the | |
garments in the load. Follow garment label instructions. | |||
| Press and hold to start a cycle, or press once while a cycle | ||
| NOTE: Sensor Cycles use a preset temperature that is | ||
| is in process to pause it. | ||
4 MORE TIME/LESS TIME for TIMED CYCLES | not adjustable. | ||
Dryness Level | |||
| Use these buttons with Timed Cycles to increase or | ||
| You may adjust the Dryness Level on Sensor Cycles, if | ||
| decrease the length of a Timed Cycle. | ||
| desired. If items are not as dry as you would like after | ||
|
| ||
5 | LED DISPLAY AND SETTINGS BUTTONS | an Sensor Cycle, select More Dry. If items are too dry, | |
| When you select a cycle, its default settings will light up | select Less Dry. | |
| NOTE: Dryness Level is for use with Sensor Cycles | ||
| and the Estimated Time Remaining will be displayed. | ||
| Use the buttons along the bottom of the display to adjust | only. | |
|
| ||
| settings. See “Cycle Guide” for available settings on each | Wrinkle Prevent™ Option | |
| cycle. Not all settings are available with all cycles. | If you will be unable to remove a load immediately, | |
press Wrinkle Prevent to add 90 minutes of periodic tumbling to help reduce wrinkling.
6
