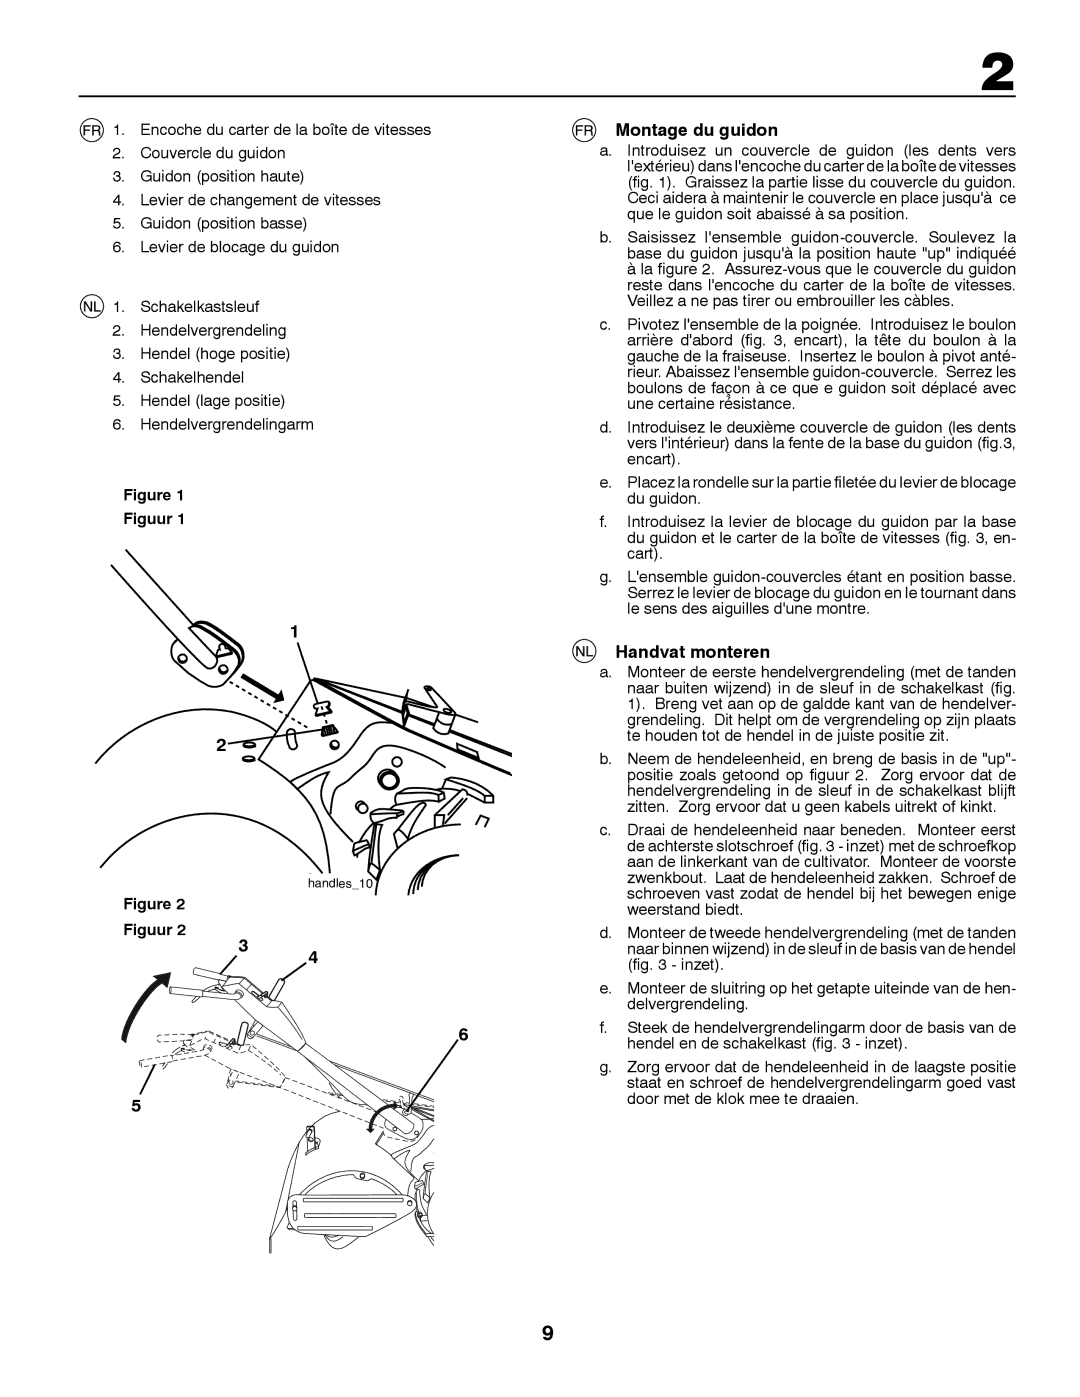
1. Encoche du carter de la boîte de vitesses

2.Couvercle du guidon

3.Guidon (position haute)

4.Levier de changement de vitesses

5.Guidon (position basse)

6.Levier de blocage du guidon

1. Schakelkastsleuf

2.Hendelvergrendeling

3.Hendel (hoge positie)

4.Schakelhendel

5.Hendel (lage positie)

6.Hendelvergrendelingarm

Figure 1

Figuur 1

1

2

2

Montage du guidon

a.Introduisez un couvercle de guidon (les dents vers l'extérieu) dans l'encoche du carter de la boîte de vitesses (fig. 1). Graissez la partie lisse du couvercle du guidon. Ceci aidera à maintenir le couvercle en place jusqu'à ce que le guidon soit abaissé à sa position.

b.Saisissez l'ensemble guidon-couvercle. Soulevez la base du guidon jusqu'à la position haute "up" indiquéé à la figure 2. Assurez-vous que le couvercle du guidon reste dans l'encoche du carter de la boîte de vitesses. Veillez a ne pas tirer ou embrouiller les càbles.

c.Pivotez l'ensemble de la poignée. Introduisez le boulon arrière d'abord (fig. 3, encart), la tête du boulon à la gauche de la fraiseuse. Insertez le boulon à pivot anté- rieur. Abaissez l'ensemble guidon-couvercle. Serrez les boulons de façon à ce que e guidon soit déplacé avec une certaine résistance.

d.Introduisez le deuxième couvercle de guidon (les dents vers l'intérieur) dans la fente de la base du guidon (fig.3, encart).

e.Placez la rondelle sur la partie filetée du levier de blocage du guidon.

f.Introduisez la levier de blocage du guidon par la base du guidon et le carter de la boîte de vitesses (fig. 3, en- cart).

g.L'ensemble guidon-couvercles étant en position basse. Serrez le levier de blocage du guidon en le tournant dans le sens des aiguilles d'une montre.

Handvat monteren

a.

Monteer de eerste hendelvergrendeling (met de tanden


naar buiten wijzend) in de sleuf in de schakelkast (fig.


1). Breng vet aan op de galdde kant van de hendelver-


grendeling. Dit helpt om de vergrendeling op zijn plaats


te houden tot de hendel in de juiste positie zit.

b.

Neem de hendeleenheid, en breng de basis in de "up"-


positie zoals getoond op figuur 2. Zorg ervoor dat de


hendelvergrendeling in de sleuf in de schakelkast blijft


zitten. Zorg ervoor dat u geen kabels uitrekt of kinkt.

c.

Draai de hendeleenheid naar beneden. Monteer eerst


de achterste slotschroef (fig. 3 - inzet) met de schroefkop


aan de linkerkant van de cultivator. Monteer de voorste


zwenkbout. Laat de hendeleenheid zakken. Schroef de

Figure 2 Figuur 2

5

handles_10

3 4

6


schroeven vast zodat de hendel bij het bewegen enige


weerstand biedt.

d.

Monteer de tweede hendelvergrendeling (met de tanden


naar binnen wijzend) in de sleuf in de basis van de hendel


(fig. 3 - inzet).

e.

Monteer de sluitring op het getapte uiteinde van de hen-


delvergrendeling.

f.

Steek de hendelvergrendelingarm door de basis van de


hendel en de schakelkast (fig. 3 - inzet).

g.

Zorg ervoor dat de hendeleenheid in de laagste positie


staat en schroef de hendelvergrendelingarm goed vast


door met de klok mee te draaien.

9

Page 9
Image 9
McCulloch MRT6 instruction manual Montage du guidon, Handvat monteren, Figuur

MRT6 specifications

The McCulloch MRT6 is a versatile and innovative garden tool designed for optimal performance in various landscaping tasks. This multi-tool system combines several functions into one compact unit, making it a popular choice among both professional landscapers and home gardening enthusiasts.

One of the standout features of the MRT6 is its powerful 2-stroke engine, which provides exceptional performance while maintaining low emissions. This environmentally friendly engine not only reduces the carbon footprint but also ensures efficient operation, allowing users to work longer without frequent refueling. The lightweight design enhances maneuverability, making it easy to carry and operate for extended periods.

The MRT6 is equipped with a range of interchangeable attachments, which can be easily swapped out to suit different gardening needs. The system includes a hedge trimmer, grass trimmer, and pole saw, among others, allowing users to tackle various tasks without the need for multiple tools. This adaptability is further complemented by the tool-free attachment system, ensuring quick and seamless transitions between attachments.

Another notable aspect of the McCulloch MRT6 is its ergonomic design. The adjustable handles and balanced weight distribution reduce strain on the user's body, promoting comfort during prolonged use. Additionally, the anti-vibration technology minimizes vibrations, further enhancing user comfort and control.

The MRT6 also features a robust build quality, designed to withstand the rigors of outdoor use. Its durable materials ensure longevity, making it a reliable tool for years to come. Furthermore, the easy-start system allows for hassle-free ignition, so users can start their tasks promptly without frustration.

Safety is paramount with the MRT6, and it includes several features to protect the user. The safety switch prevents accidental starting, while the protective blade guard adds an extra layer of safety during operation.

In summary, the McCulloch MRT6 is a powerful, adaptable, and user-friendly garden tool. With its efficient engine, interchangeable attachments, ergonomic design, and safety features, it stands out as an excellent choice for anyone looking to streamline their gardening tasks while ensuring a high level of performance. Whether maintaining a small garden or tackling larger landscaping projects, the MRT6 promises to deliver efficiency and reliability.