2.Assembly 2. Zusammenbau

2.Montage 2. Montaje

2.Montaggio 2. Montering

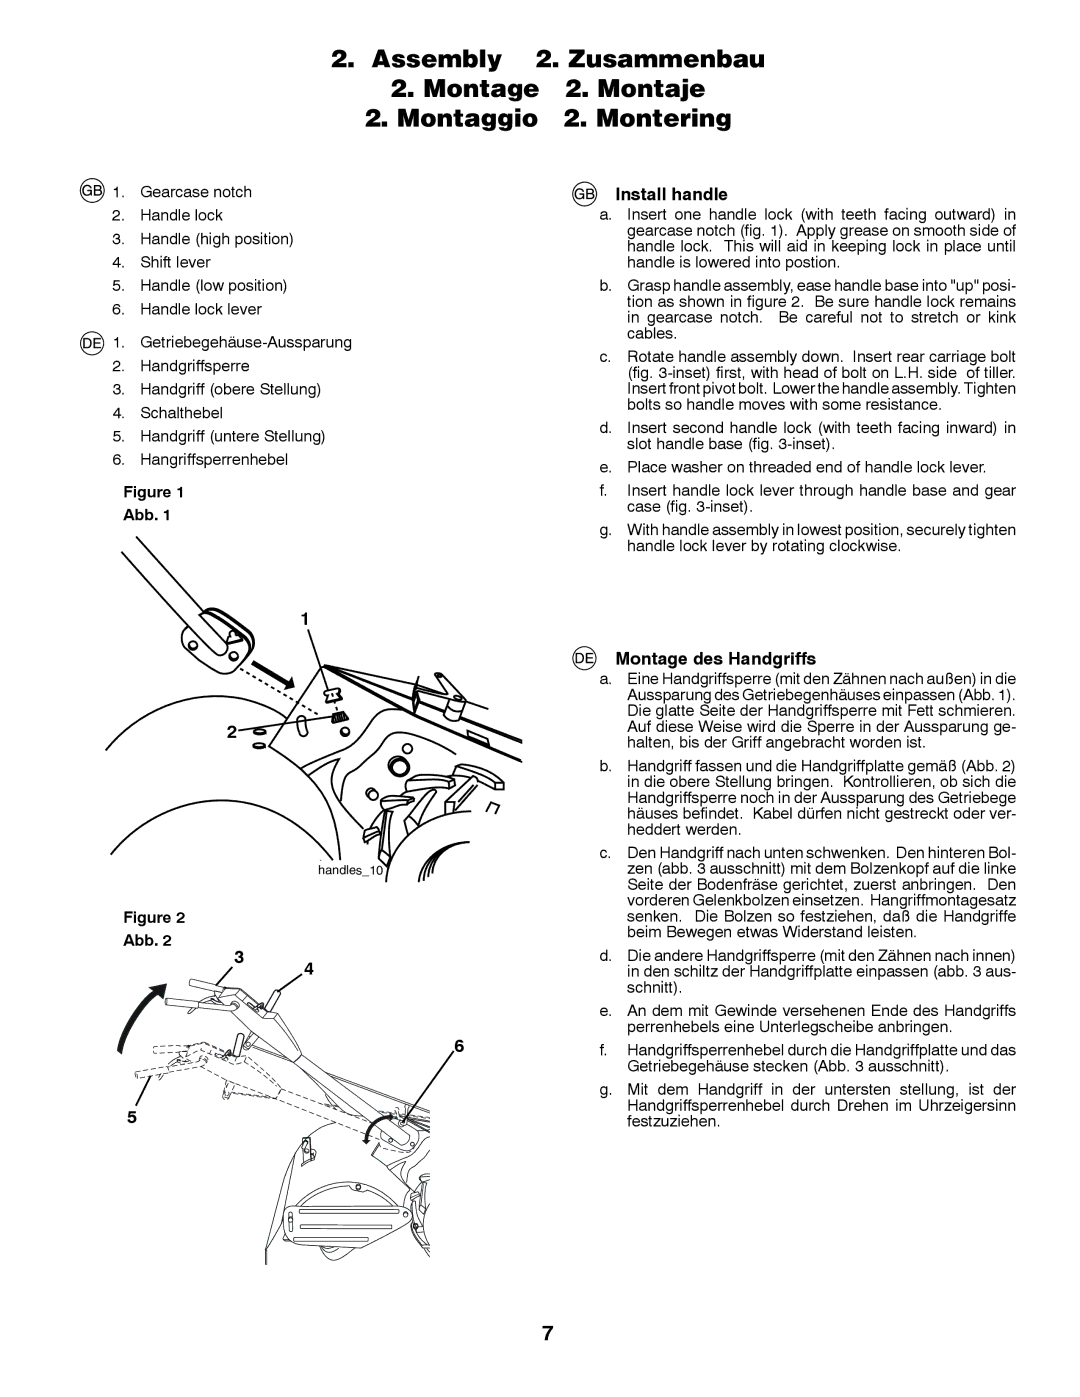
1. Gearcase notch

2.Handle lock

3.Handle (high position)

4.Shift lever

5.Handle (low position)

6.Handle lock lever

1. Getriebegehäuse-Aussparung

2.Handgriffsperre

3.Handgriff (obere Stellung)

4.Schalthebel

5.Handgriff (untere Stellung)

6.Hangriffsperrenhebel

Figure 1

Abb. 1

Install handle

a.Insert one handle lock (with teeth facing outward) in gearcase notch (fig. 1). Apply grease on smooth side of handle lock. This will aid in keeping lock in place until handle is lowered into postion.

b.Grasp handle assembly, ease handle base into "up" posi- tion as shown in figure 2. Be sure handle lock remains in gearcase notch. Be careful not to stretch or kink cables.

c.Rotate handle assembly down. Insert rear carriage bolt (fig. 3-inset) first, with head of bolt on L.H. side of tiller. Insert front pivot bolt. Lower the handle assembly. Tighten bolts so handle moves with some resistance.

d.Insert second handle lock (with teeth facing inward) in slot handle base (fig. 3-inset).

e.Place washer on threaded end of handle lock lever.

f.Insert handle lock lever through handle base and gear case (fig. 3-inset).

g.With handle assembly in lowest position, securely tighten handle lock lever by rotating clockwise.


1


Montage des Handgriffs


a. Eine Handgriffsperre (mit den Zähnen nach außen) in die


Aussparung des Getriebegenhäuses einpassen (Abb. 1).

2

Die glatte Seite der Handgriffsperre mit Fett schmieren.

Auf diese Weise wird die Sperre in der Aussparung ge-


halten, bis der Griff angebracht worden ist.


b. Handgriff fassen und die Handgriffplatte gemäß (Abb. 2)


in die obere Stellung bringen. Kontrollieren, ob sich die


Handgriffsperre noch in der Aussparung des Getriebege


häuses befindet. Kabel dürfen nicht gestreckt oder ver-


heddert werden.

handles_10

Figure 2

Abb. 2

3 4

c.Den Handgriff nach unten schwenken. Den hinteren Bol- zen (abb. 3 ausschnitt) mit dem Bolzenkopf auf die linke Seite der Bodenfräse gerichtet, zuerst anbringen. Den vorderen Gelenkbolzen einsetzen. Hangriffmontagesatz senken. Die Bolzen so festziehen, daß die Handgriffe beim Bewegen etwas Widerstand leisten.

d.Die andere Handgriffsperre (mit den Zähnen nach innen) in den schiltz der Handgriffplatte einpassen (abb. 3 aus- schnitt).


e.

An dem mit Gewinde versehenen Ende des Handgriffs

6


perrenhebels eine Unterlegscheibe anbringen.

f.

Handgriffsperrenhebel durch die Handgriffplatte und das


Getriebegehäuse stecken (Abb. 3 ausschnitt).


g. Mit dem Handgriff in der untersten stellung, ist der

5


Handgriffsperrenhebel durch Drehen im Uhrzeigersinn


festzuziehen.

7

Page 7
Image 7
McCulloch MRT6 instruction manual Install handle, Montage des Handgriffs, Abb

MRT6 specifications

The McCulloch MRT6 is a versatile and innovative garden tool designed for optimal performance in various landscaping tasks. This multi-tool system combines several functions into one compact unit, making it a popular choice among both professional landscapers and home gardening enthusiasts.

One of the standout features of the MRT6 is its powerful 2-stroke engine, which provides exceptional performance while maintaining low emissions. This environmentally friendly engine not only reduces the carbon footprint but also ensures efficient operation, allowing users to work longer without frequent refueling. The lightweight design enhances maneuverability, making it easy to carry and operate for extended periods.

The MRT6 is equipped with a range of interchangeable attachments, which can be easily swapped out to suit different gardening needs. The system includes a hedge trimmer, grass trimmer, and pole saw, among others, allowing users to tackle various tasks without the need for multiple tools. This adaptability is further complemented by the tool-free attachment system, ensuring quick and seamless transitions between attachments.

Another notable aspect of the McCulloch MRT6 is its ergonomic design. The adjustable handles and balanced weight distribution reduce strain on the user's body, promoting comfort during prolonged use. Additionally, the anti-vibration technology minimizes vibrations, further enhancing user comfort and control.

The MRT6 also features a robust build quality, designed to withstand the rigors of outdoor use. Its durable materials ensure longevity, making it a reliable tool for years to come. Furthermore, the easy-start system allows for hassle-free ignition, so users can start their tasks promptly without frustration.

Safety is paramount with the MRT6, and it includes several features to protect the user. The safety switch prevents accidental starting, while the protective blade guard adds an extra layer of safety during operation.

In summary, the McCulloch MRT6 is a powerful, adaptable, and user-friendly garden tool. With its efficient engine, interchangeable attachments, ergonomic design, and safety features, it stands out as an excellent choice for anyone looking to streamline their gardening tasks while ensuring a high level of performance. Whether maintaining a small garden or tackling larger landscaping projects, the MRT6 promises to deliver efficiency and reliability.