3


4

7

Figure 9


6


5


2

8

1 3

Inset A

9

10

11

Figure 10


1


_


e


stak


_


Inset B

depth


Inset C


18


12


13


14


19

15


16


17

h


2


_


e


k


sta


dept

_


1.

Outer side shield

11.

Depth Stake pin

2.

Nut "A"


12.

Transport position

3.

Nut "B"


13.

Shallowest tilling

4.

Drive control lever

14.

Shallow tilling

5.

Drive control release

15.

Deep tilling

6.

Handle


16.

Deepest tilling

7.

Throttle control

17.

Depth stake

8.

Starter handle

18.

"Release" position

9.

Shift lever indicator

19.

"Lock" position

10.

Depth stake


23


Reverse

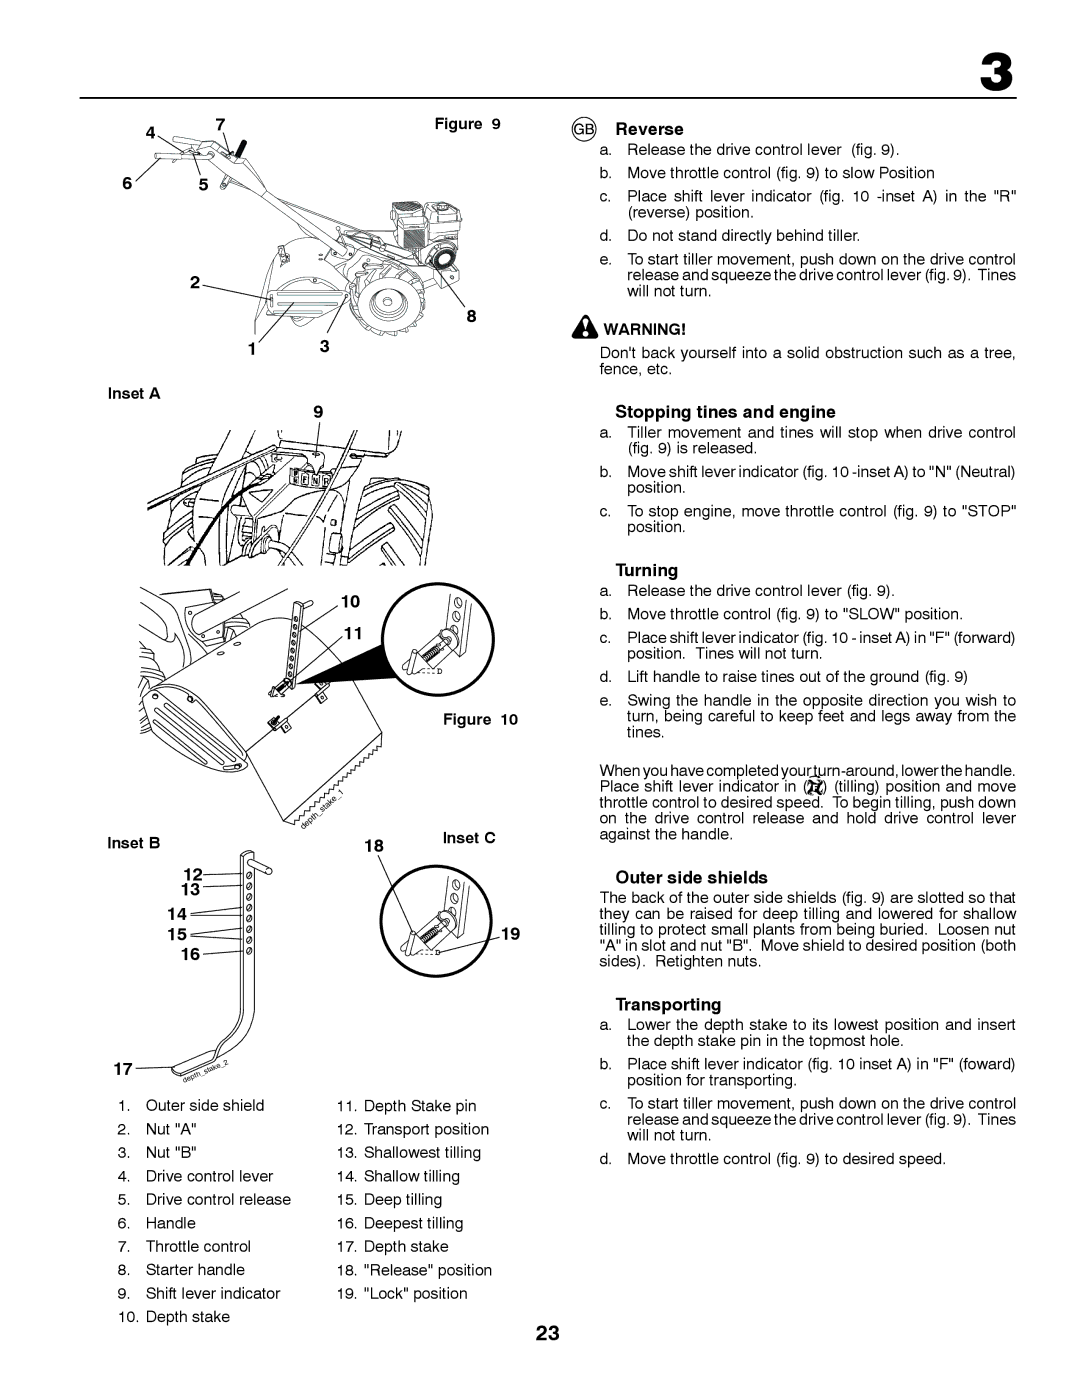
a.Release the drive control lever (fig. 9).

b.Move throttle control (fig. 9) to slow Position

c.Place shift lever indicator (fig. 10 -inset A) in the "R" (reverse) position.

d.Do not stand directly behind tiller.

e.To start tiller movement, push down on the drive control release and squeeze the drive control lever (fig. 9). Tines will not turn.

WARNING!

Don't back yourself into a solid obstruction such as a tree, fence, etc.

Stopping tines and engine

a.Tiller movement and tines will stop when drive control (fig. 9) is released.

b.Move shift lever indicator (fig. 10 -inset A) to "N" (Neutral) position.

c.To stop engine, move throttle control (fig. 9) to "STOP" position.

Turning

a.Release the drive control lever (fig. 9).

b.Move throttle control (fig. 9) to "SLOW" position.

c.Place shift lever indicator (fig. 10 - inset A) in "F" (forward) position. Tines will not turn.

d.Lift handle to raise tines out of the ground (fig. 9)

e.Swing the handle in the opposite direction you wish to turn, being careful to keep feet and legs away from the tines.

When you have completed your turn-around, lower the handle. Place shift lever indicator in () (tilling) position and move throttle control to desired speed. To begin tilling, push down on the drive control release and hold drive control lever against the handle.

Outer side shields

The back of the outer side shields (fig. 9) are slotted so that they can be raised for deep tilling and lowered for shallow tilling to protect small plants from being buried. Loosen nut "A" in slot and nut "B". Move shield to desired position (both sides). Retighten nuts.

Transporting

a.Lower the depth stake to its lowest position and insert the depth stake pin in the topmost hole.

b.Place shift lever indicator (fig. 10 inset A) in "F" (foward) position for transporting.

c.To start tiller movement, push down on the drive control release and squeeze the drive control lever (fig. 9). Tines will not turn.

d.Move throttle control (fig. 9) to desired speed.

Page 23
Image 23
McCulloch MRT6 instruction manual Reverse, Stopping tines and engine, Turning, Outer side shields, Transporting

MRT6 specifications

The McCulloch MRT6 is a versatile and innovative garden tool designed for optimal performance in various landscaping tasks. This multi-tool system combines several functions into one compact unit, making it a popular choice among both professional landscapers and home gardening enthusiasts.

One of the standout features of the MRT6 is its powerful 2-stroke engine, which provides exceptional performance while maintaining low emissions. This environmentally friendly engine not only reduces the carbon footprint but also ensures efficient operation, allowing users to work longer without frequent refueling. The lightweight design enhances maneuverability, making it easy to carry and operate for extended periods.

The MRT6 is equipped with a range of interchangeable attachments, which can be easily swapped out to suit different gardening needs. The system includes a hedge trimmer, grass trimmer, and pole saw, among others, allowing users to tackle various tasks without the need for multiple tools. This adaptability is further complemented by the tool-free attachment system, ensuring quick and seamless transitions between attachments.

Another notable aspect of the McCulloch MRT6 is its ergonomic design. The adjustable handles and balanced weight distribution reduce strain on the user's body, promoting comfort during prolonged use. Additionally, the anti-vibration technology minimizes vibrations, further enhancing user comfort and control.

The MRT6 also features a robust build quality, designed to withstand the rigors of outdoor use. Its durable materials ensure longevity, making it a reliable tool for years to come. Furthermore, the easy-start system allows for hassle-free ignition, so users can start their tasks promptly without frustration.

Safety is paramount with the MRT6, and it includes several features to protect the user. The safety switch prevents accidental starting, while the protective blade guard adds an extra layer of safety during operation.

In summary, the McCulloch MRT6 is a powerful, adaptable, and user-friendly garden tool. With its efficient engine, interchangeable attachments, ergonomic design, and safety features, it stands out as an excellent choice for anyone looking to streamline their gardening tasks while ensuring a high level of performance. Whether maintaining a small garden or tackling larger landscaping projects, the MRT6 promises to deliver efficiency and reliability.