2

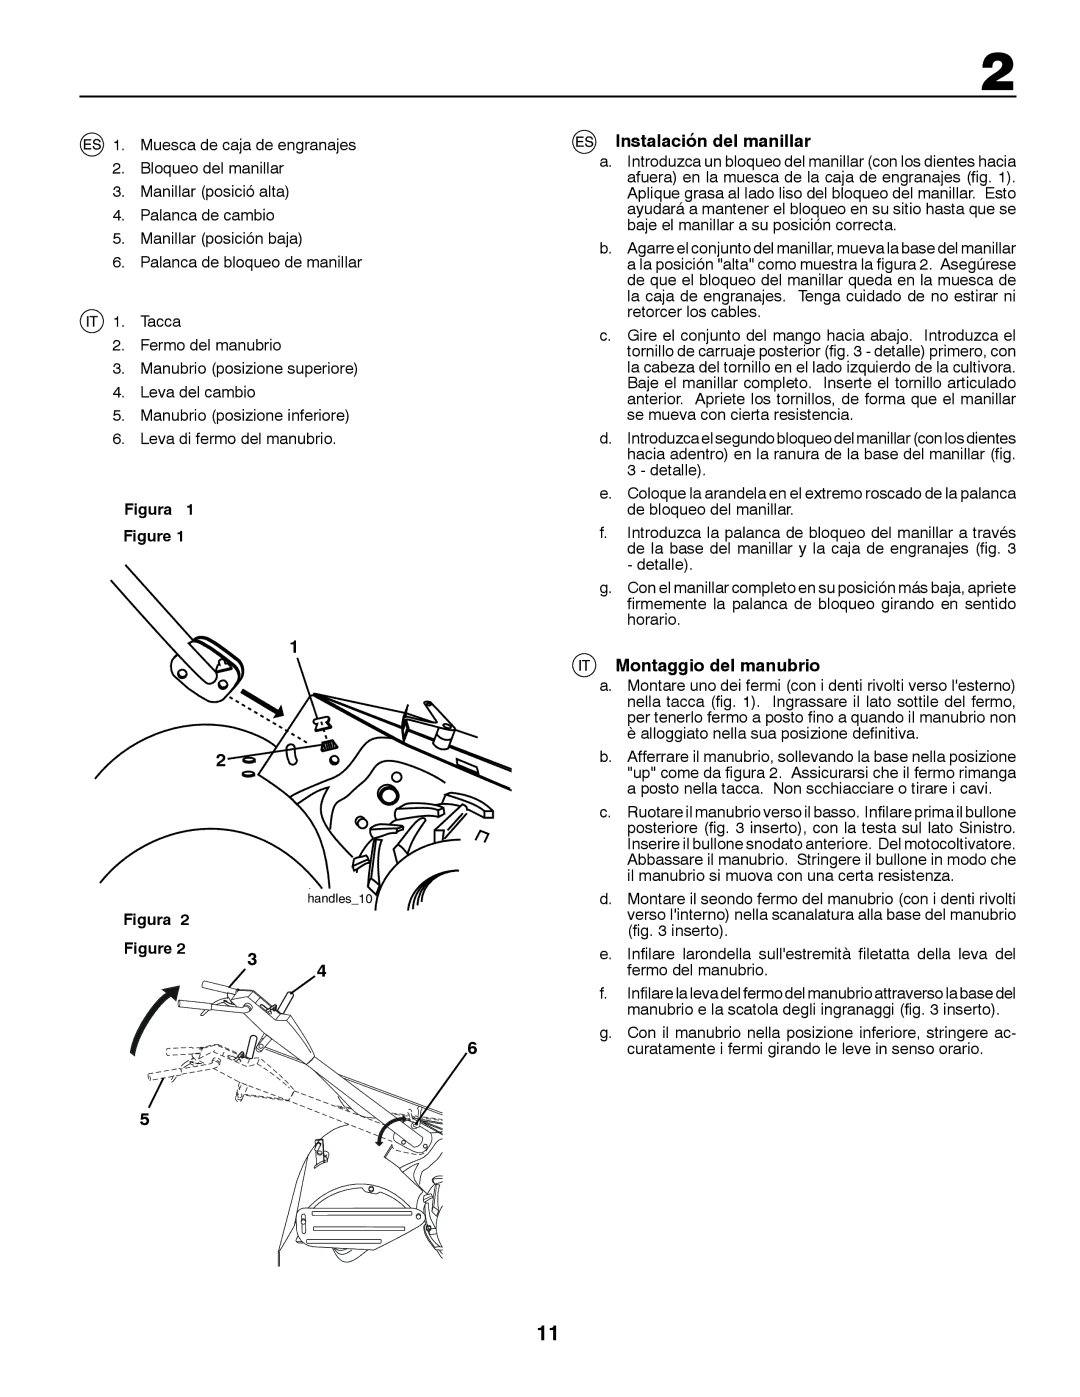
1. Muesca de caja de engranajes

2.Bloqueo del manillar

3.Manillar (posició alta)

4.Palanca de cambio

5.Manillar (posición baja)

6.Palanca de bloqueo de manillar

1. Tacca

2.Fermo del manubrio

3.Manubrio (posizione superiore)

4.Leva del cambio

5.Manubrio (posizione inferiore)

6.Leva di fermo del manubrio.

Figura 1

Figure 1

1

2

handles_10

Figura 2


Figure 2

3


4


Instalación del manillar

a.Introduzca un bloqueo del manillar (con los dientes hacia afuera) en la muesca de la caja de engranajes (fig. 1). Aplique grasa al lado liso del bloqueo del manillar. Esto ayudará a mantener el bloqueo en su sitio hasta que se baje el manillar a su posición correcta.

b.Agarre el conjunto del manillar, mueva la base del manillar a la posición "alta" como muestra la figura 2. Asegúrese de que el bloqueo del manillar queda en la muesca de la caja de engranajes. Tenga cuidado de no estirar ni retorcer los cables.

c.Gire el conjunto del mango hacia abajo. Introduzca el tornillo de carruaje posterior (fig. 3 - detalle) primero, con la cabeza del tornillo en el lado izquierdo de la cultivora. Baje el manillar completo. Inserte el tornillo articulado anterior. Apriete los tornillos, de forma que el manillar se mueva con cierta resistencia.

d.Introduzca el segundo bloqueo del manillar (con los dientes hacia adentro) en la ranura de la base del manillar (fig. 3 - detalle).

e.Coloque la arandela en el extremo roscado de la palanca de bloqueo del manillar.

f.Introduzca la palanca de bloqueo del manillar a través de la base del manillar y la caja de engranajes (fig. 3 - detalle).

g.Con el manillar completo en su posición más baja, apriete firmemente la palanca de bloqueo girando en sentido horario.

Montaggio del manubrio

a. Montare uno dei fermi (con i denti rivolti verso l'esterno) nella tacca (fig. 1). Ingrassare il lato sottile del fermo, per tenerlo fermo a posto fino a quando il manubrio non è alloggiato nella sua posizione definitiva.

b.

Afferrare il manubrio, sollevando la base nella posizione


"up" come da figura 2. Assicurarsi che il fermo rimanga


a posto nella tacca. Non scchiacciare o tirare i cavi.

c.

Ruotare il manubrio verso il basso. Infilare prima il bullone


posteriore (fig. 3 inserto), con la testa sul lato Sinistro.


Inserire il bullone snodato anteriore. Del motocoltivatore.


Abbassare il manubrio. Stringere il bullone in modo che


il manubrio si muova con una certa resistenza.

d.

Montare il seondo fermo del manubrio (con i denti rivolti


verso l'interno) nella scanalatura alla base del manubrio


(fig. 3 inserto).

e.

Infilare larondella sull'estremità filetatta della leva del


fermo del manubrio.

f.

Infilare la leva del fermo del manubrio attraverso la base del


manubrio e la scatola degli ingranaggi (fig. 3 inserto).

g.

Con il manubrio nella posizione inferiore, stringere ac-

6

curatamente i fermi girando le leve in senso orario.

5

11

Page 11
Image 11
McCulloch MRT6 instruction manual Instalación del manillar, Montaggio del manubrio

MRT6 specifications

The McCulloch MRT6 is a versatile and innovative garden tool designed for optimal performance in various landscaping tasks. This multi-tool system combines several functions into one compact unit, making it a popular choice among both professional landscapers and home gardening enthusiasts.

One of the standout features of the MRT6 is its powerful 2-stroke engine, which provides exceptional performance while maintaining low emissions. This environmentally friendly engine not only reduces the carbon footprint but also ensures efficient operation, allowing users to work longer without frequent refueling. The lightweight design enhances maneuverability, making it easy to carry and operate for extended periods.

The MRT6 is equipped with a range of interchangeable attachments, which can be easily swapped out to suit different gardening needs. The system includes a hedge trimmer, grass trimmer, and pole saw, among others, allowing users to tackle various tasks without the need for multiple tools. This adaptability is further complemented by the tool-free attachment system, ensuring quick and seamless transitions between attachments.

Another notable aspect of the McCulloch MRT6 is its ergonomic design. The adjustable handles and balanced weight distribution reduce strain on the user's body, promoting comfort during prolonged use. Additionally, the anti-vibration technology minimizes vibrations, further enhancing user comfort and control.

The MRT6 also features a robust build quality, designed to withstand the rigors of outdoor use. Its durable materials ensure longevity, making it a reliable tool for years to come. Furthermore, the easy-start system allows for hassle-free ignition, so users can start their tasks promptly without frustration.

Safety is paramount with the MRT6, and it includes several features to protect the user. The safety switch prevents accidental starting, while the protective blade guard adds an extra layer of safety during operation.

In summary, the McCulloch MRT6 is a powerful, adaptable, and user-friendly garden tool. With its efficient engine, interchangeable attachments, ergonomic design, and safety features, it stands out as an excellent choice for anyone looking to streamline their gardening tasks while ensuring a high level of performance. Whether maintaining a small garden or tackling larger landscaping projects, the MRT6 promises to deliver efficiency and reliability.