Installation

THERMOSTAT INSTALLATION:

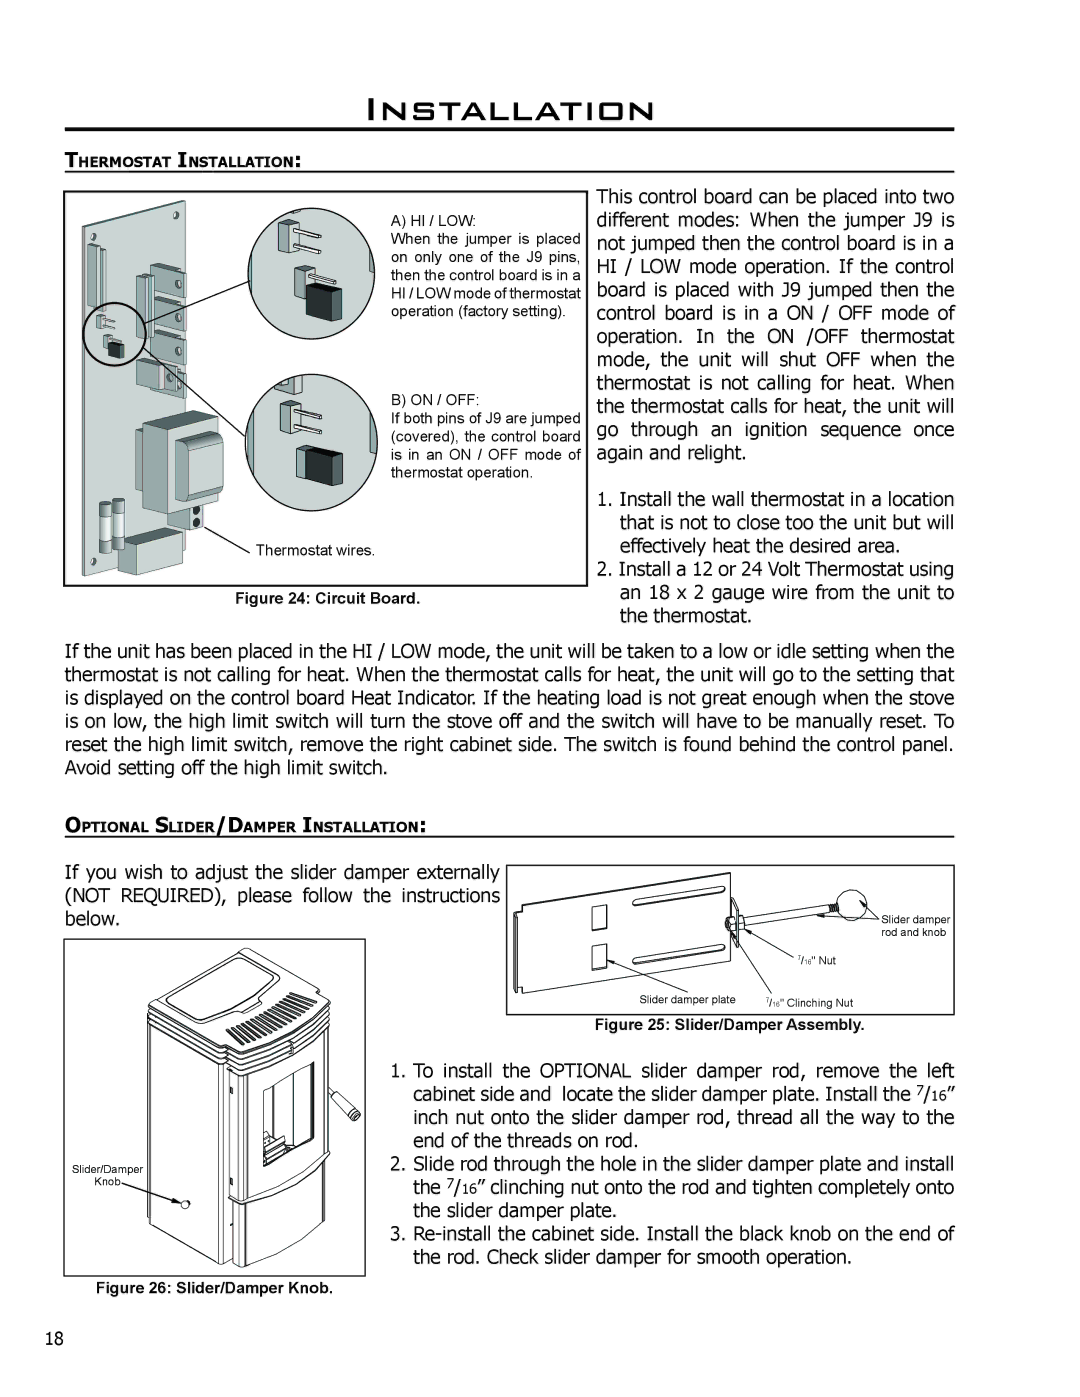
A) HI / LOW:

When the jumper is placed on only one of the J9 pins, then the control board is in a HI / LOW mode of thermostat operation (factory setting).

B) ON / OFF:

If both pins of J9 are jumped (covered), the control board is in an ON / OFF mode of thermostat operation.

Thermostat wires.

Figure 24: Circuit Board.

This control board can be placed into two different modes: When the jumper J9 is not jumped then the control board is in a HI / LOW mode operation. If the control board is placed with J9 jumped then the control board is in a ON / OFF mode of operation. In the ON /OFF thermostat mode, the unit will shut OFF when the thermostat is not calling for heat. When the thermostat calls for heat, the unit will go through an ignition sequence once again and relight.

1.Install the wall thermostat in a location that is not to close too the unit but will effectively heat the desired area.

2.Install a 12 or 24 Volt Thermostat using an 18 x 2 gauge wire from the unit to the thermostat.

If the unit has been placed in the HI / LOW mode, the unit will be taken to a low or idle setting when the thermostat is not calling for heat. When the thermostat calls for heat, the unit will go to the setting that is displayed on the control board Heat Indicator. If the heating load is not great enough when the stove is on low, the high limit switch will turn the stove off and the switch will have to be manually reset. To reset the high limit switch, remove the right cabinet side. The switch is found behind the control panel. Avoid setting off the high limit switch.

OPTIONAL SLIDER/DAMPER INSTALLATION:


If you wish to adjust the slider damper externally


(NOT REQUIRED), please follow the instructions


below.


Slider damper


rod and knob


7/16" Nut


Slider damper plate

7/16" Clinching Nut


Figure 25: Slider/Damper Assembly.


1. To install the OPTIONAL slider damper rod, remove the left


cabinet side and locate the slider damper plate. Install the 7/16


inch nut onto the slider damper rod, thread all the way to the


end of the threads on rod.


Slider/Damper

2. Slide rod through the hole in the slider damper plate and install

Knob

the 7/16” clinching nut onto the rod and tighten completely onto


the slider damper plate.


3. Re-install the cabinet side. Install the black knob on the end of


the rod. Check slider damper for smooth operation.

Figure 26: Slider/Damper Knob.


18

Page 18
Image 18
Mega Catch Mini technical manual To install the Optional slider damper rod, remove the left

Mini specifications

The Mega Catch Mini is a state-of-the-art mosquito trap designed for users who demand effectiveness and ease of use in pest control. Compact in size yet powerful in performance, this innovative device is perfect for both indoor and outdoor settings, making it a versatile solution for homeowners and outdoor enthusiasts alike.

One of the main features of the Mega Catch Mini is its advanced CO2 technology. This trap imitates human breath by releasing carbon dioxide, which attracts mosquitoes and other flying insects. By mimicking the natural allure of humans, the Mega Catch Mini effectively increases its catch rate, ensuring fewer pesky insects buzzing around your space.

Another notable characteristic is its silent operation. Unlike traditional bug zappers that create an audible zap sound, the Mega Catch Mini operates quietly, ensuring that your peaceful evenings are undisturbed. This makes it an ideal choice for patio gatherings, backyard barbeques, or simply enjoying a quiet night at home.

The Mega Catch Mini is also equipped with a powerful fan that draws insects into a contained trap, preventing their escape. This efficient trapping mechanism eliminates the need for toxic chemicals or harmful pesticides, making it a safer option for households with children and pets.

Easy to set up and use, the Mega Catch Mini features a simple plug-and-play design. Users can easily place it in any location for optimal performance. Its lightweight design makes it easy to move from one area to another, ensuring that you can adapt to varying outdoor conditions.

In terms of maintenance, the Mega Catch Mini is user-friendly. It has a removable catching tray that can be easily cleaned and emptied. This simplicity in maintenance ensures that users can operate the unit consistently without the hassle of complicated procedures.

Power-efficient design is another hallmark of the Mega Catch Mini. It consumes minimal energy compared to traditional insect traps, reducing your electricity bills while keeping your space free from bugs.

Overall, the Mega Catch Mini stands out as an effective, user-friendly, and environmentally-friendly solution for controlling mosquito populations. Its innovative technology, combined with practical features, makes it a top choice for anyone looking to enjoy their outdoor spaces without the nuisance of insects.