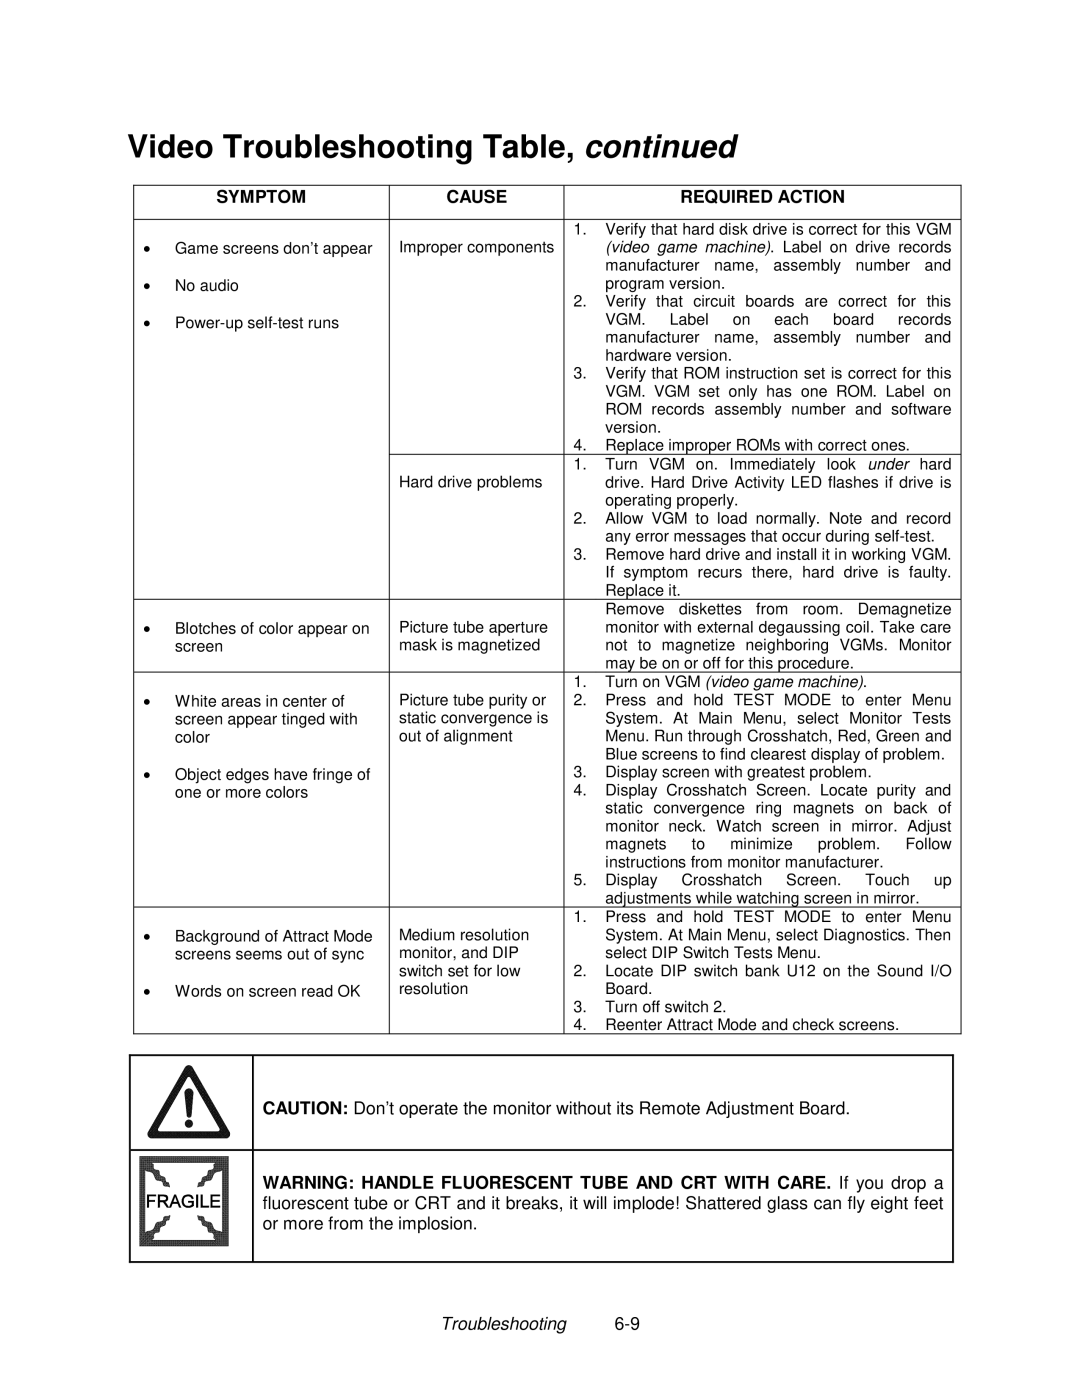
Video Troubleshooting Table, continued
| SYMPTOM | CAUSE |
| REQUIRED ACTION |
|
|
|
|
|
|
|
| 1. | Verify that hard disk drive is correct for this VGM |
• Game screens don’t appear | Improper components |
| (video game machine). Label on drive records | |
|
|
|
| manufacturer name, assembly number and |
• | No audio |
|
| program version. |
|
|
| 2. | Verify that circuit boards are correct for this |
• |
|
| VGM. Label on each board records | |
|
|
|
| manufacturer name, assembly number and |
|
|
|
| hardware version. |
|
|
| 3. | Verify that ROM instruction set is correct for this |
|
|
|
| VGM. VGM set only has one ROM. Label on |
|
|
|
| ROM records assembly number and software |
|
|
|
| version. |
|
|
| 4. | Replace improper ROMs with correct ones. |
|
| Hard drive problems | 1. | Turn VGM on. Immediately look under hard |
|
|
| drive. Hard Drive Activity LED flashes if drive is | |
|
|
|
| operating properly. |
|
|
| 2. | Allow VGM to load normally. Note and record |
|
|
|
| any error messages that occur during |
|
|
| 3. | Remove hard drive and install it in working VGM. |
|
|
|
| If symptom recurs there, hard drive is faulty. |
|
|
|
| Replace it. |
|
|
|
| Remove diskettes from room. Demagnetize |
• Blotches of color appear on | Picture tube aperture |
| monitor with external degaussing coil. Take care | |
| screen | mask is magnetized |
| not to magnetize neighboring VGMs. Monitor |
|
|
|
| may be on or off for this procedure. |
• White areas in center of | Picture tube purity or | 1. | Turn on VGM (video game machine). | |
2. | Press and hold TEST MODE to enter Menu | |||
| screen appear tinged with | static convergence is |
| System. At Main Menu, select Monitor Tests |
| color | out of alignment |
| Menu. Run through Crosshatch, Red, Green and |
|
|
|
| Blue screens to find clearest display of problem. |
• Object edges have fringe of |
| 3. | Display screen with greatest problem. | |
| one or more colors |
| 4. | Display Crosshatch Screen. Locate purity and |
|
|
|
| static convergence ring magnets on back of |
|
|
|
| monitor neck. Watch screen in mirror. Adjust |
|
|
|
| magnets to minimize problem. Follow |
|
|
|
| instructions from monitor manufacturer. |
|
|
| 5. | Display Crosshatch Screen. Touch up |
|
|
|
| adjustments while watching screen in mirror. |
|
|
| 1. | Press and hold TEST MODE to enter Menu |
• Background of Attract Mode | Medium resolution |
| System. At Main Menu, select Diagnostics. Then | |
| screens seems out of sync | monitor, and DIP |
| select DIP Switch Tests Menu. |
|
| switch set for low | 2. | Locate DIP switch bank U12 on the Sound I/O |
• Words on screen read OK | resolution |
| Board. | |
|
|
| 3. | Turn off switch 2. |
|
|
| 4. | Reenter Attract Mode and check screens. |
CAUTION: Don’t operate the monitor without its Remote Adjustment Board.
WARNING: HANDLE FLUORESCENT TUBE AND CRT WITH CARE. If you drop a fluorescent tube or CRT and it breaks, it will implode! Shattered glass can fly eight feet or more from the implosion.
Troubleshooting