5. NetCommand IR Control

57

Initial NetCommand Setup

To perform this procedure, you need:

The remote controls for both the TV and the device you want to control.

An IR emitter cable available from Mitsubishi.

Note: To set up an A/V receiver, see “Setting Up A/V Receiver Control,” page 62.

1.Connect and position the IR emitters for the devices you wish to control. See “IR Emitter Place- ment” on the opposite page.

2.Set the TV’s remote control to TV mode and power on the TV.

3.Open the NetCommand Learn screen as follows:

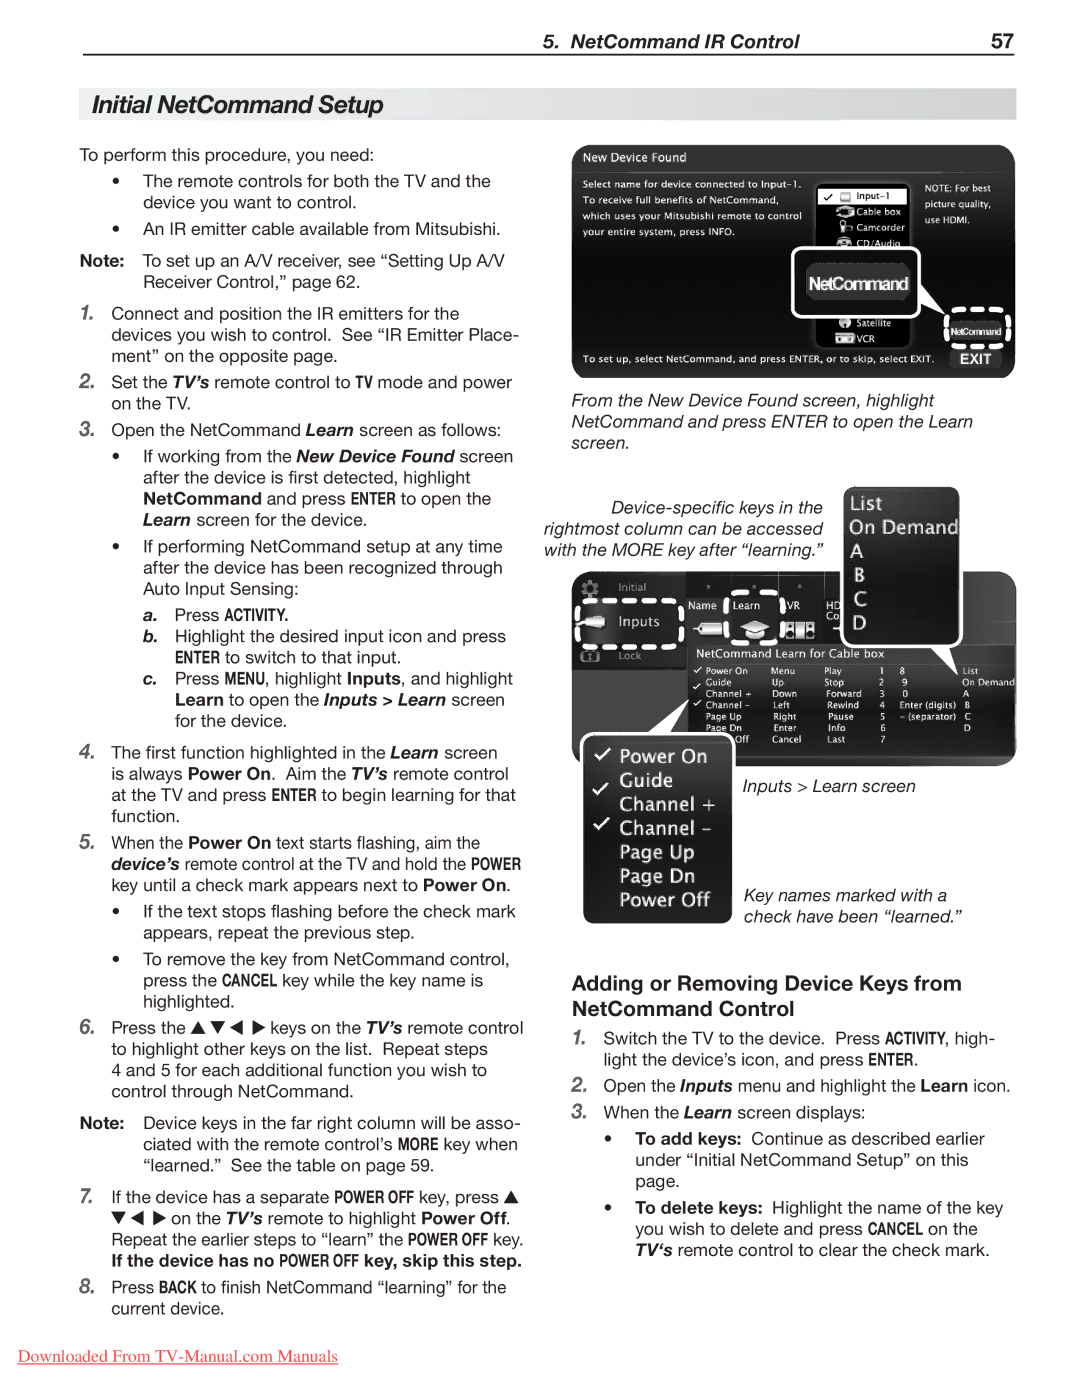
If working from the New Device Found screen after the device is first detected, highlight NetCommand and press ENTER to open the Learn screen for the device.

If performing NetCommand setup at any time after the device has been recognized through Auto Input Sensing:

a.Press ACTIVITY.

b.Highlight the desired input icon and press ENTER to switch to that input.

c.Press MENU, highlight Inputs, and highlight Learn to open the Inputs > Learn screen for the device.

4.The first function highlighted in the Learn screen is always Power On. Aim the TV’s remote control at the TV and press ENTER to begin learning for that function.

5.When the Power On text starts flashing, aim the device’s remote control at the TV and hold the POWER key until a check mark appears next to Power On.

If the text stops flashing before the check mark appears, repeat the previous step.

To remove the key from NetCommand control, press the CANCEL key while the key name is highlighted.

6.Press the keys on the TV’s remote control to highlight other keys on the list. Repeat steps

4 and 5 for each additional function you wish to control through NetCommand.

Note: Device keys in the far right column will be asso- ciated with the remote control’s MORE key when “learned.” See the table on page 59.

7.If the device has a separate POWER OFF key, press on the TV’s remote to highlight Power Off. Repeat the earlier steps to “learn” the POWER OFF key.

If the device has no POWER OFF key, skip this step.

8.Press BACK to finish NetCommand “learning” for the current device.

From the New Device Found screen, highlight NetCommand and press ENTER to open the Learn screen.

Device-specific keys in the rightmost column can be accessed with the MORE key after “learning.”

Inputs > Learn screen

Key names marked with a check have been “learned.”

Adding or Removing Device Keys from NetCommand Control

1.Switch the TV to the device. Press ACTIVITY, high- light the device’s icon, and press ENTER.

2.Open the Inputs menu and highlight the Learn icon.

3.When the Learn screen displays:

To add keys: Continue as described earlier under “Initial NetCommand Setup” on this page.

To delete keys: Highlight the name of the key you wish to delete and press CANCEL on the TV‘s remote control to clear the check mark.

Downloaded From TV-Manual.com Manuals

Page 57
Image 57
Mitsubishi Electronics LT-46151, LT-40153 Initial NetCommand Setup, Adding or Removing Device Keys from NetCommand Control

LT-52249, LT-46249, LT-40153, LT-40151, LT-52151 specifications

Mitsubishi Electronics has long been a key player in the television market, continuously pushing the envelope with innovative technology and high-performance displays. Among its lineup, the models LT-40151, LT-52153, LT-40153, LT-46151, and LT-46153 stand out with a host of remarkable features that cater to diverse consumer needs.

The LT-40151 is equipped with a 40-inch display, providing a sharp and vivid visual experience powered by Mitsubishi's proprietary technology. With a resolution of 1080p, this model showcases an impressive picture quality, ensuring that viewers enjoy their favorite films, shows, and games with stunning detail. The inclusion of advanced color-enhancing mechanisms ensures vibrant hues, bringing images to life like never before.

Moving to the LT-52153, this 52-inch model takes things up a notch, ideal for consumers seeking a larger screen experience without compromising on quality. Alongside its sizeable display, it includes enhanced sound technology that complements the visual experience, allowing for immersive viewing. The LT-52153 features connectable options for modern devices, supporting HDMI and USB inputs, making multimedia connectivity seamless.

The LT-40153, sharing a similar size and resolution with the LT-40151, excels in providing user-friendly features. This includes intuitive menu navigation and settings adjustments, ensuring that users can tailor their viewing experience to suit personal preferences with ease.

For those who desire a slightly larger viewing area, the LT-46151 and LT-46153 models, both at 46 inches, offer a perfect blend of performance and functionality. Equipped with Mitsubishi's state-of-the-art digital signal processing, these models provide crystal-clear images while reducing motion blur, making them excellent for fast-paced action scenes in sports or movies.

Moreover, all five models incorporate energy-efficient technologies, allowing them to be environmentally friendly while still delivering high performance. The integration of smart TV capabilities in some models also provides access to streaming services and apps, making it easier for users to enjoy a wide range of content.

In summary, the LT-40151, LT-52153, LT-40153, LT-46151, and LT-46153 models from Mitsubishi Electronics represent an impressive fusion of advanced technology, high-quality display, and user-friendly features. These televisions are designed to enhance the viewing experience, making them a strong choice for any setting.