14

ADDING VENT SECTIONS


GAS INSTALLATION

For ease of assembly, a 7" telescop-


1. Install rigid black pipe, or 1/2" type L copper tubing with

ing stove pipe may be installed over


a shut-off valve to the stove.


the 4" vent connection of the adapter.


2. Seal and tighten the gas line securely to the flex connec-

Add vent sections, twist locking


tor.


(clockwise) securely, to the required


height. The vent should extend, at

FIGURE 32

FIGURE34


least, 3 feet above its point of con-


tact with the roof and, at least, 2 feet


DO NOT KINK FLEXIBLE CONNECTOR.

higher than any wall, roof or build-


ing within 10 feet. (This is a guide-


3. Check for gas leaks by brushing on a soap and water

line only; local venting codes should


solution. DO NOT USE OPEN FLAME.

be followed which may differ in


height and clearance requirements.)


FIGURE 35


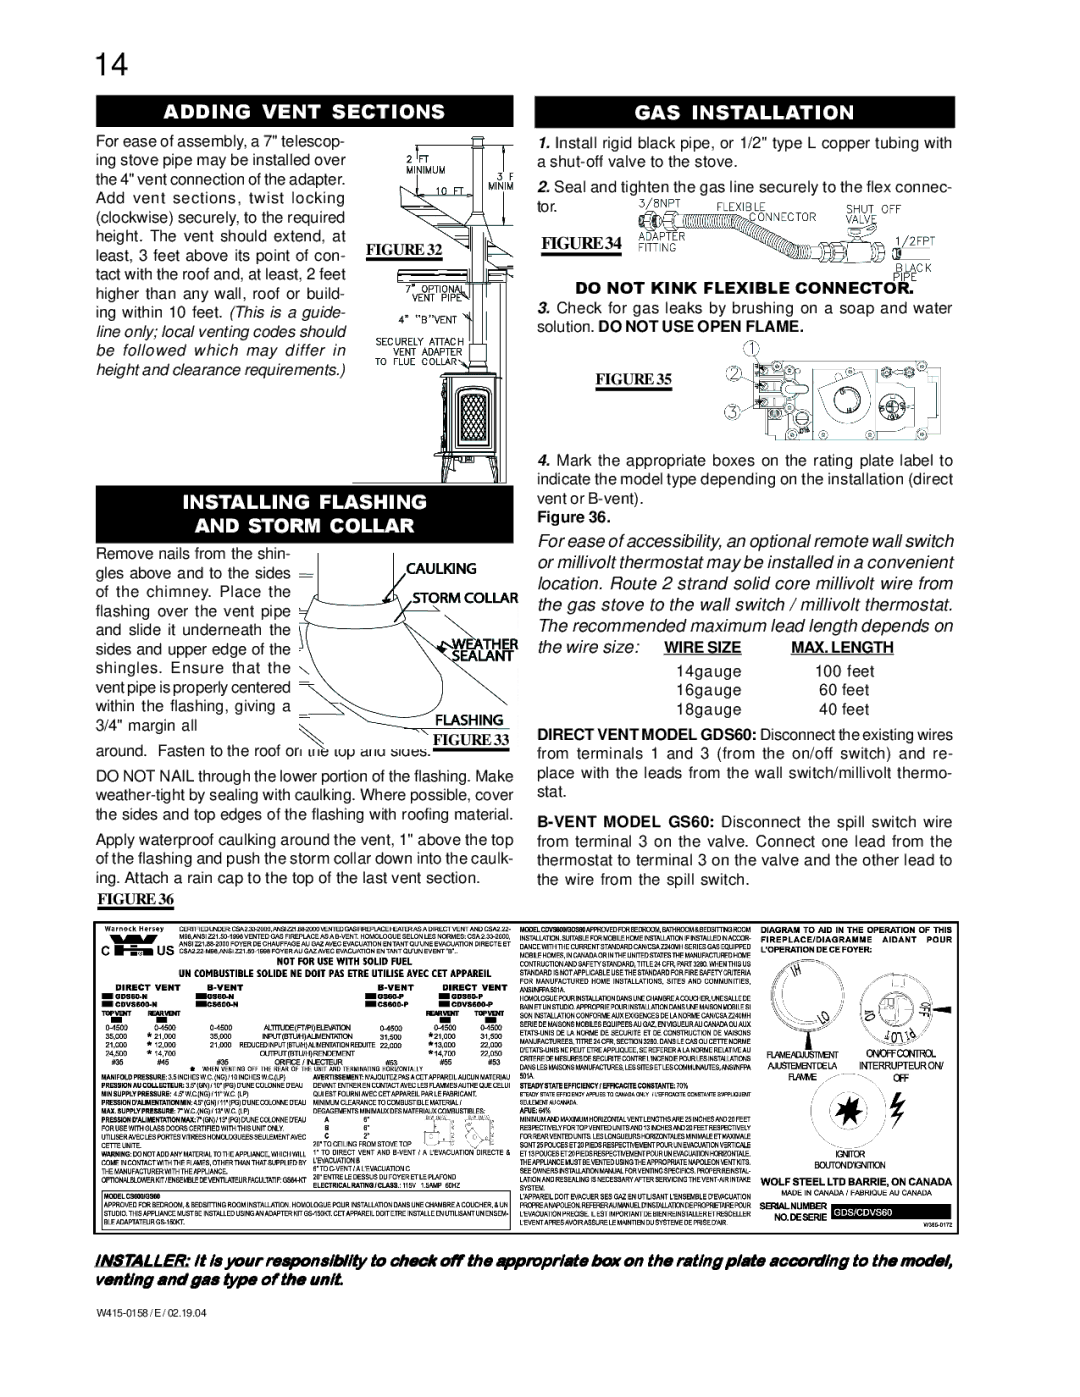
4. Mark the appropriate boxes on the rating plate label to


indicate the model type depending on the installation (direct

INSTALLING FLASHING


vent or B-vent).


Figure 36.


AND STORM COLLAR


For ease of accessibility, an optional remote wall switch


Remove nails from the shin-


or millivolt thermostat may be installed in a convenient

gles above and to the sides


location. Route 2 strand solid core millivolt wire from

of the chimney. Place the


the gas stove to the wall switch / millivolt thermostat.

flashing over the vent pipe


The recommended maximum lead length depends on

and slide it underneath the


sides and upper edge of the


the wire size: WIRE SIZE

MAX. LENGTH

shingles. Ensure that the


14gauge

100 feet

vent pipe is properly centered


16gauge

60 feet

within the flashing, giving a


18gauge

40 feet

3/4" margin all


DIRECT VENT MODEL GDS60: Disconnect the existing wires

around. Fasten to the roof on the top and sides.FIGURE 33

from terminals 1 and 3 (from the on/off switch) and re-

DO NOT NAIL through the lower portion of the flashing. Make

place with the leads from the wall switch/millivolt thermo-

weather-tight by sealing with caulking. Where possible, cover

stat.


the sides and top edges of the flashing with roofing material.

B-VENT MODEL GS60: Disconnect the spill switch wire

Apply waterproof caulking around the vent, 1" above the top

from terminal 3 on the valve. Connect one lead from the

of the flashing and push the storm collar down into the caulk-

thermostat to terminal 3 on the valve and the other lead to

ing. Attach a rain cap to the top of the last vent section.

the wire from the spill switch.


FIGURE 36

INSTALLER: It is your responsiblity to check off the appropriate box on the rating plate according to the model, venting and gas type of the unit.

W415-0158 / E / 02.19.04

Page 14
Image 14
Napoleon Fireplaces GS60-N, GS60-P, GDS60-P manual Adding Vent Sections GAS Installation, Installing Flashing, Storm Collar

GDS60-N, GS60-N, GDS60-P, GS60-P specifications

Napoleon Fireplaces offers an impressive line of gas fireplaces, including the GDS60-N, GS60-N, GS60-P, and GDS60-P models, which represent the pinnacle of style, efficiency, and technology in modern heating solutions. These fireplaces are designed to enhance the comfort of your living space while ensuring an inviting atmosphere.

One of the standout features of the GDS60-N and GS60-N models is the unique Design and Style Series, which provides flexibility in customization. Homeowners can choose from a variety of finishes, including classic and contemporary styles, to seamlessly integrate the fireplace into their existing décor. The clean lines and elegant design make these units a focal point in any room.

Both models prioritize efficiency, boasting impressive heating capabilities that can warm spaces of significant size. They utilize advanced combustion technology, ensuring that heat is distributed evenly while maximizing fuel efficiency. The GDS60-P and GS60-P models offer similar features but come with a premium touch, providing enhanced aesthetics with their panoramic viewing area that showcases a mesmerizing flame display.

The burner system in these fireplaces is engineered for consistent performance, allowing users to enjoy the beauty of flickering flames with minimal maintenance. Innovative features such as the exclusive PHAZER log set provide a realistic fire effect, further enhancing the ambiance and visual appeal of the fireplace.

Additionally, Napoleon fireplaces incorporate top-tier safety measures, including an automatic shut-off feature, which ensures peace of mind for users. The intuitive remote control system enables easy temperature adjustments and flame settings, allowing for personalized comfort at the touch of a button.

Another notable characteristic is the easy installation process. These units are designed for both direct venting and conventional venting, offering versatility that caters to various home layouts. The manufacturers have placed a strong emphasis on craftsmanship, ensuring that each unit not only performs optimally but also lasts for years to come.

In conclusion, the Napoleon Fireplaces GDS60-N, GS60-N, GS60-P, and GDS60-P models epitomize the perfect fusion of technology, efficiency, and design. Homeowners looking for a reliable heating solution that doesn't compromise on style will find these gas fireplaces to be an excellent choice. With their captivating aesthetics, advanced features, and superior safety specifications, Napoleon continues to set a high standard in the fireplace industry.