AC1200 WiFi DSL Modem Router- Essentials Edition
Trademarks
Support
Compliance
Contents
Manage the WiFi Network Settings
Manage the WAN and LAN Network Settings
Manage Firewall Rules, Port Forwarding, and Port Triggering
Appendix a Supplemental Information
Router
Unpack Your Modem Router
Your package contains the following items
Front Panel with LEDs
Modem router displays status LEDs on the front panel
Power LED turns solid green
LED descriptions
Back Panel with Ports, Buttons, and Connector
Modem router back panel
Right Side Panel with WPS and WiFi On/Off Buttons
Button Icon Description
Bottom Panel Product Label
Modem router product label
Install and Access the Modem Router and Its Network
Position Your Modem Router
Types of Logins
Wired Connection
WiFi Connection
Before You Connect to the Modem Router
Netgear genie Automatic Setup Utility
Set Up Your Modem Router for DSL Service
DSL Service
To connect your modem router to a DSL service
Modem router cabling for DSL service
Install and Access the Modem Router and Its Network
Install and Access the Modem Router and Its Network
Install and Access the Modem Router and Its Network
Install and Access the Modem Router and Its Network
Install and Access the Modem Router and Its Network
Set Up Your Modem Router for Cable or Fiber Service
To connect your modem router to a cable or fiber service
Modem router cabling for cable or fiber service
Install and Access the Modem Router and Its Network
Install and Access the Modem Router and Its Network
Install and Access the Modem Router and Its Network
Install and Access the Modem Router and Its Network
Read Troubleshoot the Internet Connection on
To log in to the modem router
Change the Language
To change the language
Select Advanced Administration Set Password
To set up password recovery
Set Up Password Recovery
Let the Modem Router Automatically Update Its Firmware
Select the Enable Password Recovery check box
Access the Modem Router with the Netgear genie App
To use the genie app to access the modem router
Install and Access the Modem Router and Its Network
Manage the Internet Settings Manually
Select Advanced Setup Wizard
Use the Internet Setup Wizard After Initial Setup
To use the Setup Wizard
Manage the Internet Settings Manually
Manage the Internet Settings Manually
Manage the Internet Settings Manually
Manage the Internet Settings Manually
Manually Set Up the Internet Connection
Specify an Internet Connection Without a Login
Field Description
Internet IP Address
NAT Network Address Translation
Domain Name Server DNS Address
Router MAC Address
Manage the Internet Settings Manually
Or Manually Connect
Domain Name Server DNS Address
From the Encapsulation menu, select PPPoE PPP over Ethernet
Enter the settings as described in the following table
Internet IP Address
From the Encapsulation menu, select PPPoA PPP over ATM
Enter the settings as described in the following table
Field Description Internet IP Address
Specify an IPv6 Internet Connection
IPv6 Internet Connections and IPv6 Addresses
Set Up and IPv6 Connection Through Auto Detect
From the Internet Connection Type menu, select Auto Detect
Set Up and IPv6 Connection Through Auto Config
From the Internet Connection Type menu, select Auto Config
Manage the Internet Settings Manually
Set Up an IPv6 6to4 Tunnel Connection
From the Internet Connection Type menu, select 6to4 Tunnel
Manage the Internet Settings Manually
Set Up an IPv6 Pass-Through Connection
To set up an IPv6 pass-through Internet connection
From the Internet Connection Type menu, select Fixed
Set Up an IPv6 Fixed Connection
To set up a fixed IPv6 Internet connection
Manage the Internet Settings Manually
From the Internet Connection Type menu, select Dhcp
Set Up an IPv6 Dhcp Connection
To set up an IPv6 Internet connection with a Dhcp server
Manage the Internet Settings Manually
From the Internet Connection Type menu, select PPPoE
Set Up an IPv6 PPPoE Connection
To set up an IPv6 PPPoE Internet connection
Manage the Internet Settings Manually
Application
Manage the MTU Size
MTU Concepts
Change the MTU Size
Manage the WiFi Network Settings
View or Change the Basic WiFi Settings
To view or change the basic WiFi settings
Manage the WiFi Network Settings
Wireless Network 2.4GHz b/g/n
Field Description Region Selection
Wireless Network 5GHz 802.11a/n/ac
Field Description Security Options
To 173 Mbps
Configure WPA/WPA2 Enterprise WiFi Security
To configure WPA/WPA2 enterprise security
Manage the WiFi Network Settings
Configure WEP Legacy WiFi Security
To configure WEP security
Use WPS to Add a Device to the WiFi Network
Use WPS with the Push Button Method
Select Advanced WPS Wizard
Use WPS with the PIN Method
Manage the WiFi Network Settings
To set up a guest network
Select Guest Network
To access My Local Network check box
Field Description Wireless Network 2.4GHz b/g/n
Enable Ssid Broadcast check box
Security Options Profile
Field Description Wireless Network 5GHz a/n/ac
Ssid Broadcast check box
Enable or Disable the WiFi Radios
Control the WiFi Radios
Use the WiFi On/Off Button
To enable or disable the WiFi radios
Select Advanced Advanced Setup Wireless Settings
Set Up a WiFi Schedule
To set up the WiFi schedule
Manage the WiFi Network Settings
Manage the WPS Settings
To manage WPS Settings
Manage Advanced WiFi Features
To manage advanced WiFi features
Preamble Mode
Transmit Power Control menu
Use the Modem Router as a WiFi Access Point
To set up the modem router as an AP
Select Advanced Advanced Setup Wireless Access Point
Control Access to the Internet
Select Parental Controls
Set Up Parental Controls
To set up parental controls
Control Access to the Internet
Click the Take me to the status screen button
Allow or Block Access to Your Network
Enable and Manage Network Access Control
To set up network access control
Manage Network Access Control Lists
To add or remove devices that are allowed
Control Access to the Internet 103
Add or Remove Devices from the Blocked List
To add or remove devices that are blocked
Use Keywords to Block Internet Sites
Set Up Blocking
To set up keyword and domain blocking
Select Advanced Security Block Sites
Control Access to the Internet 106
To remove a keyword or domain from the blocked list
Remove a Keyword or Domain from the Blocked List
Remove All Keywords and Domains from the Blocked List
To remove all keywords and domains from the blocked list
Specify a Trusted Computer
To specify a trusted device
To set up a schedule for blocking
Select Advanced Security Schedule
Set Up Security Event Email Notifications
To set up email notifications
Send logs according to this schedule
Field Description Send alerts and logs through e-mail
Send Alert Immediately
Optimize Performance
Select Advanced Setup QoS Setup
Optimize Traffic with QoS
Select the Turn Internet Access QoS On check box
Manage Default and Custom QoS Rules
Add a Custom QoS Rule for a Service or Application
To add a QoS rule for a service or application
From the Applications menu, select Add a new application
Optimize Performance 116
Field Description Specified Port Range
Add a Custom QoS Rule for a Device
To add a QoS rule for a device
Optimize Performance 118
Change a QoS Rule or Change the Priority for a Rule
To change a QoS rule
Remove a QoS Rule
To remove a QoS rule
To remove all QoS rules
Manage Uplink Bandwidth Control
Remove All QoS Rules
Click the OK button Basic Home screen displays
Improve Network Connections with Universal Plug and Play
To manage Universal Plug and Play
Manage Wi-Fi Multimedia Quality of Service
To disable WMM QoS
Settings
Select Advanced Setup Adsl Settings
Manage the Adsl Settings
To view or change the DSL setup
Change the WAN Connection Preference
To change the WAN connection preference
Manage the WAN Security Settings
To change the default WAN security settings
Set Up a Default DMZ Server
To set up a default DMZ server
Manage Igmp Proxying and VPN Pass-Through
Manage NAT Filtering
Enable and Configure a Vlan
To change the default NAT filtering settings
Select Advanced Setup WAN Setup
To enable and configure the Vlan
To change the default SIP ALG setting
Manage the SIP Application-Level Gateway
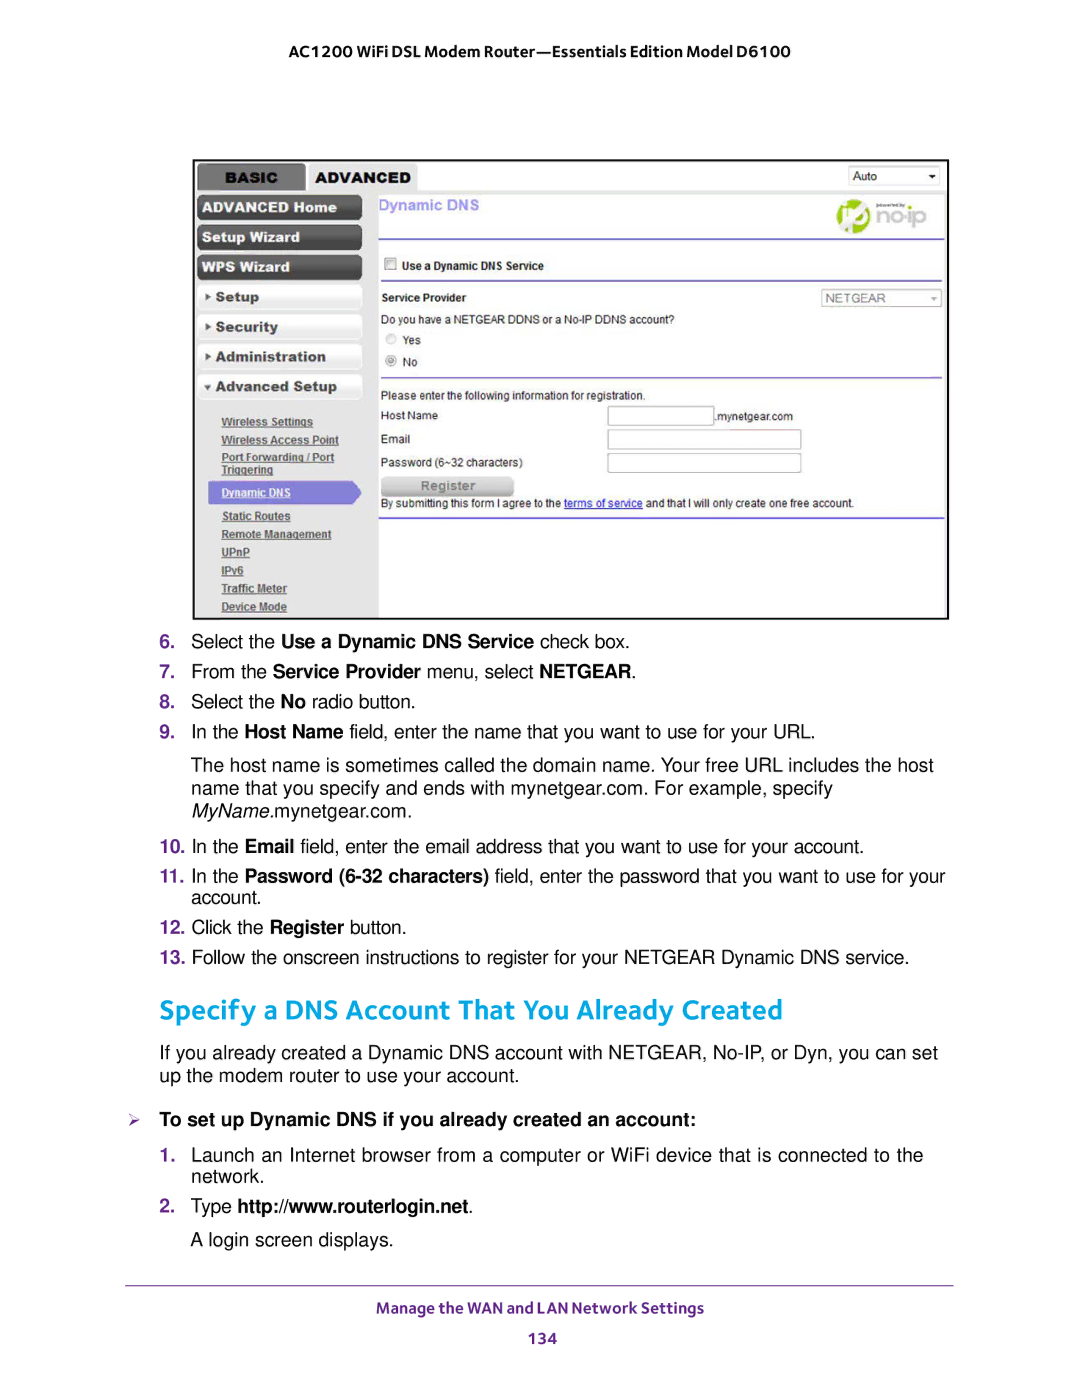
Manage Dynamic DNS
Set Up a New Dynamic DNS Account
Select Advanced Advanced Setup Dynamic DNS
To set up Dynamic DNS if you already created an account
Specify a DNS Account That You Already Created
Manage the Modem Router’s LAN IP Address Settings
Select the Use a Dynamic DNS Service check box
To change the LAN IP address settings
Select Advanced Setup LAN Setup
Manage the Router Information Protocol Settings
To manage the RIP settings
To reserve an IP address
Manage Reserved LAN IP Addresses
Reserve a LAN IP address
To change a reserved IP address entry
Change a Reserved IP Address
Remove a Reserved IP Address Entry
To remove a reserved IP address entry
To change the modem router’s device name
Change the Modem Router’s Device Name
Manage the Dhcp Server Address Pool
Manage the WAN and LAN Network Settings 141
Clear the Use Router as Dhcp Server check box
Disable the Built-In Dhcp Server
To disable the built-in Dhcp server
To set up a static route
Set Up and Manage Custom Static Routes
Set Up a Static Route
Manage the WAN and LAN Network Settings 144
To change a static route
Change a Static Route
Remove a Static Route
To remove a static route
Manage the WAN and LAN Network Settings 146
Manage the Modem Router Monitor the Traffic
To check for new firmware and update your modem router
Update the Firmware of the Modem Router
Check for New Firmware and Update the Modem Router
Manually Upload New Firmware and Update the Modem Router
D6100-V1.0.0.340.0.34.img
Restore the Settings
Manage the Configuration File of the Modem Router
Back Up the Settings
To back up the modem router’s configuration settings
Recover the admin Password
To recover your password
To reset the modem router to factory default settings
Return the Modem Router to Its Factory Default Settings
Use the Reset Button
Erase the Settings
To erase the settings
View the Status and Statistics of the Modem Router
Select Advanced Advanced Home
Manage the Modem Router and Monitor the Traffic 156
Field Description Router Information
Wireless Settings 2.4GHz
Internet Port
Wireless Settings 5.0GHz
Guest Network 2.4GHz
View the Traffic Statistics
Guest Network 5.0GHz
Field or Column Description
Adsl Link
View or Change a TCP/IP Internet Connection
To view or change the TCP/IP Internet connection status
Manage the Modem Router and Monitor the Traffic 162
View or Change a PPPoE or PPPoA Internet Connection
View or Change a Pptp or L2TP Internet Connection
View the Logs
Select Advanced Administration Logs
Manage the Activity Log and Syslog
To manage which activities are logged and view the log
Manage the Modem Router and Monitor the Traffic 166
To manage which activities are logged
Specify Which Activities Are Logged
Specify a Syslog Server
Select Attached Devices
To display the wired and WiFi devices
View Devices Currently on the Network
Monitor and Meter Internet Traffic
Start the Traffic Meter Without Traffic Volume Restrictions
Select Advanced Advanced Setup Traffic Meter
View the Traffic Statistics and Traffic Status
Restrict Internet Traffic by Volume
To record and restrict the Internet traffic by volume
Select the Traffic volume control by radio button
Restrict Internet Traffic by Connection Time
To record and restrict the Internet traffic by time
Unblock the Traffic Meter After the Traffic Limit Is Reached
To unblock the traffic meter
Manage the Modem Router Remotely
To set up remote management
Select Advanced Advanced Setup Remote Management
Select the Turn Remote Management On check box
To configure the modem router as a DSL modem only
Configure the Modem Router as a DSL Modem Only
To use remote access
From the Device Mode menu, select Modem Modem Only
Manage Firewall Rules, Port Forwarding, and Port Triggering
Select Advanced Security Firewall Rules
Add an Outbound Firewall Rule
To add an outbound firewall rule
Allow always
Block always
Block by schedule, otherwise allow
Allow by schedule, otherwise block
Change an Outbound Firewall Rule
To change an outbound firewall rule
Change the Priority of an Outbound Firewall Rule
To change the priority of an outbound firewall rule
Disable or Enable an Outbound Firewall Rule
To enable or disable an outbound firewall rule
Remove an Outbound Firewall Rule
To remove an outbound firewall rule
Select Advanced Security Firewall Rules
Starting Port field
To change a custom service or application
To remove a custom service or application
Following figure shows two entries in the Service Table
AC1200 WiFi DSL Modem Router-Essentials Edition Model D6100
AC1200 WiFi DSL Modem Router-Essentials Edition Model D6100
Click the Add Custom Service button
Change a Port Forwarding Rule
To change a port forwarding rule
Remove a Port Forwarding Rule
To remove a port forwarding rule
Application Example Make a Local Web Server Public
To make a local web server public
Manage Port Triggering for Services and Applications
How the Modem Router Implements the Port Forwarding Rule
Add a Port Triggering Rule
To add a port triggering rule
Inbound Connection
Change a Port Triggering Rule
To change a port triggering rule
AC1200 WiFi DSL Modem Router-Essentials Edition Model D6100
Remove a Port Triggering Rule
To remove a port triggering rule
Specify the Time-Out Period for Port Triggering
Disable Port Triggering
To disable port triggering
To specify the time-out for port triggering
Clear the Disable Port Triggering check box
Application Example Port Triggering for Internet Relay Chat
AC1200 WiFi DSL Modem Router-Essentials Edition Model D6100
Diagnostics and Troubleshooting
Perform a DNS Lookup
Perform Diagnostics
Ping an IP Address
To ping an IP address
Display the Routing Table
To display the routing table
Problem Possible Solution
Quick Tips for Troubleshooting
Reboot the Modem Router from the Web Management Interface
Troubleshoot with the LEDs
Bottom Panel Product Label on
WiFi LED Is Off
Power LED Remains Solid Amber
Power LED Is Off
You Cannot Log In to the Modem Router
Troubleshoot the Internet Connection
Troubleshoot the DSL Link
To check the Internet IP address
Internet LED Is Off
Obtain an Internet IP Address
Troubleshoot PPPoE or PPPoA
To verify that your PPPoE or PPPoA connection is working
Troubleshoot Internet Browsing
Troubleshoot the WiFi Connectivity
Changes Are Not Saved
To ping the modem router from a Windows computer
Troubleshoot Your Network Using the Ping Utility
Test the LAN Path to Your Modem Router
Test the Path from Your Computer to a Remote Device
Supplemental Information
Main WiFi network
Factory Settings
Feature Default Behavior Router login
Internet connection
General WiFi settings
Feature Default Behavior
Guest WiFi network
Technical Specifications
Feature Description
Supplemental Information 221