Page
David BUSCH’S
Associate Director of Marketing
For Cathy
Acknowledgments
About the Author
Contents
Chapter Nikon D7000 Roadmap
Chapter Getting the Right Exposure
Chapter Mastering Autofocus Options 133
Chapter Live View and D-Movies 153
Chapter Advanced Techniques 179
Chapter Setup Playback and Shooting Menus 213
Chapter Setup The Custom Settings Menu 275
Chapter Setup The Setup Menu, Retouch Menu My Menu 311
Page
Chapter Working with Lenses 345
Chapter Making Light Work for You 395
Chapter Useful Software for the Nikon D7000 443
Chapter Nikon D7000 Troubleshooting Prevention 459
Glossary 489 Index 501
Preface
Introduction
Page
David Busch’s Compact Field Guide for the Nikon D7000
Family Resemblance
Who Are You?
Introduction
Page
Who Am I?
Page
Part
David Busch’s Nikon D7000 Guide to Digital SLR Photography
Part I Getting Started with Your Nikon D7000
This page intentionally left blank
Nikon D7000 Thinking Outside of the Box
David Busch’s Nikon D7000 Guide to Digital SLR Photography
First Things First
David Busch’s Nikon D7000 Guide to Digital SLR Photography
Nikon D7000 Thinking Outside of the Box
David Busch’s Nikon D7000 Guide to Digital SLR Photography
Nikon D7000 Thinking Outside of the Box
David Busch’s Nikon D7000 Guide to Digital SLR Photography
Nikon D7000 Thinking Outside of the Box
Initial Setup
Mastering the Multi Selector and Command Dials
OK button
Battery Included
Setting the Clock
Battery and a Spare
Charging the Battery
Final Steps
Mounting the Lens
Dealing with Errors
Adjusting Diopter Correction
Inserting a Secure Digital Memory Card
More about CSM Options in Chapter
Formatting a Memory Card
HOW Many SHOTS?
File Capacity of 8GB Card
Choosing a Release Mode
Nikon D7000 Quick Start
Remote
Shooting Movies
Selecting an Exposure Mode
Choosing a Scene Mode
David Busch’s Nikon D7000 Guide to Digital SLR Photography
Choosing an Advanced Mode
Choosing a Metering Mode
Choosing a Focus Mode
Autofocus/Manual focus switch Autofocus mode button
Choosing the Focus Area Mode
Nikon D7000 Quick Start
Adjusting White Balance and ISO
Other Settings
Making Settings Under LOW Light
Using the Self-Timer
Reviewing the Images You’ve Taken
Using the Built-in Flash
Pop-up flash
Transferring Photos to Your Computer
Changing Default Settings
Resetting the Nikon D7000
Two-Button Reset
Image quality Normal Image Size L Large
Shooting Menu/Custom Settings menu Reset
Flash compensation Off Exposure compensation Off Flash mode
Recommended Default Changes
Custom Settings Menu
Shooting Menu
Nikon D7000 Roadmap
David Busch’s Nikon D7000 Guide to Digital SLR Photography
Nikon D7000 Full Frontal
On/Off
TIP
Lens mount
Nikon D7000 Roadmap
David Busch’s Nikon D7000 Guide to Digital SLR Photography
Nikon D7000’s Business End
David Busch’s Nikon D7000 Guide to Digital SLR Photography
Playback Button
David Busch’s Nikon D7000 Guide to Digital SLR Photography
Menu button
Playing Back Images
Zooming the Nikon D7000 Playback Display
Viewing Thumbnails
Nikon D7000 Roadmap
Working with Calendar View
Working with the Shooting Information/ Photo Data Displays
Using the Shooting Information Display
15 1 2 3 4 5 6 7 8 9 bk bl bm bn bo bp bq br bs
Movie Quality
Using the Photo Data Displays
Focus
Highlights screen RGB histogram screen
Shooting Data 1 screen Data 2 screen
Shooting Data 3 screen GPS data screen
Going Topside
Frame Shutter
Mode dial
David Busch’s Nikon D7000 Guide to Digital SLR Photography
Focal plane indicator
LCD Control Panel Readouts
Exposure
First, in Figure
GPS ISO
Lens Components
Focus ring Autofocus
On/Off switch
Indexing
Looking Inside the Viewfinder
Points
Underneath Your Nikon D7000
Using the MB-D11 Multi-Power Battery Pack/Vertical Grip
False Economy
First, remove the rubber gas- ket covering the contacts
Remove the grip. To remove the grip, reverse these steps
Beyond Basics
David Busch’s Nikon D7000 Guide to Digital SLR Photography
Getting Right Exposure
Getting a Handle on Exposure
Getting the Right Exposure
David Busch’s Nikon D7000 Guide to Digital SLR Photography
Stops and Shutter Speeds
Equivalent Exposures
Correctly Exposed
How the D7000 Calculates Exposure
Stops Versus Stops
Overexposed
Underexposed
WHY the Gray Card CONFUSION?
MODES, MODES, and More Modes
Choosing a Metering Method
Matrix Metering
David Busch’s Nikon D7000 Guide to Digital SLR Photography
Center-Weighted Metering
David Busch’s Nikon D7000 Guide to Digital SLR Photography
Spot Metering
David Busch’s Nikon D7000 Guide to Digital SLR Photography
Choosing an Exposure Method
Aperture-Priority
David Busch’s Nikon D7000 Guide to Digital SLR Photography
Shutter-Priority
Program Mode
Making EV Changes
Manual Exposure
Metering with Older Lenses
Using Scene Modes
117
Adjusting Exposure with ISO Settings
Dealing with Noise
Bracketing
121
White Balance Bracketing
ADL Bracketing
White Balance Bracketing Programs
Bracketing and Merge to HDR
125
David Busch’s Nikon D7000 Guide to Digital SLR Photography
127
Fixing Exposures with Histograms
Displaying Histograms
129
20 This histogram shows an underexposed image
131
David Busch’s Nikon D7000 Guide to Digital SLR Photography
Mastering Autofocus Options
How Focus Works
Phase Detection
135
Improved Cross-Type Focus Point
137
Contrast Detection
Adding Circles of Confusion
David Busch’s Nikon D7000 Guide to Digital SLR Photography
141
Using Autofocus with the Nikon D7000
Autofocus Simplifies Our Lives… Doesn’t It?
Bringing the Multi-CAM 4800DX AF System into Focus
Autofocus Point Selection Overview
Choosing Autofocus Point Selection Mode
Single-Point AF
Dynamic-Area AF
3D-tracking
Autofocus Mode
Autofocus Mode and Priority
Automatic-Area AF
Single-Servo Autofocus AF-S
Continuous-Servo Autofocus AF-C
Automatic Autofocus AF-A
Manual Focus
Autofocus Activation… and More
Trap Auto Focus
Live View and D-Movies
New Perspective of Live View
What You Can Do with Live View
Focus Mode
Metering Mode
Beginning Live View
Focus Area
157
David Busch’s Nikon D7000 Guide to Digital SLR Photography
159
Viewing Live View Information
Introducing Subject-Tracking
Aperture
Live View display with virtual horizon
Shooting in Live View
Shooting Movies with the D7000
What Frame Rate 24 fps or 30 fps?
Viewing Your Movies
Not Much of a Limitation
Editing Your Movies
Saving a Frame
Make a Shooting Script
Tips for Shooting Better Movies
Use Storyboards
Storytelling in Video
171
David Busch’s Nikon D7000 Guide to Digital SLR Photography
173
Lighting for Video
Illumination
Creative Lighting
Lighting Styles
Audio
Tips for Better Audio
This page intentionally left blank
Advanced Techniques
Continuous Shooting
David Busch’s Nikon D7000 Guide to Digital SLR Photography
181
Tiny Slice of Time
183
Working with Short Exposures
185
Long Exposures
Three Ways to Take Long Exposures
Working with Long Exposures
Second expo- sure rendered the passersby almost invisible
David Busch’s Nikon D7000 Guide to Digital SLR Photography
Self-Timer
Delayed Exposures
Time-Lapse/Interval Photography
David Busch’s Nikon D7000 Guide to Digital SLR Photography
Geotagging with the Nikon GP-1
Nikon GP-1 geotagging unit
WiFi
David Busch’s Nikon D7000 Guide to Digital SLR Photography
Focus Stacking
David Busch’s Nikon D7000 Guide to Digital SLR Photography
199
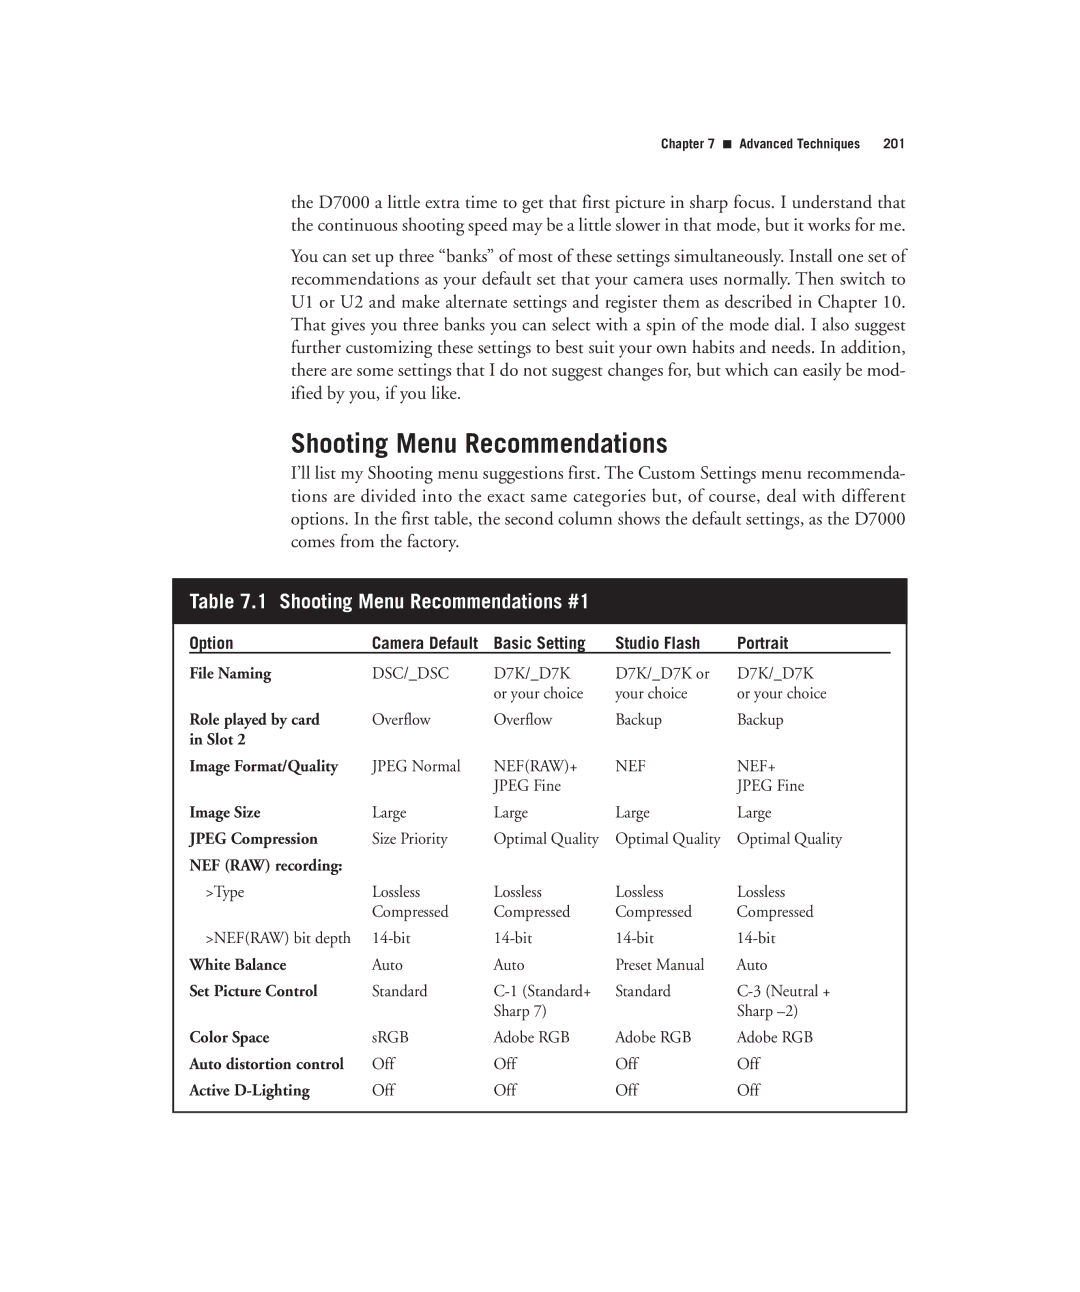
Recommended Customized Settings
Shooting Menu Recommendations
Long Exp. NR
ISO sensitivity settings
Movie Settings
High ISO NR
Custom Settings Menu Recommendations
High ISO NR ISO
Custom Settings Menu Recommendations #1
Timers/AE Lock
D12
D10
D11
D13
Aperture setting
F10
Item Option Sports Indoors
Commander Only
Menus and playback
Advanced Tools
David Busch’s Nikon D7000 Guide to Digital SLR Photography
Setup Playback and Shooting Menus
Anatomy of the Nikon D7000’s Menus
215
Playback Menu Options
Delete
Playback Folder
Hide Image
Display Mode
Copy Images
221
Tip
Image Review
After Delete
Rotate Tall
Slide Show
Print Set Dpof
Shooting Menu Options
Common shooting set- tings can be changed in this menu
Reset Shooting Menu
Storage Folder
Default Shooting Menu Values
File Naming
Entering Text on the Nikon D7000
Use this D7000 screen to enter text
Role Played by Card in Slot
Image Quality
235
RAW+JPEG formats here
Jpeg vs. RAW
David Busch’s Nikon D7000 Guide to Digital SLR Photography
Hidden Jpegs
Jpeg Compression
Image Size
NEF RAW Recording
241
David Busch’s Nikon D7000 Guide to Digital SLR Photography
White Balance
Your two choices look like this
David Busch’s Nikon D7000 Guide to Digital SLR Photography
245
Using Preset Manual White Balance
247
Storing and Retrieving White Balance Settings
249
Set Picture Control
White Balance Library
Choosing a Picture Control Style
Editing a Picture Control Style
253
Filters VS. Toning
255
Manage Picture Control
257
Auto Distortion Control
Color Space
259
David Busch’s Nikon D7000 Guide to Digital SLR Photography
Active D-Lighting
David Busch’s Nikon D7000 Guide to Digital SLR Photography
Long Exp. NR
David Busch’s Nikon D7000 Guide to Digital SLR Photography
High ISO NR
ISO Sensitivity Settings
267
Multiple Exposure
Movie Settings
Interval Timer Shooting
Sequence
Tip
Remote Control Mode
Pause or Cancel Interval Shooting
This page intentionally left blank
Setup The Custom Settings Menu
Custom Settings Menu Layout
Reset Custom Settings
Default Custom Settings Values Autofocus
Default Custom Settings Bank Values Timers/AE Lock
Default Custom Settings Bank Values Shooting/Display
Default Custom Settings Bank Values Bracketing/Flash
Autofocus
A1 AF-C Priority Selection
A2 AF-S Priority Selection
A3 Focus Tracking with Lock-on
A4 AF Point Illumination
A5 Focus Point Wrap-Around
A6 Number of Focus Points
A8 Live View/Movie AF
A7 Built-in AF-Assist Illuminator
Metering/Exposure
B1 ISO Sensitivity Step Value
B2 EV Steps for Exposure Cntrl
B3 Easy Exposure Compensation
B4 Center-Weighted Area
B5 Fine-Tune Optimal Exposure
Timers/AE Lock
C1 Shutter Release Button AE-L
C2 Auto Meter-Off Delay
C3 Self-Timer
C4 Monitor Off Delay
Shooting/Display
C5 Remote on Duration
Turn off modeling flash. Set CSM #e4 to Off
D1 Beep
D2 Viewfinder Grid Display
D3 ISO Display and Adjustment
D4 Viewfinder Warning Display
D6 CL Mode Shooting Speed
D5 Screen Tips
D7 Max. Continuous Release
D8 File Number Sequence
HOW Many SHOTS, REALLY?
D9 Information Display
D10 LCD Illumination
D14 Battery Order
D11 Exposure Delay Mode
D13 MB-D11 Battery Type
D12 Flash Warning
Bracketing/Flash
E1 Flash Sync Speed
E2 Flash Shutter Speed
E3 Flash Cntrl for Built-in Flash
E4 Modeling Flash
E5 Auto Bracketing Set
E6 Bracketing Order
Controls
F2 OK Button Shooting Mode
F1 Illuminator Switch
F3 Assign Fn. Button
David Busch’s Nikon D7000 Guide to Digital SLR Photography
F4 Assign Preview Button
F5 Assign AE-L/AF-L Button
F6 Customize Command Dials
F7 Release Button to Use Dial
F8 Slot Empty Release Lock
F9 Reverse Indicators
F10 Assign MB-D11 AE-L/AF-L Button
Setup The Setup Menu, Retouch Menu, and My Menu
Setup Menu Options
Hdmi
Save User Settings
Format Memory Card
Clean Image Sensor
Reset User Settings
LCD Brightness
Setup The Setup Menu, Retouch Menu, and My Menu
Video Mode
Lock Mirror Up for Cleaning
Flicker Reduction
Time Zone and Date
Auto Image Rotation
Language
Image Comment
Image Dust Off Ref Photo
Wireless Transmitter
Battery Info
Copyright Information
Save/Load Settings
GPS
Virtual Horizon
Non-CPU Lens Data
AF Fine Tune
Eye-Fi Upload
Firmware Version
Retouch Menu Options
Retouch menu allows simple in- camera editing
Lighting
Red-Eye Correction
Trim
Trim Sizes
Color Balance
Monochrome
Filter Effects
Image Overlay
David Busch’s Nikon D7000 Guide to Digital SLR Photography
NEF RAW Processing
Tip
Resize
Quick Retouch
Straighten
Distortion Control
Fisheye
Color Outline
Perspective Control
Miniature Effect
David Busch’s Nikon D7000 Guide to Digital SLR Photography
Side-by-Side Comparison
To use Side-by-Side Comparison
Edit Movie
Using My Menu
David Busch’s Nikon D7000 Guide to Digital SLR Photography
Working with Lenses
Sensor Sensibilities
David Busch’s Nikon D7000 Guide to Digital SLR Photography
Crop or Not?
Your First Lens
349
Buy Now, Expand Later
351
David Busch’s Nikon D7000 Guide to Digital SLR Photography
What Lenses Can You Use?
Ingredients of Nikon’s Alphanumeric Soup
355
David Busch’s Nikon D7000 Guide to Digital SLR Photography
What Lenses Can Do for You
David Busch’s Nikon D7000 Guide to Digital SLR Photography
359
Zoom or Prime?
361
An 85mm f/1.4 lens was perfect for this hand- held photo
Using Wide-Angle and Wide-Zoom Lenses
Categories of Lenses
Field of View at Various Focal Lengths
Tectural photos
DOF in Depth
Avoiding Potential Wide-Angle Problems
David Busch’s Nikon D7000 Guide to Digital SLR Photography
Using Telephoto and Tele-Zoom Lenses
Wide f/stop helped isolate the statue from its background
Avoiding Telephoto Lens Problems
David Busch’s Nikon D7000 Guide to Digital SLR Photography
Telephotos and Bokeh
Add-ons and Special Features
Lens Hoods
Telephoto Converters
Macro Focusing
377
Vibration Reduction
Vibration Reduction in the Camera or in the LENS?
Your Second and Third… Lens
Magic Three
Original Magic Three
FULL-FRAME FOLLY?
New Magic Three
David Busch’s Nikon D7000 Guide to Digital SLR Photography
Fine-Tuning the Focus of Your Lenses
Correct focus top, front focus middle, and back focus bottom
Lens Tune-up
Evaluate Current Focus
22 Use this focus test chart, or create one of your own
David Busch’s Nikon D7000 Guide to Digital SLR Photography
Changing the Fine-Tuning Setting
Set Default Value
393
This page intentionally left blank
Making Light Work for You
Continuous Illumination versus Electronic Flash
397
David Busch’s Nikon D7000 Guide to Digital SLR Photography
399
Electronic flash can freeze almost any action
Continuous Lighting Basics
Daylight
Incandescent/Tungsten Light
Fluorescent Light/Other Light Sources
Adjusting White Balance
Electronic Flash Basics
Determining Exposure
Guide Numbers
How Electronic Flash Works
Typical Electronic Flash Sequence
David Busch’s Nikon D7000 Guide to Digital SLR Photography
Choosing a Flash Sync Mode
David Busch’s Nikon D7000 Guide to Digital SLR Photography
413
Ghost Images
Avoiding Sync Speed Problems
Every Which WAY, Including UP
David Busch’s Nikon D7000 Guide to Digital SLR Photography
High-Speed FP Sync
Working with Nikon Flash Units
Nikon SB-900
Nikon D7000 Built-in Flash
Nikon SB-700
Nikon SB-600
Nikon SB-400
Nikon SB-R200
Using Zoom Heads
Flash Techniques
Zoom Head Equivalents for DX Mode
Flash Modes
425
Burn OUT
Working with Wireless Commander Mode
Setting Commander Mode for the D7000’s Built-in Flash
David Busch’s Nikon D7000 Guide to Digital SLR Photography
Setting Commander and Remote Modes for the SB-900
Connecting External Flash
Diffusing and Softening the Light
Using Flash Exposure Compensation
More Advanced Lighting Techniques
David Busch’s Nikon D7000 Guide to Digital SLR Photography
Fill flash brightened up the shadows in this photo
David Busch’s Nikon D7000 Guide to Digital SLR Photography
Basic Flash Setups
Using Multiple Light Sources
Studio Flash
David Busch’s Nikon D7000 Guide to Digital SLR Photography
Connecting Multiple Non-Dedicated Units to Your Nikon D7000
Light Stands
Other Lighting Accessories
Soft Boxes
Backgrounds
Snoots and Barn Doors
25 Soft boxes provide a diffuse
Page
Enhancing Your Experience
David Busch’s Nikon D7000 Guide to Digital SLR Photography
Useful Software for the Nikon D7000
Nikon’s Applications and Utilities
Nikon View NX
Nikon Transfer
David Busch’s Nikon D7000 Guide to Digital SLR Photography
Nikon Capture NX2
Capture NX2’s tools are arranged in dockable palettes
Control Points are used to make common adjustments
Nikon Camera Control Pro
Other Software
Phase One Capture One Pro C1 Pro
DxO Optics Pro
Bibble Pro
BreezeBrowser Pro
BreezeSystems NKRemote
Photoshop/Photoshop Elements
455
David Busch’s Nikon D7000 Guide to Digital SLR Photography
457
David Busch’s Nikon D7000 Guide to Digital SLR Photography
Nikon D7000 Troubleshooting Prevention
Battery Powered
Keeping Track of Your Batteries and Memory Cards
Upgrading Your Firmware
When to Upgrade Your Firmware
Why Three Firmware Modules?
How It Works
Getting Ready
View your cur- rent firmware versions before upgrading
Updating from a Card Reader
Updating with a USB Connection
Starting the Update
Turn the camera off when update is
Protect Your LCD
Troubleshooting Memory Cards
All Your Eggs in One Basket?
Extreme Backup
Preventive Measures
David Busch’s Nikon D7000 Guide to Digital SLR Photography
What Can Go Wrong?
What Can You Do?
Ultimate Irony
Diminishing Returns
David Busch’s Nikon D7000 Guide to Digital SLR Photography
Clean Your Sensor
Dust the FAQs, Ma’am
Can see dust on my mirror. How can I remove it?
Identifying and Dealing with Dust
Never see any dust on my sensor. What’s all the fuss about?
Avoiding Dust
Use a robust air bulb for clean- ing your sensor
Sensor Cleaning
483
Air Cleaning
Brush Cleaning
Liquid Cleaning
David Busch’s Nikon D7000 Guide to Digital SLR Photography
Tape Cleaning
Magnifier Assisted Cleaning
David Busch’s Nikon D7000 Guide to Digital SLR Photography
Glossary
David Busch’s Nikon D7000 Guide to Digital SLR Photography
Glossary
David Busch’s Nikon D7000 Guide to Digital SLR Photography
Exif See exchangeable image file format Exif
David Busch’s Nikon D7000 Guide to Digital SLR Photography
Glossary
David Busch’s Nikon D7000 Guide to Digital SLR Photography
Glossary
David Busch’s Nikon D7000 Guide to Digital SLR Photography
Glossary
David Busch’s Nikon D7000 Guide to Digital SLR Photography
AA Auto Aperture flash, 425 AC adapters
Non-TTL auto flash, 425 a Aperture-priority mode
Accessory shoe, 75-76 cover
Action-stopping. See freezing action Active D-Lighting
AEB automatic exposure bracketing
Adobe Premiere Elements, 167 Adobe RGB
Adorama
AF-A automatic AF
Aperture. See also f/stops
Audio/video cable, 8 audio/video port, 54-55 auto-area AF
Battery chargers, 8 Battery grips, 13, 50-51, 89-92
Beach/Snow mode, 30, 117 beep indicator
Backing up images on memory cards Backlighting
Body caps
Bellows extension, 377 Bibble Pro
Black body radiators
Brightness histograms
Calendar view, working in, 64-65 calibrating
Camera user settings
Cables. See also USB cables
Camera shake. See also vibration reduction
Comments
Color temperature, 244-245. See also WB white balance
Colormunki, X-Rite Commander mode
Computers. See also transferring images to computer
Corel Photo Paint, 450 Corel Video Studio, 167 cost
Contrast
Contrast detection, 138-139 control panel
Cropping. See also crop factor
Lighting. See also Active D-Lighting
Degrees Kelvin
DOF depth-of-field button
DOF depth-of-field
Exif information, software for, 297 Expeed
Eyepiece cap
Exposure modes, 104. See also Advanced modes Scene modes
Eyecup Eyeglasses, diopter correction for, 20 eyepiece
Stops. See also aperture
Fill flash/fill light
Fine-tuning focus of lenses
Flash mode button
Finelight Studios, 395 firmware
Flash modes
Flexible Program, 114-115. See also P Program mode
Flicker Reduction options, Setup menu Flickr
Flip-up hoods for LCD, 469 fluorescent light
Folders. See also folder names Playback folder
Focus tracking
Foggy images with telephoto lenses Folder names
Food mode, 30, 118 foregrounds
HDTV. See also Hdmi
Guide numbers GN
HDR High Dynamic Range
Highlights display, 69
Image Recall, 476 image size
Interval timer
IX lenses
Filter holders, 384 lighting gels
Long exposures, 186-190. See also long exposure noise
Live View information display
Longitudinal/axial chromatic aberration
Magnifying eyepiece, 13 main command dial, 15
Maximum aperture
MF manual focus
Modeling light, 406 monitor-off delay
Menu button, 14, 47-48, 58-59 Menus
Micro lenses, 357 microphone
Multiple light sources
Multiple exposures
MUP. See mirror lock-up MUP My Menu
Nikon Capture NX2, 12
Nikon SB-700. See also Commander mode
Nikon SB-900, 12. See also Commander mode
Nikon Creative Lighting System CLS 422
Phase One Capture Pro C1Pro Photo data displays
Program mode
Pet Portrait mode, 30, 117 phase detection
Photo Rescue 2 Photographic Solutions
Pinnacle Studio, 167 pixel density
Power. See also batteries
Power switch, 76-77 pre-flash
Pixels. See also sensors
RAW utilities. See also Adobe Camera Raw Nikon ViewNX
Recent Settings
RAW formats
RAW+JPEG format
Release priority, 34, 282 remaining shots
Remote control cable, 12 remote mirror up
Retouch indicator
Repeating flash RPT
Self-timer lamp Sensor Brush Sensor cleaning, 477
Save User Settings options, setup menu Saving
Secure Digital cards. See memory cards self-timer
RGB histograms, 69, 71
Sharpness
Sepia toning effects, 253, 255 setup
Setup menu
Shooting menu
Silhouette effect
Shutter speed. See also sync speed
Silent Wave motor, 350, 355
Sizing/resizing. See also cropping image size
Spyder products, Datacolor, 261 sRGB
Sub-command dial, 15
Spot metering, 32
Subject-tracking AF
Television. See also Hdmi
Taking aperture, 84-85 Tamron
Telephoto lenses, 358-359
Text, entering, 232-233, 318 third-party vendors
ViewNX 2. See Nikon ViewNX 2 vignetting
TTL through the lens
Virtual horizon
Wedding photography
Wide-area AF Wide-zoom lenses. See wide-angle lenses WiFi
WB white balance button, 58-59 WBB white balance bracketing
Wein Safe Sync White, John
Zoom heads
Zoom in button, 58-59 zoom lenses
We’ve got your shot covered
NEW