Reference Manual
Special Effects Mode
Let your camera take over
It’s easy to record beautiful movies
Add special effects to capture truly unique shots
Page
Read This First
Introduction
About This Manual
Iii
Icon
Other Information
Reference Section, F Technical Notes and Index
Use Only Nikon Brand Electronic Accessories
Information and Precautions
Life-Long Learning
Before Taking Important Pictures
About the Manuals
Items prohibited by law from being copied or reproduced
Vii
Comply with copyright notices
Disposing of Data Storage Devices
Viii
For Your Safety
Observe caution when handling batteries
Keep out of reach of children
Use appropriate cables
Observe caution when using
Xii
Do not operate the flash with
Flash window touching a
Xiii
Experienced radio/television technician for help
Xiv
Following apply only to users in European countries
Table of Contents
Xvi
Xvii
Xviii
F16
F20
F21
Using Menus dButton
Camera Body
Monitor
Playback a
Camera Body
Lens
15, E85
Ashooting mode button
Multi selector Apply selection button
Lens Cap
Attaching the Camera Strap and Lens Cap
Remove the lens cap before you take a picture
Raising and Lowering the Flash
Press Hor Ito select the desired menu icon
Using Menus dButton
Press the kbutton
Settings for the item you selected are displayed
Press Hor Ito select a setting
Press Hor Ito select an item in the menu
Shooting Mode
Monitor
21, 96, E86
65, E31
Number of exposures remaining
22, E32
Playback Mode
9999/9999
Sequence display when Individual
Current image number
Page
Playback
Preparation 3 Set the Display Language, Date, and Time
Open the battery-chamber/memory card slot Cover
Close the battery-chamber/memory card slot Cover
Preparation 1 Insert the Batteries
Applicable Batteries
Battery Type
AC Power Source
Removing the Batteries
Alkaline Batteries
Preparation 2 Insert a Memory Card
Insert a memory card
Inserting a Memory Card
Slide the memory card in until it clicks into place
High Temperature Caution
Turn the camera off and be sure that the power-on lamp
Internal Memory and Memory Cards
Removing the Memory Card
Press the power switch to turn on the camera
Press the multi selector Hor Ito
Select the desired language and then Press the kbutton
Press Hor Ito select Yes and then press the kbutton
Basics
When Easy auto mode is displayed, press the kbutton
Clock Battery
Changing the Language Setting and the Date and Time Setting
Imprinting the Shooting Date in Printed Images
Battery Level Indicator
Battery level indicator
Turn the Camera On
Number of Exposures Remaining
Power Saving Function Auto Off
Turning the Camera On and Off
Remove the lens cap and turn the camera on
Basics of Shooting and Playback Camera enters
Select a Shooting Mode
Press the Abutton
Changing Settings When Shooting
Available Shooting Modes
Shooting mode icon
Frame a Picture
Hold the camera steady
Frame the picture
When Using a Tripod
Using the Zoom
Digital Zoom and Interpolation
Press the shutter-release button halfway A29
Focus and Shoot
Shutter is released and the image is saved
AF-assist Illuminator and Flash
Shutter-release Button
To Make Sure You Do Not Miss a Shot
Play Back Images
Press the cplayback button
Use the multi selector to select an image to
Display
Viewing Images
More Information
Playback Zoom a
Thumbnail Display, Calendar Display a
Basics
Delete Images
Shooting and Playback
Deleting the Last Image Captured While in Shooting Mode
Operating the Erase Selected Images Screen
Deleting Images in a Sequence
To undo the selection, press I to remove c
Page
Smart Portrait Mode Capturing Smiling Faces
Features That Can Be Set Using the Multi Selector
Features That Cannot Be Used Simultaneously Focusing
Special Effects Mode Applying Effects When Shooting
GEasy Auto Mode
Changing GEasy Auto Mode Settings
Automatic Scene Selection
One image is captured at a slow shutter speed
Scene Mode Shooting Suited to Scenes
Changing Scene Mode Settings
Backlighting
Easy panorama Pet portrait 3D photography
Characteristics of Each Scene
To View a Description of Each Scene
Page
HSunset
IDusk/dawn
Shooting using a tripod to stabilize the camera
MFireworks show Shutter speed is fixed at four seconds
Page
Page
Focus Area
Pet Portrait Auto Release
Be detected or other subjects may be framed by a border
Movies cannot be recorded in 3D Shooting Features
Playing Back 3D Images
Icon of the last effect selected is displayed
Old photograph
Changing Special Effects Mode Settings
Slider
Smart Portrait Mode Capturing Smiling Faces
Set Smile timer a 65, E41 to Off
Stop shooting
Turn the camera off
Changing Smart Portrait Mode Settings
Auto Off When Using Smile Timer
When the Self-timer Lamp Flashes
Features That Cannot Be Used Simultaneously
Using Skin Softening
AAuto Mode
Changing AAuto Mode Settings
Features That Can Be Set Using the Multi Selector
Available Features
Macro mode
Geasy Scene Special Smart Aauto Auto
Press the mflash pop-up button
Using the Flash Flash Modes
Then press the kbutton
Available Flash Modes
Flash Mode Setting
Lowering the Flash
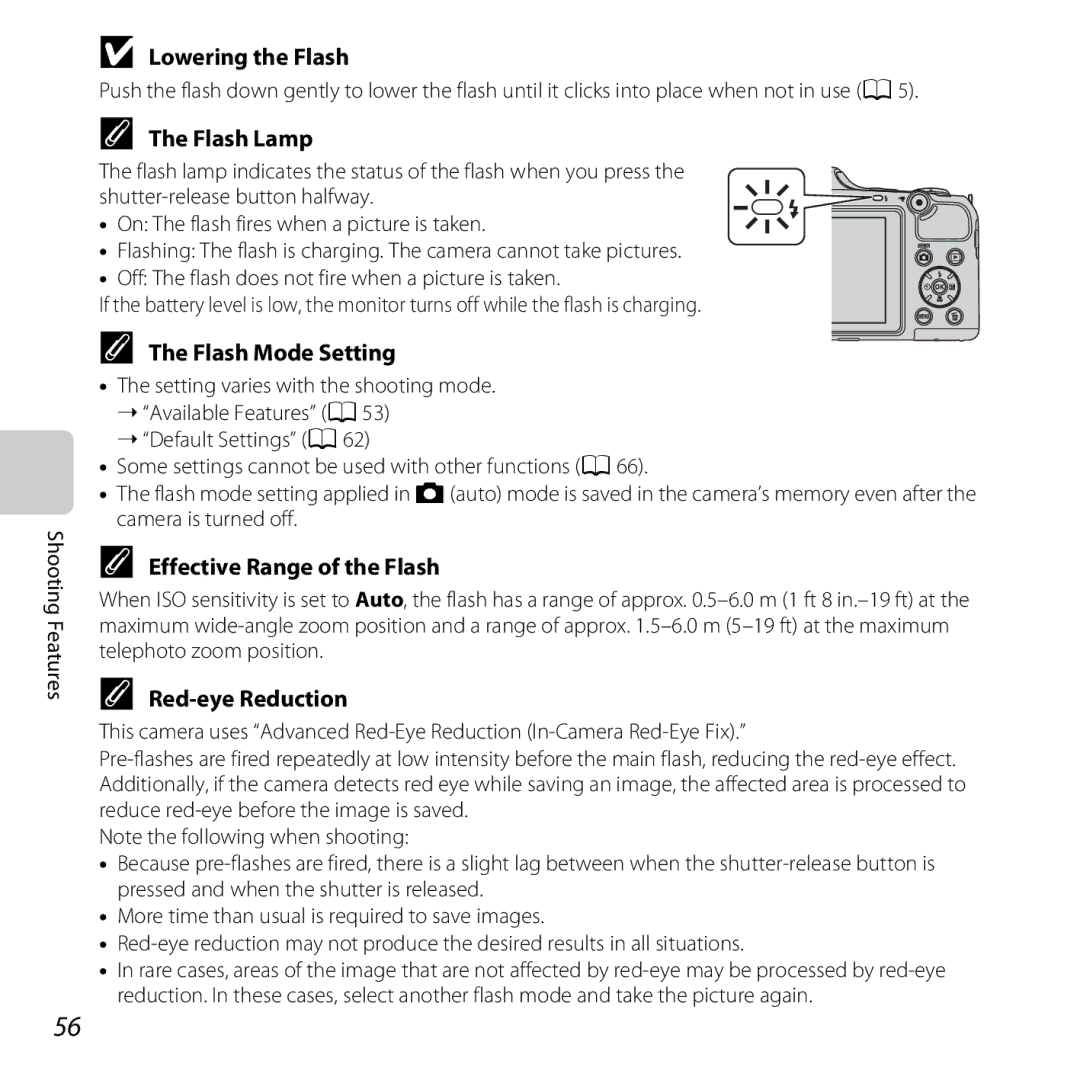
Flash Lamp
Effective Range of the Flash
Focus and exposure are set Shooting Features
Using the Self-timer
Kbutton
Press the shutter-release button the rest of the way down
Using the Self-timer With Continuous Shooting
Image is captured
Using Macro Mode
From the lens Shooting Features
Macro Mode Setting
Autofocus
Adjusting Brightness Exposure Compensation
You can adjust overall image brightness
Press the kbutton to apply the compensation value
Press the shutter-release button to take a picture
Default Settings
Default settings for each shooting mode are described below
Flash1 Self-timer Macro Exposure
Off Off6
Flash1 Self-timer Macro Exposure Compensation
Easy auto Scene Special Smart Auto mode Mode
White balance Continuous
Available Shooting Menus
Daylight, Incandescent, Fluorescent, Cloudy, and Flash
120 fps, Continuous H 60 fps, BSS, and Multi-shot
Sepia, and Cyanotype
Certain features cannot be used simultaneously
Features That Cannot Be Used Simultaneously
Fps, Continuous H 60 fps, or BSS is selected
Than Auto, Motion detection is disabled
Using Face Detection
Focusing
Detection to automatically focus on people’s faces
Shooting Features
Focus Lock
Subjects Not Suitable for Autofocus
Page
Playback Features
Using ViewNX
Playback Zoom
Playback Zoom
Thumbnail Display, Calendar Display
Full-frame display
With softer facial skin tones
Filter effects1
Print order3
Memory card in an automatic slide show Protect
Option Description
Connecting the Camera to a TV, Computer, or Printer
Insert the plug straight Playback Features
Page
Using ViewNX
Installing ViewNX
Compatible Operating Systems
Windows
Start the installer
Download the software
Follow the on-screen instructions to install the software
Remove the ViewNX 2 CD-ROM from the CD-ROM drive
Connecting the USB Cable
When using Windows
Transferring Images to the Computer
Choose how images will be copied to the computer
Terminate the connection
Transfer images to the computer
Click Start Transfer
Start ViewNX
Viewing Images
Starting ViewNX 2 Manually
Page
Recording
Recording Movies Playing Back Movies
Playing Back Movies
Recording Movies
Display the shooting screen
Lower the flash A5
Press the bemovie-record button to start movie recording
Camera Temperature
Functions Available with Movie Recording
Maximum Movie Recording Time E55 File and Folder Names E83
Autofocus mode
Movie options
Select the movie type
Select ASingle AF
Deleting Movies
Playing Back Movies
Recording and Playing Back Movies Movie options
Functions Available During Playback
Adjusting Volume
Use the zoom control during playback
Page
General Camera Setup
Setup
Displayed when the camera is turned on
Monitor settings
Image review, and monitor brightness settings
Motion is detected when shooting still images AF assist
Battery type
Eye-Fi card Reset all
Inserted in the camera
Page
Shooting Menu for AAuto Mode
Using Easy Panorama Shooting and Playback
Shooting with Easy Panorama
Select Normal 180 or Wide 360 as
Shooting range, and then press the kbutton
Example of camera movement
Iis displayed to indicate the direction of camera movement
Page
Using the controls displayed at the top in the monitor
Viewing Images Captured with Easy Panorama
Viewing Images in a Sequence
Continuous L
Kbutton to display each image in a sequence
Displayed. To display images in a sequence as thumbnails
Sequence Display Options
Playback Menu Options Available When Using Sequence
Changing Key Picture in Sequence
Deleting Images in a Sequence
Editing Still Images
Editing Features
Miniature effect, Painting, and Toy camera effect
E10
Restrictions on Image Editing
Filter effects Used together Skin softening
Function can be used
Quick Retouch Enhancing Contrast and Saturation
Button
E11
Original and Edited Images
Lighting Enhancing Brightness and Contrast
E12
Skin Softening Softening Skin Tones
Check the preview of the copy and then press
E13
File and Folder Names E83 Reference Section
Filter Effects Applying Digital Filter Effects
E14
E15
Adjust the effect and then press the kbutton
Example Soft
Select Yes and then press the kbutton
Small Picture Reducing the Size of an Image
E16
Crop Creating a Cropped Copy
Refine copy composition
Press the dbutton
E17
E18
Image Size
Editing Movies
Press Hor Ito select the Mcontrol choose start point
Press Hor Ito select Nchoose end point
E19
E20
Edited movie is saved
When using the included audio/video cable
When using a commercially available Hdmi cable
Turn off the camera Connect the camera to the TV
E21
Using a TV Remote Control Hdmi Device Control
Set the TV’s input to external video input
Hold down the cbutton to turn on the camera
E22
E23
Connecting the Camera to a Printer Direct Print
Print order option E42
Connecting the Camera to a Printer
Check printer settings
Turn off the camera Turn on the printer
E24
Turn on the camera
E25
Select Copies and then press the kbutton
Printing Individual Images
E26
Select Paper size and then press the kbutton
Select the desired paper size and then press
Select Start print and then press
Printing begins
Printing Multiple Images
Select the desired paper size and then press the kbutton
E28
To exit the print menu, press the d button
Press the k button when setting is complete
E29
Paper Size
E30
Dpof printing
Image Mode Image Size and Quality
Shooting Menu for AAuto Mode
E31
E32
Number of Images That Can Be Saved
White Balance Adjusting Hue
Enter Aauto mode Mdbutton MWhite balance Mkbutton
Option Description AAuto default setting
E33
Using Preset Manual
Select Measure
E34
Camera zooms in to the position for measuring white balance
Press the kbutton to measure a value for preset manual
Frame the reference object in the measuring
Window
E35
Continuous Shooting
E36
Images Captured Using Continuous Shooting
E37
When lighting is dim
ISO Sensitivity
E38
Option Description AAuto
Color Options
E39
Skin Softening
Smart Portrait Menu
E40
Smile Timer
Enter smart portrait mode Mdbutton MBlink proof Mkbutton
Blink Proof
E41
Print Order Creating a Dpof Print Order
Playback Menu
E42
Copies up to nine of each
Select images up to 99 and the number
E43
E44
Canceling Existing Print Order
Print Date
Slide Show
Slide show begins
End the slide show or restart it
E45
Protect
E46
Image Selection Screen
Press the multi selector Jor K to select an image
Press Hor Ito select or deselect or to
Specify the number of copies
Press the kbutton to apply image selection
E48
Rotate Image
E49
Copy Copy Between Internal Memory and Memory Card
Use the multi selector to select a destination
Select a copy option and then press
E50
Copying Images in a Sequence
E51
If Memory contains no images. Is Displayed
Choose Key Picture
Sequence Display Options
E52
Movie Menu
Movie Options
Normal Speed Movie Options
E53
HS Movie Options
E54
E55
Maximum Movie Recording Time
Recording Movies in Slow Motion and Fast Motion HS Movie
Press the bemovie-record button to start recording
Press the bemovie-record button to end recording
E56
When jHS 1080/0.5× is selected
E57
HS Movie
Recorded movies are played back at about 30 fps
Wind Noise Reduction
Autofocus Mode
E58
Setup Menu
Welcome Screen
E59
Dbutton Mzmenu icon MWelcome screen Mkbutton
E60
Time Zone and Date
Day/Month/Year
Select xTravel destination and then press the kbutton
Selecting the Travel Destination Time Zone
E61
Press Jor Kto select the travel destination time zone
E62
WHome Time Zone
Daylight Saving Time
Photo Info
Monitor Settings
E63
Battery Level
E64
Addition to information shown
Movie frame+auto info In addition to information shown
E65
Print Date Imprinting Date and Time
Dbutton Mzmenu icon MPrint date Mkbutton
E66
Print Date and Print Order
E67
Vibration Reduction
Dbutton Mzmenu icon MVibration reduction Mkbutton
E68
Motion Detection
Dbutton Mzmenu icon MMotion detection Mkbutton
E69
AF Assist
Under dim lighting
When using Sports a 38, Museum a 41, Easy panorama a
Sound Settings
E70
When the Monitor Has Turned Off to Save Power
Auto Off Setting
Auto Off
E71
Format Memory/Format Card
Formatting the Internal Memory
Formatting Memory Cards
E72
E73
Language
Italian
E74
TV Settings
Hdmi and HDMI-CEC
Portrait A38 or Night portrait A39 scene mode
Blink Warning
E75
Blink? screen is displayed in the monitor
Blink Warning Screen
E76
Eye-Fi Upload Indicator
Eye-Fi upload is set to Disable
Eye-Fi Upload
E77
Reset All
Scene Mode
Special Effects Mode
E78
Setup Menu
E79
Smart Portrait Menu
Shooting Menu
Others
E80
Playback menu Choose key picture E52
E81
Battery Type
Firmware Version
E82
Lithium FR6/L91 AA-size lithium batteries Reference Section
E83
File and Folder Names
Images and movies are assigned file names as follows
E84
Optional Accessories
E85
Error Messages
Error accessing Eye-Fi card Card is locked
E86
Hot
E87
Photography
E88
E89
E90
E91
E92
Technical Notes and Index
Technical Notes and Index
Caring for the Product
Camera
Spare Batteries
Batteries
Charging Batteries
Battery Terminals
Remaining Battery Charge
Charging Rechargeable Batteries
Cold Environment Usage
Memory Cards
Cleaning and Storage
Cleaning
Do not use alcohol, thinner, or other volatile chemicals
Body
Storage
Troubleshooting
Power, Display, Settings Issues
Not respond
96, E71
Select Show info
Hide info is selected for Photo info
Support Print date
Shooting Issues
F10
Pressed
36, 40
When Portrait, Night portrait, Night
Off is selected for Sound settings Shutter
F11
On, Easy panorama, Pet portrait, or 3D
Problem Cause/Solution AF-assist illuminator does
F12
Eye are corrected
Vauto with red-eye reduction and try taking a Picture again
When Night portrait , Night landscape , or
Playback Issues
F13
F14
Displayed Internal memory
F15
Cannot be printed
F16
Specifications
Nikon Coolpix L820 Digital Camera
F17
F18
Specifications
Operating environment Temperature 0C-40C 32F-104F Humidity
F19
Products Association Cipa
Approved Memory Cards
F20
F21
Supported Standards
AVC Patent Portfolio License
Trademark Information
F22
FreeType License FreeType2 MIT License Harfbuzz
Symbols
Index
Numerics
F23
F24
Technical Notes and Index Black and white copy n
F25
F26
Power switch/power-on lamp.. , 22
Pet portrait auto release
F27
Skin softening........ , 76, E13, E40
F28
Page
CT2L0211