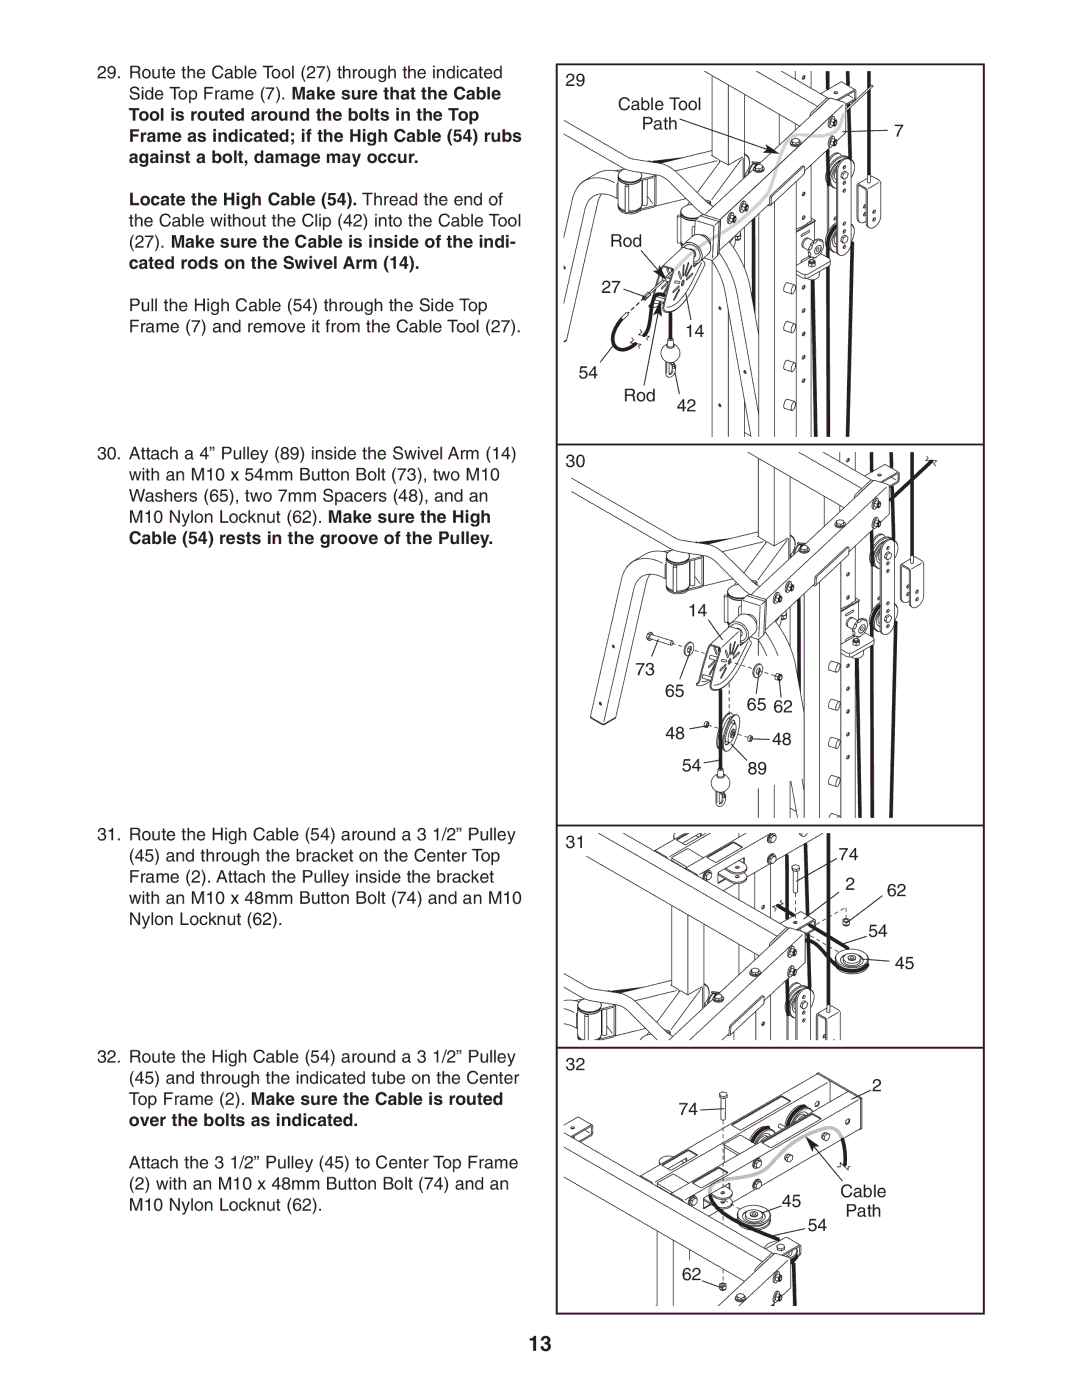
29. Route the Cable Tool (27) through the indicated | 29 |
|
|
|
|
Side Top Frame (7). Make sure that the Cable |
|
|
|
| |
Cable Tool |
|
|
| ||
Tool is routed around the bolts in the Top |
|
|
| ||
Path |
|
| 7 | ||
Frame as indicated; if the High Cable (54) rubs |
|
| |||
|
|
|
| ||
against a bolt, damage may occur. |
|
|
|
|
|
Locate the High Cable (54). Thread the end of |
|
|
|
|
|
the Cable without the Clip (42) into the Cable Tool |
|
|
|
|
|
(27). Make sure the Cable is inside of the indi- | Rod |
|
|
|
|
cated rods on the Swivel Arm (14). |
|
|
|
|
|
Pull the High Cable (54) through the Side Top | 27 |
|
|
|
|
|
|
|
|
| |
Frame (7) and remove it from the Cable Tool (27). |
| 14 |
|
|
|
| 54 |
|
|
|
|
| Rod | 42 |
|
|
|
|
|
|
|
| |
30. Attach a 4” Pulley (89) inside the Swivel Arm (14) | 30 |
|
|
|
|
with an M10 x 54mm Button Bolt (73), two M10 |
|
|
|
| |
|
|
|
|
| |
Washers (65), two 7mm Spacers (48), and an |
|
|
|
|
|
M10 Nylon Locknut (62). Make sure the High |
|
|
|
|
|
Cable (54) rests in the groove of the Pulley. |
|
|
|
|
|
|
| 14 |
|
|
|
| 73 |
|
|
|
|
|
| 65 | 65 62 |
|
|
|
|
|
|
| |
|
| 48 | 48 |
|
|
|
|
|
|
| |
|
| 54 | 89 |
|
|
31. Route the High Cable (54) around a 3 1/2” Pulley | 31 |
|
| 74 |
|
(45) and through the bracket on the Center Top |
|
|
| ||
|
|
|
| ||
Frame (2). Attach the Pulley inside the bracket |
|
|
| 2 | 62 |
with an M10 x 48mm Button Bolt (74) and an M10 |
|
|
| ||
|
|
|
| ||
|
|
|
|
| |
Nylon Locknut (62). |
|
|
| 54 | |
|
|
|
| ||
|
|
|
|
| 45 |
32. Route the High Cable (54) around a 3 1/2” Pulley | 32 |
|
|
|
|
(45) and through the indicated tube on the Center |
|
|
|
| |
|
|
| 2 |
| |
Top Frame (2). Make sure the Cable is routed |
|
|
|
| |
| 74 |
|
|
| |
over the bolts as indicated. |
|
|
|
| |
|
|
|
|
| |
Attach the 3 1/2” Pulley (45) to Center Top Frame |
|
|
|
|
|
(2) with an M10 x 48mm Button Bolt (74) and an |
|
| 45 | Cable |
|
M10 Nylon Locknut (62). |
|
|
| ||
|
| Path |
| ||
|
|
|
|
| |
|
|
|
| 54 |
|
|
| 62 |
|
|
|
| 13 |
|
|
|
|
