LS-100
Description of This Manual
Trademarks and registered trademarks
Index
Menus About the PC 117 For Quick Reference 123
Table of Contents
Chapter About the PC
Chapter About the Tuner, the Lissajous Metronome
Chapter Menus
Chapter For Quick Reference
FWarning
Safety precautions
FDanger
FCaution
Do not turn the volume up before start- ing operation
Recorder
Do not disassemble, repair, or modify the product
Battery
AC adapter
XLR/standard phone combo jack
Disposal of rechargeable battery
Do not damage the power supply cord
Do not touch or hold the AC adapter with wet hands
Lithium ion battery
Checking Accessories
How to attach the strap
Manual
Overview of Recorder
Main Features
Name of Each Part
SD card slot
Name of Each Part Battery/SD card cover Lock switch
Switch L
USB terminal
Connecting with External Devices
Connecting with External Devices
Overdubbing
Recorder Mode
Lets use LS-100
Solo practice
Mix them into a single file
Multi-Track Mode
Tuner/Lissajous/Metronome Mode
According to the type For microphones Instrument
Recording Tips for Each Instrument
Recorder position examples
Hall
Acoustic guitar
Electric guitar
Instrument
Connecting the instruments
Connecting the microphone
XLR/standard phone combo jack
Startup
Recharging the battery
Power Supply
Inserting the battery
Connecting the recorder to the USB AC adapter for recharge
Battery indicator
Recharging
4Operating temperature
4Recommended temperature range
4Discharge
Slide the POWER/HOLD switch
How to Use the POWER/HOLD Switch
Turning the power on Turning the power off
Sleep mode
Slide the POWER/HOLD switch to
Activating the hold mode
Clearing the hold mode
Slide the POWER/HOLD switch to posi- tion a
Initial Settings before Using the Recorder
Setting the date and time Time & Date
1038 p.m 2238 Initial value
How to set the voice guide
Example 1038 p.m
March 24 initial value
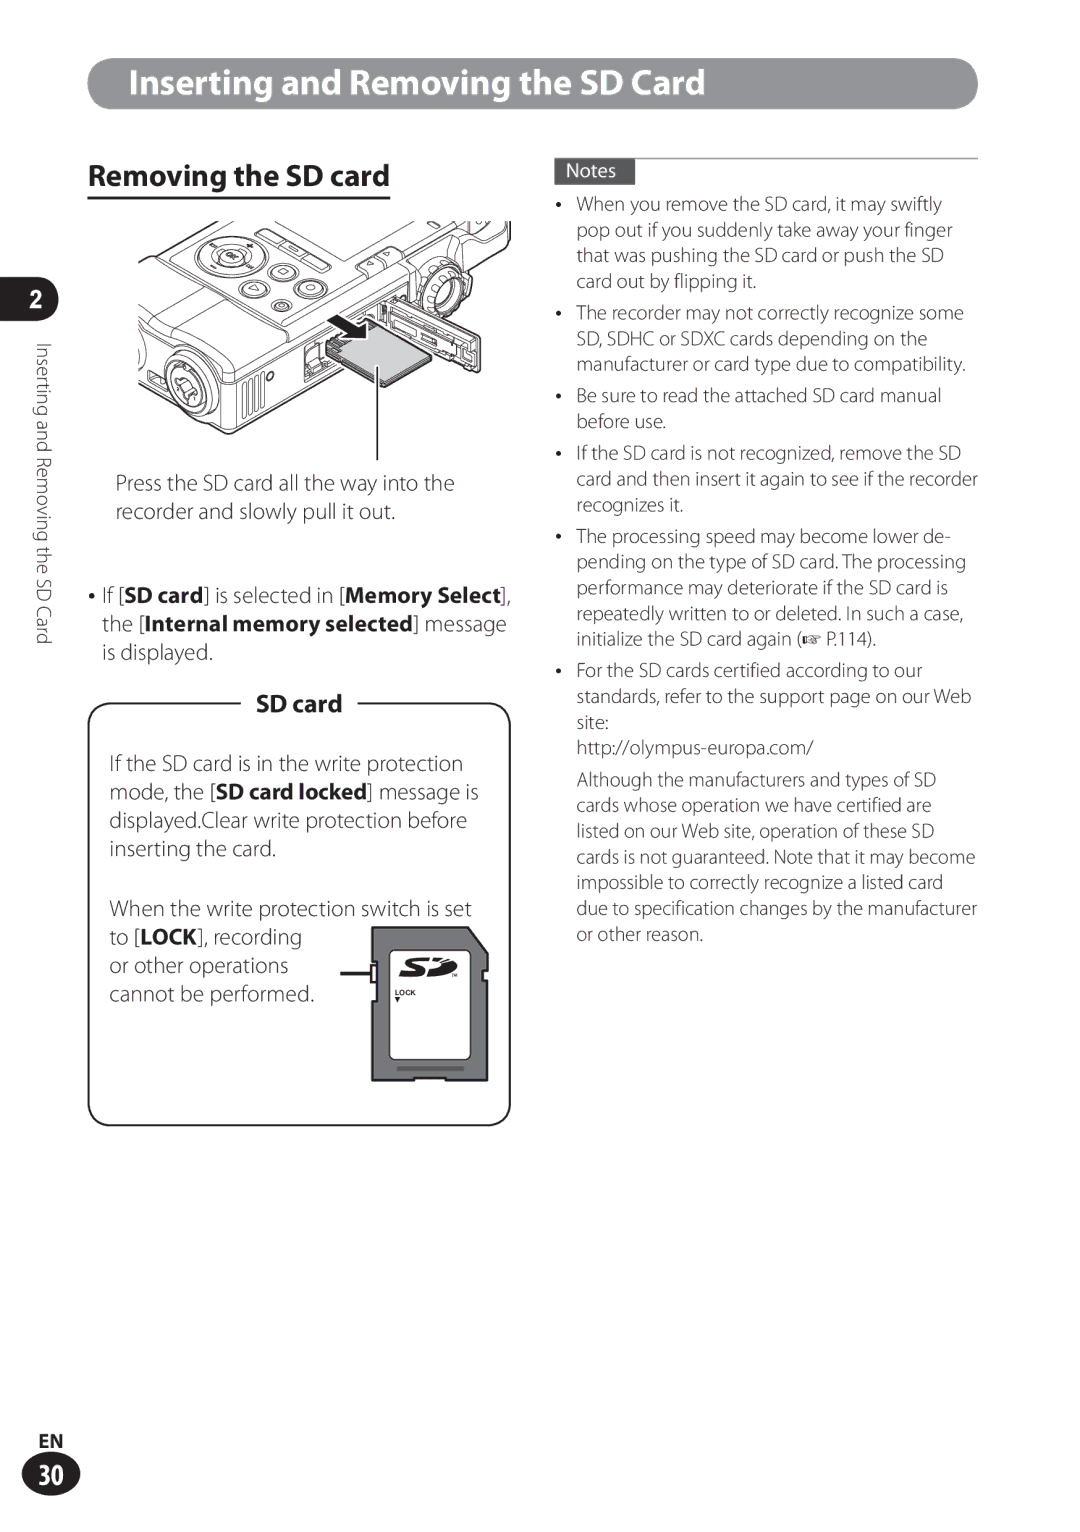
Inserting and Removing the SD Card
Inserting the SD card
Card is inserted all the way
Removing the SD card
SD card
Operations on the Home Screen
Recorder Mode
Overdub
What You Can Do in the Recorder Mode
Normal
Play Sync
Selecting folders and files
Files and Folders
Folders
Folder List Screen
File Screen
File name
MP3 format
Before Recording
Adjusting the recording level properly
Recording standby mode
REC Level dial
Recording
Normal Recording Normal
Pausing the recording
Overdubbing Overdub
Usage Example
Play
File to dub over P
Set the Rec Mode to Overdub
Press the REC button to start recording
Press the Play button to start
Play Sync Play Sync
Vocal
CRecording level meter
Adjust the recording level to balance it
With the playback file
Select a file for sync recording P
Voice Sync Recording V-Sync. Rec
Set the Rec Mode to V-Sync
Press the 9/0button to adjust the voice sync level
Press the REC button again to start recording
Important Notes on Recording
Recording using the metronome
Select Setting and set Display to On P
Set Metronome Menu to On
Press the OK button
Searching for files
Home Recorder
Press the F1 Search button
Playback
Volume dial
Playback
Changing the playback speed
Fast-forwarding
Rewinding
Skipping to the beginning of a file
At the position you wish to
Placing an index mark
Erasing an index mark
Place an index mark, press
Segment repeat playback
Releasing the segment repeat playback
Will flash on the display
While the recorder is stopped Press the Erase button
Erasing
Erasing a File
Select All in folder or One file
Start point and End point will
Partially erasing a file
Playerase.the file you wish to partially
Flash alternately on the display
Disconnect the AC adapter Remove the battery
Important Notes on Erasing
Multi-Track Mode
Bounce
What You Can Do in the Multi-Track Mode
Project
Save as one file
Selecting a project and track
Home screen Project screen
Multi-Track screen
Multi-Track screen
File list screen under a project
On next
Creating a Multi-Track Project
Select Multitrack
Creating a Multi-Track Project
Bounce the tracks
See pages 59 to 63 for details
Select a track
Select Multitrack
Select Multitrack, and press the OK button
Adjust the recording level
Start recording
Stop recording
Check the track playback
Adjust the track
Press the 9button to choose the setting you wish to change
Press the Play button
Left/right balance Press 9three times
Add tracks
Output balance Press 9twice
Track assignment Press 9four times
Bounce the tracks
Press the Stop button to stop recording and playback
Erase a track
Erasing a Multi-Track Project/Track
Erasing a project
Select a project to erase Press the Erase button
Select Start with the + button Press the OK button
Select the track to erase with
+/− button
Erase confirmation screen appears
Lissajous, Metronome
Using the tuner
Home Tuner
Bass chords chart
Adjust while looking at the tuning meter and the indicator
Guitar chords chart
String number/Note name
Home Lissajous
What is a phase difference?
About the Lissajous measurement
Before starting to measure
Examples of the measurement display
Phase difference
Current measurement value appears
Degrees
Home Metronome
Using the metronome
Press the +/− button to adjust the tempo
Press the Play button to start the metronome
Menus
Item to be set
How to set the menus
Press the Menu button
Press the 9/0button to
Press the +/ − button to select a
Setting
When the menu screen is opened
Menu item Menu screen
Recording Menu Rec Menu Menu settings for recording
Choices field indicates the default setting
List of menus
Multi-Track Mode, Play Menu do not function
Metronome P Tempo, Sound, Beat, Volume List of menus
CD Write P Format file into a CD
Bounce P To one file
Speed 100%-400%
Languages available for display vary
Language Lang P Depending on the sales region
Voice Guide P
Resets the settings to the default Reset Settings P
Power Save P
AC Adapter Optional USB Settings P USB Class Composite
Fn. Recorder F1 F2 F3
Sync. time setting
Recording mode Rec Mode
Menu Rec Menu Rec Mode
Recording menu Rec Menu
Menu Rec Menu Mic Gain
Press the OK button to finish the setting
Microphone gain Mic Gain
Input source
Recording level Rec Level
Menu Rec Menu Rec Level
Press the +/− button to select a menu item
Limit/Comp Off
Input switch Input Select
Menu Rec Menu Input Select
Line
Phantom Power
Microphone power source Mic Power
Menu Rec Menu Mic Power
Plug-in Power
Press the +/− button to select the recording rate
Recording format Rec Format
Menu Rec Menu Rec Format
MP3
300Hz
Low cut filter
Menu Rec Menu Low Cut Filter
100Hz
Menu Rec Menu Pre-Recording
How to use Pre-Recording
Pre-recording Pre-Recording
While the recorder is in stop mode, press the REC button
Recording monitor Rec Monitor
Menu Rec Menu Rec Monitor
Recording monitor functions
Play menu Play Menu
Play mode Play Mode
Menu Play Menu Play Mode
Skip space Skip Space
Min min
How to play with skipping and reverse skipping
Press the OK button to finish
Sec sec min min
Select a file to set the erase lock
File menu File Menu
Erase lock File Lock
Stop mode, open the menu
File Move/Copy Move/Copy
Menu File Menu Move/Copy
Selected files setting
Repeat , select a file to be
Press the +/− button to select a
Moving/copying to Recorder
Moving/copying to Multitrack
Project to be moved or copied
Multi-Track Mode, File Divide does not function
File divide File Divide
Menu File Menu File divide
File divide is available only from the file display screen
Menu File Menu
Property Property
MP3 Convert
Property
Menu File Menu MP3 Convert
Press the + button to select Start Press the OK button
Convert check screen appears
Screen for your selection will appear
CD write CD Write
Menu File Menu CD Write
File menu Insert an empty CD to the CD drive
Bounce Bounce
Setting 1File
Setting Selected Files
Home Multitrack
Menu File Menu Bounce
Screen shifts to the Multi-Track screen
Bounce check window appears
Metronome menu Metronome Menu
Setting
Te m p o , S o u n d , B e a t , o r Volume
Metronome Metronome
Setting sets the metronome tone
Using the metronome function in Multi-Track Mode
Sound setting
Metronome volume can be adjusted between 01
LCD/Sound menu LCD/Sound Menu
Backlight Backlight
Menu LCD/Sound Menu Backlight
Menu LCD/Sound Menu Beep
Beep sound Beep
Menu LCD/Sound Menu LED
LED turns on
Menu LCD/Sound Menu LanguageLang
Language switch Lang Language Lang
Voice guide Voice Guide
Menu LCD/Sound Menu Voice Guide
Intro play Intro Play
Menu LCD/Sound Menu Intro Play
10sec., 5sec., 3sec
Fn. Recorder setting
Fn key setting Fn. Setting
Fn. Setting
Device menu Device Menu
Memory Select
Fn. MTR setting
Memory select
Registered function is called
Menu Device Menu Power Save
Sleep Power Save
Time setting Time & Date
Menu Device Menu Time & Date
Menu Device Menu USB Settings
USB setting USB Settings
Press the +/− button to select the setting item
USB Connection
Storage Class or Composite and then press the OK button
AC Adapter
Optional
Composite
Menu Device Menu Reset Settings
Setting reset Reset Settings
Menu setting after setting reset default setting
Recording Menu
Metronome Menu
LCD/Sound Menu
Device menu
Format Format
Screen shifts to the Format screen
115
Menu Device Menu Memory Info
Memory information Memory Info
System information System Info
Menu Device Menu System Info
About the PC
PC operating environment
Using the recorder on your PC
Precautions on using the recorder connected to a PC
Windows Macintosh
Connecting to your PC
Screen. Click Safely remove USB Mass Storage Device
Disconnecting from your PC
Windows
Macintosh
Drive name and folder name when a PC is connected SD card
Transferring voice files to your PC
Using the recorder as a USB microphone/speaker
Using the recorder as an external memory for your PC
For Quick Reference
Alarm message list
Alarm message list
Message Description Action
125
Troubleshooting
Symptom Probable cause Action
Troubleshooting
127
128
Accessories optional
Glossary
Glossary Description
Glossary
Specifications
General points
Reference input level
General frequency response
Guide to recording times
Hz to 20 kHz
Maximum recording time for a single file
Recording format Built-in memory SD card
Guide to battery life
Lithium ion battery linear PCM format
User Support E-mail address in Europe
Technical assistance and support
STechnical Hotline Number in Europe
For customers in Europe
Olympus Imaging Corp