Convertible Camera
AW-E860L
English Version
Contents
Preface
Features
Special notes on operation
DON’TS
Precautions
DOS
Front view
Major operating controls and their functions
Side view
Cooling fan
Lens mount
Lens fixing ring knob
Mounting hole
NO/BAR switch NO/BAR
Menu switch MENU/A
ITEM/AWC switch ITEM/AWC/S
YES/ABC switch YES/ABC/+
@ G/L input connector G/L
Remote connector I/F Remote
= Power indicator
DC 12 V input connector DC 12V
12 E
Camera cable Lens fixing ring knob To iris connector
Mounting
Lens mounting
13 E
Camera mounting
Mounting adapter
Turn the iris selection switch to Position a 14 E
Flange back adjustment For zoom lens
Focus ring Flange back adjust ring Flange back lock knob
Iris gain control G, S
Automatic iris power zoom lens
Iris gain control in a lens
15 E
Connections
$ Connection of device with a composite input connector
16 E
17 E
$ Connection of a remote control unit RCU
RCU cable AW-CA50A26 15 m Set to Multi
RCB cable AW-CA50T10 3 m Video signal
$ Connection of a remote control box RCB
18 E
19 E
$ Connection with multiple cameras Colour lock mode
An example of connection for VBS/BB input Colour lock mode
External sync signal BB Camera for external sync
RS-232C Computer AC adapter AW-PS505A
$ Connection of computer
$ Connection of devices with camera pan/tilt control system
20 E
$ Automatic white balance control AWC
Adjustment
Adjustment by Camera
Adjustment with the RCU RCB, hybrid control panel
22 E
$ Manual white balance setting
$ Automatic tracking white balance setting ATW
Adjustment with the RCU RCB
23 E
$ Reset to 3200K or 5600K white balance
$ Black balance adjustment
YES/ABC switch
24 E
$ Total pedestal level adjustment
Adjustment with RCU RCB, hybrid control panel
NO/BAR switch
25 E
$ Gen-lock adjustment
Horizontal phase control
Horizontal phase control
Colour bar of camera Sprit line
When horizontal phase adjustment is required using RCU
Colour phase adjustment
Select SC Fine on the sub menu. Perform fine
$ Use Mode Setting
Use mode setting
$ Setting by camera
28 E
$ Setting by RCU RCB or hybrid control panel
Scene File switch
Hybrid control panel
Main Menu screen
Menu item setting
$ Menu item setting
Use mode Blinking
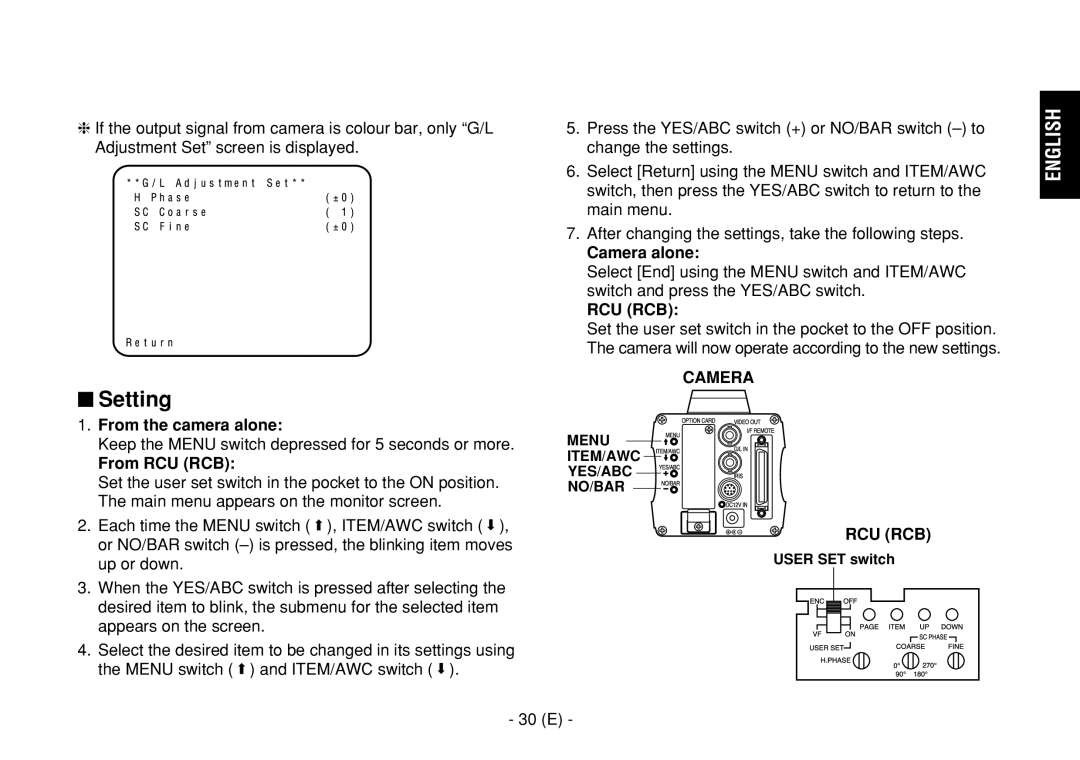
Camera alone
$ Setting
From the camera alone
From RCU RCB
2Colour Set Display 4Sharpness DTL Set Display
$ Sub Menu Halogen Mode, Fluorescent Mode, Outdoor Mode
Measurement
Auto ND ELC Setting Auto ND ELC OFF, on
Brightness Set Display
Portions of the screen are excluded from
Eye L Night Eye L
Auto Gain Up Control Setting Auto Gain Up OFF, on
AGC switch
DB 0 dB should be selected in normal cases
Colour Set Display
Manual Gain switch
34 E
? Subcarrier Phase Fine Adjustment SC Fine -511 to +511
L Adjustment Set Display
Sharpness DTL Set Display
Detail Level Setting Level OFF, Low, High
Noise Suppress Level Setting Noise Suppress OFF, Low, High
DTL switch
OFF Electronic shutter is turned off
Other Set Display
Component Output Setting Signal Select RGB, Y/Pr/Pb, Y/C
CCD Read Out Mode Setting V Resolution Normal, Fine
38 E
39 E
$ Sub menu User Mode
40 E
Colour Matrix Set Display Other Set Display
Iris control Iris switch
$ Setting and changing of the setting items User Mode
Iris, Shutter, Gain Set Display
42 E
Manual Gain switch AGC switch
Gain Setting Gain Auto, 0 dB to 30 dB, N/Eye L, N/Eye H
43 E
44 E
45 E
Pedestal, B Pedestal
Gain control Pedestal control
46 E
\ Subcarrier Phase Fine Adjustment SC Fine -511 to +511
Detail Band Setting Detail Band 1 to
Detail Set Display
Level Dependent Level Setting Level Dependent 0% to 25%
Noise Suppress Level Setting Noise Suppress 1 to
Dark Detail Level Setting Dark Detail 0 to
Colour Matrix Set Display
Other Set Display
Zebra Level Setting Level 70% to 110%
Setting and changing the optional cards
Optional Card Setting Sub Menu
Zebra Indicator Setting Zebra OFF, on
$ Setting to initial set
Setting to initial set
52 E
Halogen, Fluorescent, Outdoor Mode
Halogen mode
Outdoor mode
User mode
User Mode
53 E
54 E
Unit mm
Appearance
55 E
Source voltage Power consumption
Specifications
Dimensions W!H!D
Input/Output connectors Video OUT BNC connector
Indicator
Allowable temperature ranges
58 E
Standard accessories
Rubber sheet Screw Mounting adapter Mounting spacer
For business users in the European Union
Deutsche Ausgabe
Inhalt
Hinweis
Vorwort
Anzeige des vollen Farbbalkens auf dem Monitorbildschirm
Merkmale
Seitenverhältnis wählbar zwischen 169 und
Besondere Hinweise für den Betrieb
Nein
Vorsichtsmassnahmen
Vorsichtsmassnahmen
Vorderansicht
Wichtige Bedienungselemente und ihre Funktionen
Seitenansicht
Kühlgebläse
Objektivfassung
Knopf des Objektivbefestigungsrings
Befestigungsbohrung
Nein/BAR-Schalter NO/BAR
Menüschalter MENU/A
Posten/AWC-Schalter ITEM/AWC/S
Ja/ABC-Schalter YES/ABC/+
? Kabelbride
Schnittstellen-Fernbedienungs-Steckverbinder I/F Remote
= Stromanzeige
Gleichstrom-Eingangssteckverbinder DC 12V
Steuerkabel
Einbau
Anbringen des Objektives
12 G
Kamera-Einbauhalterung WV-831 Einbauadapter
Anbringen der Kamera
Verhütung von Herunterfallen oder Lösen der Kamera
14 G
Rückflanscheinstellung für Zoom objektiv
Entfernungsring
15 G
Blendengewinnsteuerung in einem Objektiv
An der Vorderseite eines Objektives befindet sich
Motorbetriebenes Zoomobjektiv mit Blendenautomatik
Vorsicht
Anschlüsse
16 G
RCU-Kabel AW-CA50A26 15 m Auf Multi stellen
$ Anschluss einer Fernbedienungseinheit RCU
Hinweise
17 G
Wechselstrom-Adapter AW-PS505A Fernbedienungskasten
RCB-Kabel AW-CA50T10 3 m Videosignal Fernbedienungskasten
$ Anschluss eines Fernbedienungskastens RCB
18 G
Video-Verteiler
$ Anschluss mit Mehreren Kameras Farbverriegelungsmodus
Kamera
Kamera für externe
Ø6,5-mm-Stecker RS-232C Computer Wechselstrom-Adapter
$ Anschluss eines Computers
20 G
Kabel für PC-Steuerung AW-CA50T9 10m
Kamera
Einstellung
$ Automatische Weissbalance-Regelung AWC
Einstellung an der Kamera
$ Manuelle Weissbalanceeinstellung
$ Automatische Tracking Weissbalanceeinstellung ATW
22 G
$ Schwarzbalanceeinstellung
Wellenform für Weißbalance Einstelldiagramm
Schalter Auto LED-Warnanzeige AUTO-Einstellschalter
24 G
$ Gesamte Schwarzwertimpulspegel Einstellung
NO/BAR-Schalter
Fernbedienungskasten, Hybrid-Steuertafel
Horizontalphasenregelung
$ Taktsynchronisierungseinstellung
Einstellung mit Fernbedienungseinheit
Farbphaseneinstellung
$ Einstellen des Betriebsmodus
Einstellen des Betriebsmodus
$ Einstellungen mittels Kamera
Schalter
Hybrid-Steuertafel
28 G
Kamera Fernbedienungseinheit Fernbedienungskasten
Betriebsmodus Blinkt
Einstellen der Menüposten
$ Einstellen der Menüposten
Hinweise Hauptmenüanzeige
Kamera alleine
$ Einstellung
Von der Kamera alleine aus
Von der Fernbedienungseinheit dem Fernbedienungskasten aus
2Seite Farbeinstellung
$ Hilfsmenü Halogenmodus, Fluoreszenzmodus, Außenmodus
4Seite Konturen-DTL-Einstellung
32 G
Seite Helligkeitseinstellung
Automatische ND ELC-Einstellung
Auto ND ELC OFF, on
Manu Gain Up 0 dB bis 30 dB, N/Eye L, N/Eye H
AGC-Maximalverstärkung AGC Max Gain 6dB
Auto Gain Up OFF, on 12dB, 18dB, 24dB, N/Eye L, N/Eye H
Einstellung des manuellen Gewinnerhöhungsreglers
Manueller GAIN-Schalter
Seite Farbeinstellung
Einstellung des Chromapegels Chroma Level -3 bis +3
34 G
Grobeinstellung der Hilfsträgerphase SC Coarse 1, 2, 3
= Einstellung der Horizontalphase H Phase -206 bis +49
Seite G/L-Einstellung
36 G
Seite Konturen-DTL-Einstellung
DTL-Schalter
Kontrasteinstellung Contrast Gamma Low, Mid, High
Seite Sonstige Einstellungen
OFF Der elektronische Verschluß ist ausgeschaltet
38 G
Einstellung des CCD-Auslesemodus V Resolution Normal, Fine
39 G
$ Hilfsmenü Anwendermodus
40 G
Seite Farbmatrixeinstellung Seite Sonstige Einstellungen
Einstellposten Anwendermodus
$ Einstellen und Ändern der
6Seite Blenden-, Verschluss-, Verstärkungseinstellung
Deutsch
42 G
Manueller GAIN-Schalter AGC-Schalter
43 G
44 G
Gewinnregler Wertregler
45 G
Seite Detaileinstellung
Einstellung der Horizontalphase H Phase -206 bis +49
46 G
Einstellen der Menüposten
Seite Farbmatrixeinstellung
Dynamic
Clean DNR-Einstellung Clean DNR OFF, Low, High
Einstellung des Gammakorrekturpegels
Gamma 0.35 bis
Einstellen und Auswechseln der Zusatzkarten
Einstellung der Sicherheitszone Safety Zone OFF, 1, 2, 3, 4
Untermenü für Zusatzkarten-Einstellung
$ Rückstellen auf die anfänglichen Einstellungen
Rückstellen auf die Anfänglichen Einstellungen
Außenmodus
Halogen-, Fluoreszenz-, Außenmodus
52 G
Posten Halogenmodus
53 G
Anwendermodus
Posten
54 G
Einheit mm
Aussehen
55 G
Versorgungsspannung 12V Gleichspannung Leistungsaufnahme
Technische Daten
Farbbalken
Farbsättigungsregelung
Codiersystem
Verstärkungswahl
58 G
Normalzubehör
Gummifolie Schraube Einbauadapter Montage-Abstandshalter
Für Geschäftskunden in der Europäischen Union
Confier toute réparation à un personnel qualifié
$ Ne pas dévisser le couvercle
Table DES Matières
Remarque
Préface
Caractéristiques dominantes
Remarques particulières relatives au fonctionnement
CE QU’IL NE Faut PAS Faire
Mesures de précaution
CE QU’IL Faut Faire
Vue de face
Principaux organes de réglage et fonctions
Vue latérale
Embase filetée
Emplacement de carte d’extension
Monture d’objectif
Molette de fixation d’objectif
Sélecteur NO/BAR NO/BAR
Commutateur de menu MENU/A
Sélecteur d’option/AWC ITEM/AWC/S
Sélecteur YES/ABC YES/ABC/+
@ Connecteur d’entrée G/L G/L
Connecteur de commande à distance I/F I/F Remote
= Témoin d’alimentation
? Attache de câble
12 F
Installation
Installation de l’objectif
Câble de commande Câble de caméra vidéo
Fixer solidement 13 F
Installation de la caméra vidéo
Bague de réglage De mise au point
Réglage de foyer arrière d’objectif pour objectif zoom
Avec la bague de réglage de mise au point
14 F
15 F
Commande de gain de diaphragme en objectif
Commande de réglage de gain de diaphragme G, S
Objectif zoom électronique motorisé Diaphragme automatique
Connecteur
Branchements
16 F
Câble coaxial 75 Ω
Câbles RCU AW-CA50A26 15 m Placer sur Multi
$ Branchement d’une unité de commande à distance RCU
Remarques
17 F
18 F
$ Branchement d’un boîtier de commande à disitance RCB
Distance
Caméra vidéo de synchronisation
Signal de synchronisation
19 F
Extérieur BB
20 F
$ Raccordement d’un ordinateur
Caméra vidéo
Réglages
$ Calage automatique de la balance des
Blancs AWC
22 F
$ Calage manuel de la balance des blancs
Remarques
23 F
$ Calage de la balance du noir
Réglage réalisé avec la caméra vidéo
24 F
$ Réglage de décollement de niveau du noir
Réglage réalisé avec la caméra vidéo
Fermer l’objectif
$ Réglage de verrouillage de synchronisation
Calage de la phase horizontale
25 F
26 F
Calage de phase de la couleur
27 F
Réglages de mode de fonctionnement
$ Réglages de mode de fonctionnement
$ Réglage effectués par la caméra vidéo
Sélecteur
Boîtier de commande à distance
Panneau de commande hybride
28 F
$ Sélection des options de menu
Sélection des options de menu
Page-écran de menu principal
Seulement la caméra vidéo
$ Réglages
30 F
4Ecran de réglage de la netteté DTL
2Ecran de réglage de la couleur
Ecran de réglage de la luminosité
Commutateur AGC
34 F
Ecran de réglage de la couleur
Réglage du niveau de chrominance Chroma Level -3 à +3
Réglage de teinte chair Flesh Tone -3 à +3
Ecran de réglage de l’ajustement G/L
Réglage global de phase de sous-porteuse SC Coarse 1, 2, 3
36 F
Ecran de réglage de la netteté DTL
37 F
Ecran des autres réglages
Réglage de contraste Contrast Gamma Low, Mid, High
OFF L’obturateur électronique est arrêté
Aspect Ratio 169
Réglage de mode de lecture CCD
Resolution Normal, Fine
Sélection du rapport longueur-largeur
6Ecran de réglage du diaphragme
$ Menu secondaire Mode utilisateur
De l’obturateur et du gain
7Ecran de réglage de la couleur
40 F
$ Réglage et modification des paramètres
Mode utilisateur
6Ecran de réglage du diaphragme, de l’obturateur et du gain
Scan Synchro Scan
42 F
43 F
Réglage du gain Gain Auto, 0 dB à 30 dB, N/Eye L, N/Eye H
44 F
45 F
Unité de commande à distance boîtier de commande à distance
Réglage de niveau de bande de détail Detail Band 1 à
Ecran de réglage du détail
46 F
Sélection des options de menu
Ecran de réglage de la matrice de couleur
Réglage de niveau de correction de gamma Gamma 0,35 à 0,55
49 F
Réglage de niveau d’écrêtage du blanc White Clip 95% à 110%
Menu auxiliaire de réglage de carte en option
Réglage et remplacement des cartes en option
$ Retour sur les réglages initiaux
Retour sur les réglage initiaux
51 F
52 F
Modes éclairage halogène, éclairage fluorescent, extérieur
Paramètre de réglage Mode Utilisateur
Mode utilisateur
53 F
Paramètre de réglage
54 F
Unité mm
Aspect extérieur
55 F
Tension
Caractéristiques techniques
Consommation 15,4 W
Mire de couleur
Dimensions L!H!P
Sélection du gain
Sélection de lecture du capteur CCD Trame, image1, image2
Utilisateurs professionnels de l’Union européenne
Accessoires standard
58 F
Versione Italiana
Sommario
Nota
Prefazione
Caratteristiche
Page
Cose DA NON Fare
Precauzioni
Cose DA Fare
Veduta parte superiore
Comandi principali e loro funzioni
Veduta parte frontale
Veduta parte laterale
Ventola di raffreddamento
Montatura obiettivo
Ghiera di fissaggio obiettivo
Foro di montaggio
Interruttore no/barra NO/BAR
Interruttore del menu MENU/A
Interruttore della voce/AWC ITEM/AWC/S
Interruttore sì/ABC YES/ABC/+
? Morsetto cavo
= Indicatore di alimentazione
Connettore di comando a distanza interfaccia I/F Remote
Connettore di ingresso corrente continua 12 V DC 12V
Al connecttore
Montaggio
Montaggio dell’obiettivo
Cavo di controllo
Adattatore di montaggio
Montaggio della videocamera
Fuoco Focus
Regolazione del dorso flangia per obiettivo zoom
Deve essere sulla posizione M
Anello di messa a
Obiettivo zoom motorizzato a diaframma automatico
Controllo di guadagno diaframma ad iride sull’obiettivo
Controllo di guadagno diaframma G, S
Precauzione
Connessioni
Cavo coassiale 75 Ω
Cavo RCU AW-CA50A26 15 m Posizionare su Multi
$ Collegamento di una unita’di comando a distanza RCU
AW-CA50B10 e WV-CA10B02 2 m WV-CA10B25 25 m WV-CA10B50 50 m
$ Collegamento di una scatola di comando a distanza RCB
Cavo RCB AW-CA50T10 3 m
Esterno o generatore di effetti Speciali
Videocamera
Esterno BB
Videocamera per il sincronismo
Cavo di controllo AW-CA50T9 10m
$ Collegamento del computer
Connettore di
Uscita video
Videocamera
Regolazioni
$ Controllo automatico di bilanciamento del bianco AWC
Regolazione con la videocamera
Regolazione con la RCU RCB
$ Regolazione manuale del bilanciamento del bianco
Secondi.- 23
$ Regolazione del bilanciamento del nero
$ Ritorno del bilanciamento del bianco a 3200K o 5600K
Regolazione con la RCU RCB, pannello di controllo ibrido
Controllo Total PED
$ Regolazione del livello del piedistallo totale
Chiudere l’obiettivo
Interruttore NO/BAR
Segnale video Regolare la fase orizzontale
$ Regolazione gen-lock
Controllo di fase orizzontale
Regolazlione con la videocamera
Barre di colore della videocamera Linea di scissione
Regolazione della fase del colore
$ Regolazione del modo operativo
Regolazione del modo operativo
$ Regolazione con la videocamera
Interruttore Scene File
Pannello di controllo ibrido
Modo Utente Lampeggia
Regolazione delle voci dei menu
$ Regolazione delle voci dei menu
Schermo del menu principale
Dalla RCU RCB
$ Regolazione
Dalla sola videocamera
Mantenere premuto l’interruttore Menu per 5 secondi o più
2Display di impostazione colore
$ Menu secondario Modo Alogeno, Fluorescente, Esterno
Regolazione ND ELC automatico Auto ND ELC OFF, on
All Viene misurata l’intera area dello schermo
Interruttore AGC
Interruttore Gain manuale
Display di impostazione colore
? Regolazione fine fase sottoportante SC Fine -511 +511
Display di impostazione regolazione G/L
Display di impostazione nitidezza DTL
Aumento del contrasto Contrast Gamma Low, Mid, High
Display di altre impostazioni
OFF L’otturatore elettronico è disattivato
Si può selezionare il rapporto di formato 169 o
Selezione del rapporto di formato Aspect Ratio 169
Regolazione della ventola Fan SW OFF, Auto
Diaframma, otturatore, guadagno
$ Menu secondario Modo Utente
6Display di impostazione 8Display di impostazione
Regolazione G/L
R----- s----- t
Display di impostazione diaframma, otturatore, guadagno
Hz 15.63kHz Synchro Scan
Shutter Mode Step, S/Scan, ELC
Regolazione del modo otturatore elettronico
Regolazione del passo/scansione sincronizzata
Gain manuale
Display di impostazione colore
Controllo di guadagno R/B Controllo di piedistallo R/B
Display di impostazione dettaglio
Regolazione della fase orizzontale H Phase -206 +49
\ Regolazione fine fase sottoportante SC Fine -511 +511
Regolazione delle voci dei menu
Il ciano e il blu
Phase Varia la tonalità del magenta
Display di impostazione matrice colore
Il verde e il ciano
Regolazione del livello di taglio bianco White Clip 95% 110%
Regolazione del livello di correzione contrasto Gamma 0.35
Sottomenu di impostazione scheda opzionale
Impostazione e cambiamento delle schede opzionali
Zebra non viene visualizzata sul mirino
$ Ritorno alle regolazioni iniziali
Ritorno alle regolazioni iniziali
Voce Modo Alogeno
Modo Alogeno, Fluorescente, Esterno
Modo Esterno
Voce Modo Utente
Modo Utente
Voce
Unità mm
Aspetto
Dati tecnici
Sistema di codifica
Indicatore
Dimensioni L!A!P
Variabilità entità colore
Per gli utenti aziendali nell’Unione Europea
Accessori standard
Versión Española
Accesorios estándar
Índice
Prefacio
Características
Notas especiales acerca del funcionamiento
Precauciones
Precauciones
Vista delantera
Controles de las operaciones principales y sus funciones
Vista lateral
Ventilador
Montura del objetivo
Perilla del anillo de fijación del objetivo
Agujero de montaje
Conmutador NO/BAR NO/BAR
Conmutador Menu MENU/A
Conmutador ITEM/AWC ITEM/AWC/S
Conmutador YES/ABC YES/ABC/+
? Abrazadera de cable
Conector de mando a distancia I/F I/F Remote
= Indicador de la alimentación
Conector de entrada de CC 12 V DC 12V
12 S
Montaje del objetivo
Cable de control
Adaptador de montaje
Montaje
Montaje de la cámara
13 S
14 S
Ajuste de Flange Back Para objetivo zoom
Control de ganancia del iris G, S
Control de ganancia de iris en un objetivo
Objetivo zoom motorizado de iris automático
15 S
Cable coaxial de 75 Ω
Conexiones
Precaución
16 S
Cable RCU AW-CA50A26 15 m Póngalo en Multi
$ Conexión de una unidad de mando a distancia RCU
Notas
17 S
18 S
$ Conexión de una caja de mando a distancia RCB
Cable RCB AW-CA50T10 3 m
$ Conexión con múltiples cámaras modo de bloqueo del color
20 S
$ Conexión de una computadora
RS-232C Computadora Adaptador de CA AW-PS505A
Cámara
Ajuste
$ Control automático del equilibrio del blanco AWC
Ajuste mediante Cámara
Ajuste con la RCU RCB
$ Ajuste manual del equilibrio del blanco
22 S
Ajuste mediante Cámara
$ Reposición del equilibrio del blanco a 3200K ó 5600K
$ Ajuste del balance del negro
23 S
24 S
$ Ajuste de nivel de pedestal total
Conmutador NO/BAR
Señal de vídeo Ajuste de la fase horizontal
$ Ajuste de intersincronizador
Control de fase horizontal
25 S
Ajuste mediante la Cámara
Ajuste de fase cromática
26 S
27 S
Ajuste del modo de utilización
$ Ajuste del modo de utilización
$ Ajuste mediante cámara
Conmutador Scene File
$ Ajuste mediante la RCU RCB o el panel de control híbrido
Panel de control híbrido
28 S
Menú principal del modo Halogen Fluorescent u Outdoor
Ajuste de elementos de menú
$ Ajuste de elementos de menú
Pantalla del menú principal
Desde la RCU RCB
$ Ajuste
Cámara solamente
Desde la cámara solamente Cámara
2Visualización de Colour Set
$ Menú secundario Modos Halogen, Fluorescent y Outdoor
4Visualización de Sharpness DTL Set
Ajuste automático ND ELC Auto ND ELC OFF, on
Visualización de Brightness Set
32 S
Conmutador AGC
33 S
34 S
Visualización de Colour Set
Conmutador Gain manual
? Ajuste fino de fase de subportadora SC Fine -511 a +511
Visualización de G/L Adjustment Set
= Ajuste de fase horizontal H Phase -206 a +49
Ajuste aproximado de fase de subportadora SC Coarse 1, 2, 3
36 S
Visualización de Sharpness DTL Set
Conmutad or DTL
Ajuste de contraste Contrast Gamma Low, Mid, High
Visualización de Other Set
OFF El obturador electrónico está apagado
Ajuste de ventilador Fan SW OFF, Auto
Ajuste del modo de lectura de CCD V Resolution Normal, Fine
Selección de relación de aspecto Aspect Ratio 169
Se puede seleccionar la relación de aspecto de 169 ó
39 S
$ Menú secundario Modo del usuario
40 S
Se puede ajustar el nivel de convergencia de Auto Iris
$ Ajuste y cambio de elementos de ajuste Modo del usuario
Visualización de Iris, Shutter, Gain Set
Ajuste de nivel de vídeo A.Iris Level -50 a +50
42 S
Gain manual
43 S
44 S
Ajuste de nivel de croma Chroma Level -3 a +3
Control de ganancia R/B Control de pedestal R/B
45 S
46 S
Ajuste de fase horizontal H Phase -206 a +49
Visualización de Detail Set
\ Ajuste fino de fase de subportadora SC Fine -511 a +511
Ajuste de elementos de menú
Visualización de Colour Matrix Set
49 S
Ajuste del indicador cebra Zebra OFF, on
Ajuste de la zona de seguridad Safety Zone OFF, 1, 2, 3, 4
Ajuste y cambio de tarjetas opcionales
Menú secundario de ajuste de tarjeta opcional
$ Ajuste de estado inicial
Ajuste de estado inicial
51 S
52 S
Modos Halogen, Fluorescente, Outdoor
Elemento Modo Halogen
53 S
Modo User
Elemento Modo User
Elemento
54 S
Unidad mm
Apariencia
55 S
Alimentación CC 12 Consumo
Especificaciones
Velocidades del obturador electrónico
Dimensiones An!Al!Prof
Sistema de codificación
Selección de ganancia
Para empresas de la Unión Europea
Accesorios estándar
58 S
Web Site http//www . panasonic . co . jp/global