DMC-TZ8/DMC-ZS5
To play back the pictures
Quick start guide
Contents
Contents
Others
Connecting with other devices
Playback Mode
Application View
Read first
Lens
To prevent damage, malfunctions, and faults
Camera ON/OFF switch
When using a tripod or unipod
Before use
Standard Accessories
About GPS
Names of parts
Microphone →76
Camera ON/OFF switch Card/Battery door →14
AF Assist Lamp →106
Zoom lever Lens barrel Hand strap eyelet Lens →7
About batteries that you can use with this unit
Charging battery
Detach the battery after charging is completed
Connect the charger to the electrical outlet
Viewing pictures
Recording still pictures
Recording motion pictures
Recording conditions
VQT2R48
Close lid
Inserting and removing the card optional/ the battery
Completely insert battery and card
Slide to the Open position and open the lid
Insert DC coupler instead of battery previous
Using the DC coupler optional instead of battery
Open DC coupler cover
Picture save destination cards and built-in memory
Inserting and removing the card optional Battery
Remaining battery and memory capacity
When in operation
Press MENU/SET
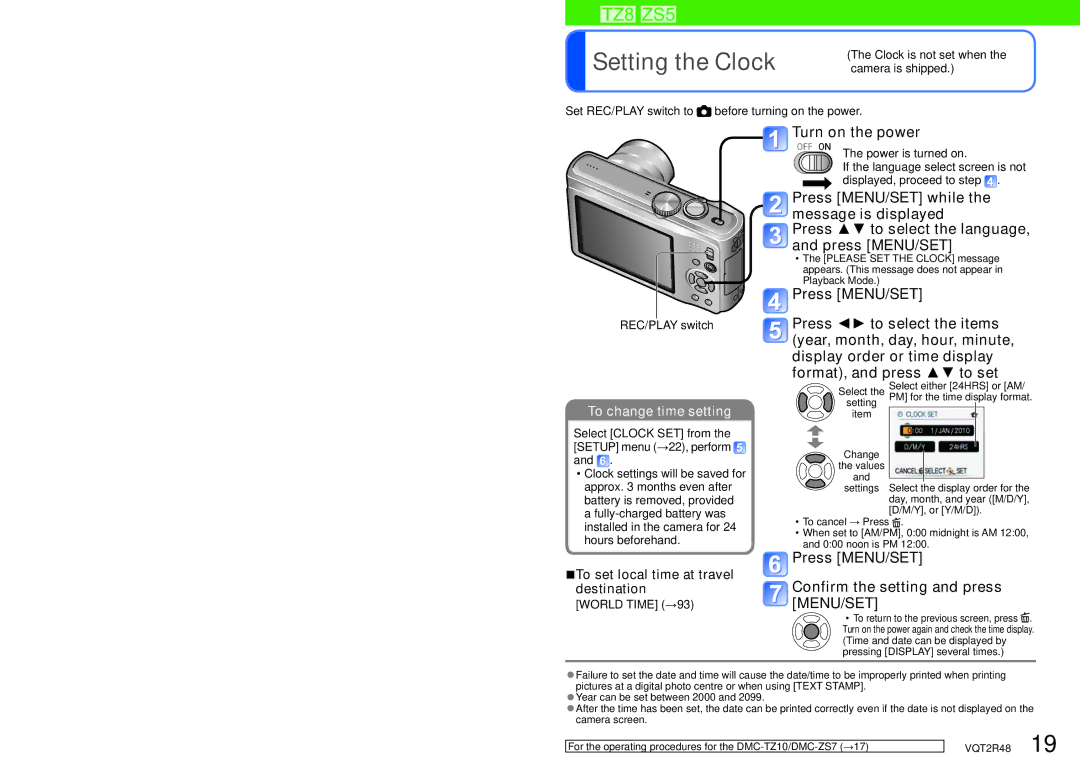
Setting the Clock
Turn on the power
REC/PLAY switch
About automatic time correction
To change time setting
Select Clock SET from the REC menu or Setup menu →22
If automatically correcting time of day, select YES
Select Clock SET from the Setup menu →22, perform
Press MENU/SET Confirm the setting and press MENU/SET
Setting the menu
Travel Mode menu REC/PLAY switch
Motion Picture menu REC/PLAY switch
Playback Mode menu REC/PLAY switch
Using the Setup menu
Display Size STANDARD/LARGE
LCD Mode
Auto Power LCD
Power LCD
OFF/2 MIN./5 MIN./10 MIN
Economy Sleep Mode
LCD Power Save OFF/ON
REC Area
YES/NO
NO.RESET
Auto Review
Zoom Resume
Video OUT NTSC/PAL
Reset Reset REC. SETTINGS?
Reset Setup PARAMETERS?
USB Mode Select on Connection
Interlaced and Progressive Formats
Hdmi Mode
Viera Link
Format
Version Disp
Language
Stabilizer DEMO. Only during recording
Demo Mode
Functions
Taking still pictures Press the shutter button
Basic shooting operation
Recording motion pictures Press the motion picture button
Mode
Mode Program AE Mode
Mode Custom Mode
Clipboard Mode
Press the shutter button
Taking still pictures Recording motion pictures
Finish recording
Please set the Clock before shooting →19
Motion Picture Mode Clipboard Mode
→10
Take a picture
Taking pictures with automatic settings
Recording Mode
Set to Intelligent Auto Mode
To use flash
AF Tracking
Set AF Mode to AF Tracking
About Happy colours
Face Detection and Face Recognition
→72
Taking pictures with your own settings
Set to Program AE Mode
To take motion pictures
Use the focus range displayed in red as a reference
Return to desired composition
Zoom In/Out
Taking pictures with zoom
Zoom types
Maximum zoom ratios by picture size
What is Extra Optical Zoom EZ?
Zoom
Press to change zoom ratio
Easy Zoom For zooming rapidly to maximum ratio
Change of zoom ratio
Zoom 4 times further than Optical/Extra Optical Zoom
Digital Zoom
Set to Scroll through pictures
Viewing your pictures Normal Play
To delete multiple up to 50 or all pictures
Deleting pictures
Guide lines
Changing recording information display
Press to change display
Histogram
Display Flash Select the desired type
Taking pictures with flash
Type, operations Uses
Focus range according to ISO Sensitivity and zoom
Digital Zoom may also be used
Display Macro Mode Select AF Macro
Taking close-up pictures
Turn to max. T
Digital Zoom magnification 1 x to 3
Display Macro Mode Select Macro Zoom
Adjust the Digital Zoom magnification with the zoom lever
Taking pictures at even closer range Macro Zoom
Focus range
Available recording range in Program AE Mode
Zoom ratio ∗1
Display Selftimer Select time duration
Taking pictures with self-timer
Display Exposure
Taking pictures with Exposure Compensation
Select a value
Display Auto Bracket
Recording while exposure is changed
Display Multi Aspect
Taking pictures by automatically changing
Picture Size combinations
Determine aperture value
Determine aperture and record
Aperture values that can be set
Set to Set to
Determine shutter speed and record
Determine shutter speed
Shutter speeds that can be set
Aperture value
Manual Exposure Mode
Following menus and functions are saved in the custom set
Register your own settings and record
CUST.SET MEM. Registering your own settings
Up to 3 current camera settings can be registered
Select custom set
Custom Switch to your own settings and record
Set to Select and set the scene
Taking pictures according to the scene
Registering commonly used scenes
Self
Scene Uses, Tips
Soft
Skin
Sports
How to select a scene →61 Using flash in Scene Modes →48
Scenery
Assist
Food
Night
Party
PET
Candle
Light
Baby
Burst
High
Sens
HI-SPEED
Starry
Flash
SKY
Photo
Beach
Snow
Aerial
Grain
Film
Dynamic
Frame is superimposed over the image
Frame
Changing registered Scene Modes
Registering commonly used scenes
Set to Set to / for
Taking pictures in registered Scene Modes
About the motion picture recording screen
Changing motion picture settings
Taking motion pictures
Press the motion picture button again to end recording
Following functions are fixed
Motion picture recording format REC Mode
Features
Recording motion pictures
Recordable time on 2 GB SD memory card
REC Mode REC Quality
Recording may end while in progress
Do not cover with your finger
Taking motion pictures Motion Picture Mode
Set to Set the mode dial to Start recording
End recording
Ratio
∗2 Qvga is fixed when recording to built-in memory
REC Quality
Playing back motion pictures →115
How the Face Recognition function works During recording
Recording with the Face Recognition function
During playback
Registering face pictures
Recording tips when registering face pictures
Press the shutter button halfway to close the menu
Select the item to edit and make the setting
About settings
Record the face picture
To set the Face Recognition function to OFF
Editing or deleting information about registered persons
Select NEW Person or Additional Image
Select the item to edit and make the setting Step →80
Automatically register face pictures
Select YES from the registration confirmation screen
Setting recognition sensitivity
Recording the place of recording with GPS
What is GPS?
Receiving signals from GPS satellites
Using in locations such as airplanes or hospitals
When checking GPS reception
GPS Setting Using GPS
Select GPS Setting from
Travel Mode menu →20
Icon Status
When GPS Setting is set to on or
Information recorded on recorded pictures
Positioning is not performed in the following situations
Change the recorded place name information
If you do not wish to record place names and landmarks
Changing the display of location name information
Using GPS to set the Clock
Travel Date
Useful features for travel Travel Mode
Select Travel Date from the Travel Mode menu →20
Recording Mode ∗ ∗
∗ Recording only. Cannot set
Step , select OFF and press MENU/SET
Useful features for travel Travel Mode
Location
To clear
To set summer time
Select World Time from the Travel Mode menu →20
World Time
Select Home Select Destination Set destination area
Using GPS to make automatic settings
Picture Size
Using the REC menu
REC Quality
Intelligent ISO
Recording Mode Settings OFF Setting guide
Quality
Aspect Ratio
Sensitivity
For REC menu setting procedures →20 Slow-moving subject
1600
Setting White Balance manually
White Balance fine adjustment excluding AWB
White Balance
For details →78
AF Mode
For REC menu setting procedures →20
Face Recog
Aerial PHOTO, Underwater Scene Modes
Setting, switch to another setting
AF will not work while AF Tracking is operating
Metering Mode
PRE AF
Scene Modes Night PORTRAIT, Night SCENERY, Starry SKY or
Exposure
Recording Mode Settings OFF/LOW/STANDARD/HIGH
MIN. Shtr Speed
No burst
Resolution
Recording Mode Settings OFF/ON/i.ZOOM
Burst
Color Effect
Recording Mode Settings OFF/ON
This is fixed to on when Macro Zoom is set
Continuous AF
Stabilizer
PICT.ADJ
Automatically detects and prevents jitter
AF Assist Lamp
Illuminates lamp when dark to facilitate focus alignment
Disabled when AF Mode is other than Face Detection
Audio REC
Clock SET
Set the Clock. Same function as that in Setup menu →22
Sets the data format of the motion picture that is recorded
Using the Motion Picture menu
REC Mode
For Motion Picture menu setting procedures →20
Continuous AF
Recording Mode Settings OFF/ON appears on the screen
Wind CUT
Set to Take a clipboard picture
Set REC/PLAY switch to Set mode dial to
Taking/viewing clipboard pictures
Taking clipboard pictures
To register zoom enlarged size and position
REC on Clipboard menu REC/PLAY switch
Zoom Mark
Clipboard menu
GPS function operations
Using Quick menu
Select item and setting
Set to Display Quick menu
To change the character type
Entering Text
MENU/SET repeat
Text is inserted at the cursor position
Set to multiple screen display
To restore
Select picture with and press MENU/SET
Correctly
Watching motion pictures/still pictures with audio
Operations during motion picture playback
Deleting →45
Capture still picture Select YES
Capturing still pictures from motion pictures
Save a scene from a motion picture as a still picture
Decide the point to split the motion picture Select YES
Splitting up motion pictures
Original motion picture that was split does not remain
Mode Play
Different playback methods Playback Mode
Select Start with and press MENU/SET
Slide Show
Select the playback method
Set playback effects
Operations during Slide Show
Different playback methods Playback Mode
Mode Play
Select the type of data View pictures
GPS Area Play
For switching Playback Mode procedure →118
To delete picture →Press delete
Select the picture
Travel Play
Select Travel Date
Select the date to play back
Play back by destination
Select the item View pictures
Category Recording information such as Scene Modes
Category Play
Select the Category
To delete pictures → Press
Favorite Play
Calendar
Using the Playback menu
Title Edit
To delete a location name or landmark name
PLACE-NAME Edit
Select the picture Enter characters Entering text
Video Divide
Single
Select items and make settings for each
Text Stamp
Set-up Press MENU/SET → Playback menu → Select Text Stamp
To check stamped text
Items that can be stamped
Select Multi in step above Select size
Resize
Select Single Select size
Select still picture Select YES
Set-up Press MENU/SET→ Playback menu → Select Leveling
Cropping
Leveling
Set-up Press MENU/SET→ Playback menu → Select Cropping
Set-up Press MENU/SET → Playback menu → Select Rotate Disp
Aspect Conv
Rotate Disp
Set-up Press MENU/SET → Playback menu → Select Aspect Conv
Set-up Press MENU/SET→ Playback menu → Select Favorite
Favorite
To clear all
Set-up Press MENU/SET→ Playback menu → Select Print SET
Print SET
Select Single or Multi Select picture
Set number of pictures
Set-up Press MENU/SET → Playback menu → Select Protect
Select Single or Multi Select picture and make setting
To cancel while releasing all Press MENU/SET
Protect
Select the picture Select YES Select a person
Face REC Edit
Select Replace or
For another
Set-up Press MENU/SET → Playback menu → Select Copy
Copy
Select the copy method direction
Select picture with and press MENU/SET for Select YES
Available file types Motion Avchd Lite∗, Motion Jpeg
Keep the recorded still pictures and motion pictures
Dubbing playback pictures via AV cables
Correct method for your device Only
Use ‘PHOTOfunSTUDIO’ to copy to your computer
For connection procedures →141
Use ‘PHOTOfunSTUDIO’ to copy pictures to your computer
Computer specifications
Using with your PC
Operate with your computer
To cancel connection
Copying still pictures and motion pictures
Select PC on the camera
Folder and file names on computer
When using Windows XP, Windows Vista, Windows 7, or Mac OS
Private
VQT2R48
Printing
To cancel print Press MENU/SET
Select PictBridge PTP on the camera
Printing date without Text Stamp
Printing multiple pictures
Print with date and text
With Text Stamp
Select item
Make settings before selecting Print Start
Connect camera to TV Turn on TV
Turn on camera Set REC/PLAY switch to
When TVs or DVD recorders have an SD card slot
Viewing on TV screen
Set to Hdmi input
What is HDMI?
Viewing on a TV with Hdmi Socket
Preparation
Viera Link Hdmi Hdavi Control
What is Viera Link HDMI?
Select a picture with , and press OK
Switching Playback Mode
When operating, refer to the Viera Link operating panel
You can press Option to switch between Playback Modes
If Viera Link Hdmi does not function correctly →161
Other related operations
Recording
List of LCD monitor displays
Press the Display button to change display →46
Playback
No Additional Selections can be Made
Message displays
No Battery Power Remains
Battery, power
MIN. Shtr Speed is set to fast speeds, e.g /250 →102
Try checking these items →156 162 first
LCD monitor
Flash
TV, computer, printer
Cannot print when connecting to printer
Others
Usage cautions and notes
When in use
Memory cards
Personal Use Only
User License Agreement for Location Name Data
Restrictions
Disclaimer of Warranty
No Warranty
Disclaimer of Liability
About copyright
Export Control
Entire Agreement
About the geographical coordinate system
Usage cautions and notes
Screen display Country or area
Switzerland
Countries and regions with no landmark information
Vanuatu
Landmark types
Recording picture/time capacity
9580
11.5 M 10.5 M
REC Quality Wvga VGA Qvga
Varies according to REC Quality →77 setting
210 310 250 340 110 195 170 320
For DMC-TZ10/DMC-ZS7 users

 Setting the Clock
 Press [MENU/SET]