Servicenter list and warranty can be found on pages 103
Warranty can be found on
Refer Servicing to Qualified Service Personnel
Accessories
FCC Note
Model Number
Serial Number
User memo
A. only Product Registration Card
Table of contents
Features
Discs
Discs you can use for recording and play
Play-only discs
Discs that cannot be played
Audio format logos
Before finalizing…
After finalizing…
Recording to DVD-R
Remote control
Control reference guide
Main unit
Opening the front panel
Unit’s display
Center circle e.g. DVD-RAM
Set up steps
Follow these steps to connect and set-up this unit
Using play lists to edit programs
Using VCR Plusr codes Manual programming
Connecting a cable TV box
Using on-screen menu icons Changing the unit’s settings
Remote control
»A Batteries
»B Use
Do not
Refer to the chart below for the code
Press and hold TV, Power ê
Television operation
For your television
When you have finished connecting the unit
Conserving power
Antenna and television connections
Basic connection
Video OUT terminal
Component Video OUT terminal
B P R
Video cable Not included
Press ê, Power to turn the unit on
Plug-in Auto Tuning
Press Enter
Plug-in Auto Tuning
³TV Mode Band Stations received by Airwaves
³CATV Mode Band Stations received by cable
Channel plan
Channel settings
Using the remote control to Add and delete channels
Press the numbered buttons to select
Channel
Channel settings
Channel settings
VCR Plus r guide
Press Action
To end the setting
If you make a mistake
Selecting TV screen
Type
Use the joystick 2, 1 to select TV Screen tab
To return to the previous screen
Auto power-off
Press 1, Play
To stop play a
To pause play
Starting play from where you
To cancel the resume function
» stopped it Resume Function
Press º, Stop
»A Fast forward and rewind-SEARCH
Press 6, SLOW/SEARCH or
»B Slow-motion play
»C Frame-by-frame viewing
»A Skipping
Press , Skip or 9, Skip
Press the numbered buttons to select the item
During play or while paused
Recording television programs
Press ´, REC to start recording
To cancel
» One Touch Recording Specify a time to stop recording
Press ´, REC to select the recording time
To show the time remaining until recording fin Ishes C
Playing while you are recording
»B Simultaneous rec and play
Press TOP MENU, Direct NAVI- Gator
Use the joystick 3, 4 to select a program and press Enter
While recording or timer recording
Reviewing the recorded images While recording Time Slip
Press Time Slip
To continue to show both the recording and play Images
Using the top window
Using the top window
About the top window
Press TOP Window to show the top window
Items Discs Pages
Icon
Top window icons
» Skipping a minute forward CM skip
Convenient features
» Selecting an amount of time to Skip-Time Slip
»A Repeat play
Use the joystick 3
»B A-B repeat play
If the Video CD has playback control
Press Audio to select the audio type
Changing audio
Audio during television reception
When using DVD-R
To change the audio type
³While receiving SAP broadcasts
³During play
When selecting markers 11 Above
Marking places to play again
Press Marker Write at the point you want to mark
Use the joystick 2, 1 to select a marker number
When marking positions 11
To mark points using the marker icon
Use the joystick 2, 1 to select the next asterisk ¢
Press Enter at the point you want
Program play
Press the numbered buttons to select the track
To cancel random play
»A Random play
Enjoying virtual surround » sound effects V.S.S
Press V.S.S
Using on-screen menu icons
Common procedures
Press Display
Use the joystick 3, 4 to select the menu
Content
Icon Content
Icons for disc information
Icon
Using on-screen menu icons
Icons for unit information
Using VCR Plusr codes to make
Timer recording
Press VCR Plusr
Press the numbered buttons to enter
Press ê, Power
Timer recording
Flexible recording mode FR
»A standby To put the unit on timer recording
Press Enter when you have finished making changes
To change the timer recording program
Timer recording setting screen from on
³CHANNEL Channel number and caption ³DATE !?
Unit to make timer recording
Press Enter when you have finished programming the timer
Manually programming
Press PROG/CHECK
To delete a timer recording
Timer recording To continue programming
» program
To end programming
Press ê, POWER, then º, Stop within 5 seconds
Releasing the unit from timer Standby
»A To check programs
Input
To skip unwanted parts
Select
Disc setting
About Disc Setting
Enter Title
Use the joystick 3, 4 to select Enter Title and press Enter
Disc setting
Use the joystick 3, 4, 2, 1 to select SET and press Enter
Enter Title
To correct a character
Disc Protection
Use the joystick 2, 1 to select Yes and press Enter
To stop partway through
Disc
When you press Enter
Releasing disc
Protection
Protection is
³Switch DVD, TV to DVD ³Insert the disc you want to format
Format
Use the joystick 3, 4 to select Format and press Enter
Use the joystick 2, 1 to select Start and press Enter
Use Joystick Select Finalize and press Enter
Finalize-Creating DVD-Video
To stop finalizing
Using the direct navigator
Selecting programs to play
To clear the program list
Program list appears
About the program list
Erasing programs
Press TOP Window
Use the joystick 3, 4, 2, 1 to
Select Direct Navigator
Entering and editing program
Titles
Protection
Protecting programs
Padlock mark appears
Releasing program
Padlock mark disappears
Checking program contents
Shorten Segment
Erasing parts of a program
Shorten Segment
Press Return or select Cancel and press Enter in step
Use the joystick 3, 4 to select Exit and press Enter
Use the joystick 2, 1 to select Erase and press Enter
To erase another part of the same program
Displaying play lists
Use the joystick 3, 4, 2, 1 to
Select Play List and press
To clear the play list screen
List and press Enter
Creating play lists
To specify another scene
Playing play lists
Use the joystick 3, 4 Select Play List
To stop play list play
³Insert a disc you created play lists on
Playing play list scenes
Editing play list scenes
Play Scenes
To stop scene play
Use the joystick 3, 4 to select Edit Scenes and press Enter
Edit Scenes
To add other scenes
Adding scenes to a play list
Use the joystick 2, 1 to select
Move and press Enter
Use the joystick 2, 1 to select Re-edit and press Enter
To move another scene
# Use the joystick 2, 1 to select Erase and press Enter
To re-edit another scene
To erase other scene
Erasing a scene from a play list
Copying play lists
Use the joystick 2, 1 to select Copy and press Enter
Erasing a play list
PL Copy
Use the joystick 3, 4 to select PL Erase and press Enter
Titling play lists
# Enter the title
PL Erase
Checking play list contents
Expanding your home theater system
Enjoying more powerful sound
Enjoying Catv broadcasts
With a cable TV box
»A Connecting a cable TV box
You cannot
With two cable boxes
Connecting a home satellite system Dishnetwork/DSS
You can You cannot
Connecting an analog » amplifier or system component
Connecting to a digital »B amplifier or system!? component
To enjoy Dolby Pro Logic
»D Connecting a video cassette recorder
Video cable
Other playback equipment
Connect to the video and audio output terminals
If it is a twin lead
If there is a twin lead and a coaxial cable
If there are two twin leads
If it is a screw & plug type terminal
³Switch DVD, TV to DVD ³Change the code on the main unit
Summary of settings
Changing the unit’s settings
Main menus Menus Options
TV Settings for DVD-Video
TV Settings for DVD-RAM
Audio
Range Compression DVD-VDolby Digital only
Language code list
When you are finished
Option and press Enter
Entering a password
Digital output
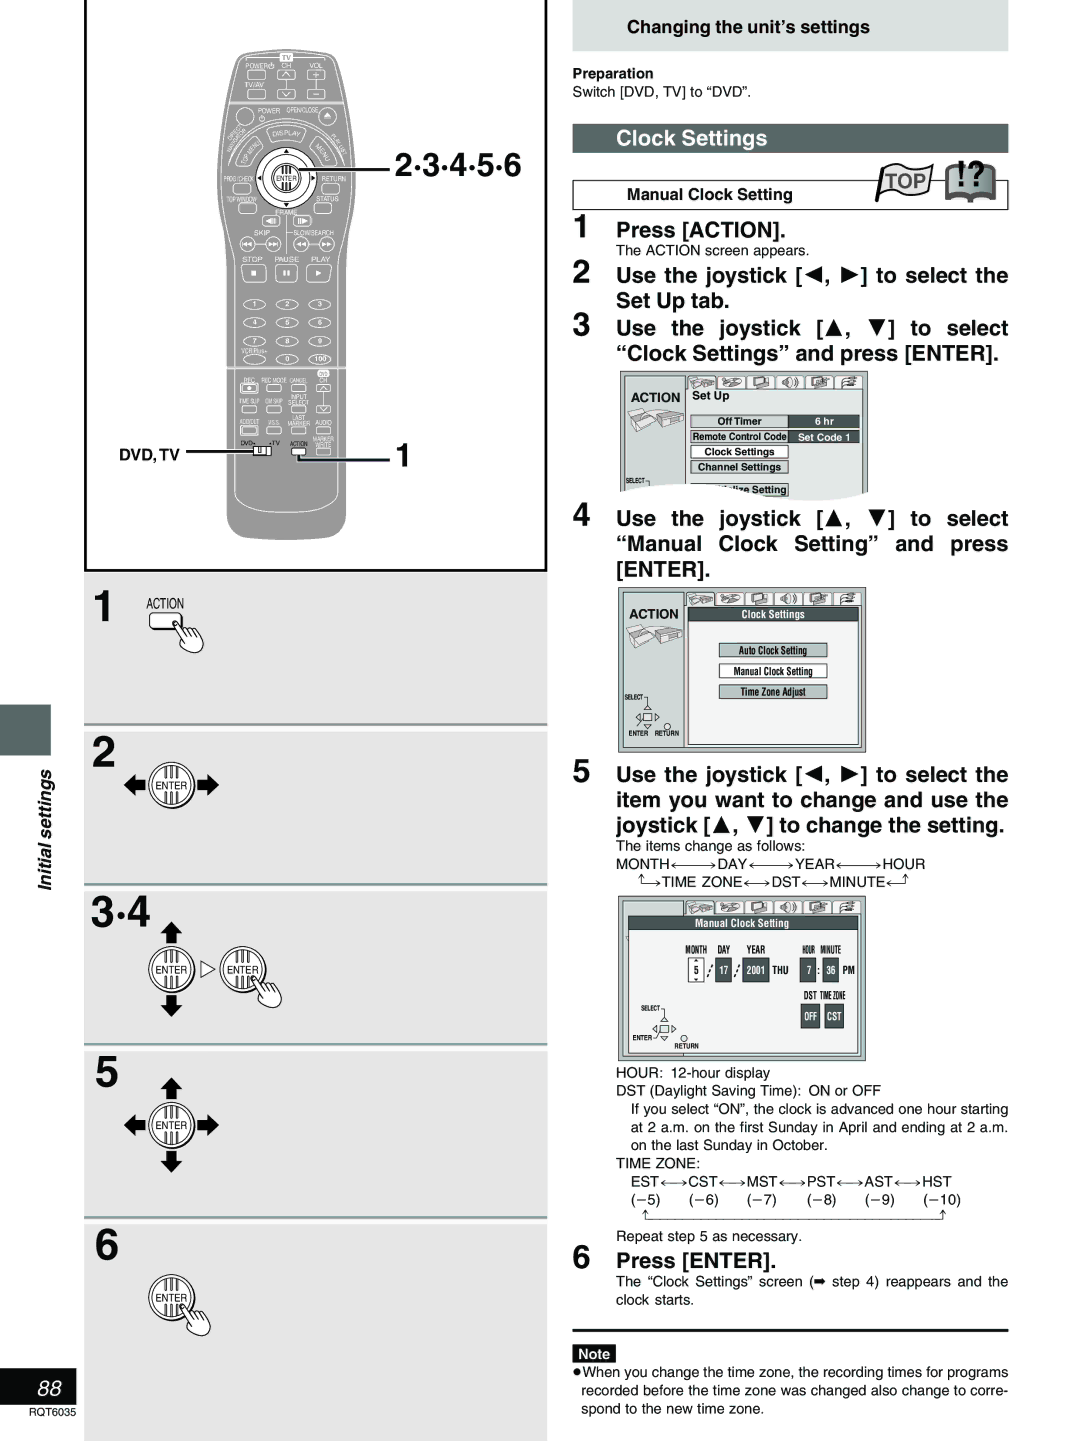
Clock Settings
To stop auto clock setting
Auto Clock Setting
Press Action
Use the joystick To select Manual Clock Setting and press
Items change as follows MONTH-----DAY-----YEAR-----HOUR
Time Zonedstminutej
Time Zone Estcstmstpstasthst
Set Up
Time Zone Adjust
Clock Settings screen reappears
Use the joystick 3, 4 to select TV or Catv and press Enter
Antenna System
TV TV broadcast 2CH-69CH Catv Catv broadcast 1CH-125CH
Screen shown in reappears
Auto Channel Setting
To stop auto channel setting
Use the joystick 2, 1 to select
Set Up tab
Use the joystick 3, 4 to Select Channel Settings Press
Use the joystick 2, 1 to select
You can choose from the following captions
Repeat this step to enter the other characters
Repeat steps , , and ! as necessary
On-screen displays
» Changing the information Displayed
Press Status to change the information displayed
»B Display examples
Specifications
Laser Specification
Glossary
Maintenance
Disc handling
Self-diagnosis
Error messages Causes and solutions
Error messages
Reference pages are shown as black circled numbers F
Troubleshooting guide
Power
Picture
Sound
Remote control
Play
Product Service
Troubleshooting guide
Recording and timer recording
Timer program remains even after recording finishes
Limited Warranty
San Gabriel Industrial Park, Carolina, Puerto Rico
Panasonic Canada Inc
Panasonic DVD Recorder One 1 year, parts and labour
Customer Name Model Number
Date of Purchase Dealer’s Name Address Phone Number
Servicenter List only for U.S.A
Factory Servicenters
Selección del tipo de la pantalla del televisor
Conexiones de antena y televisor
Pulse Action para finalizar el ajuste
Pulse 1, Play
Reproducción de discos
Grabación de programas de TV
Index