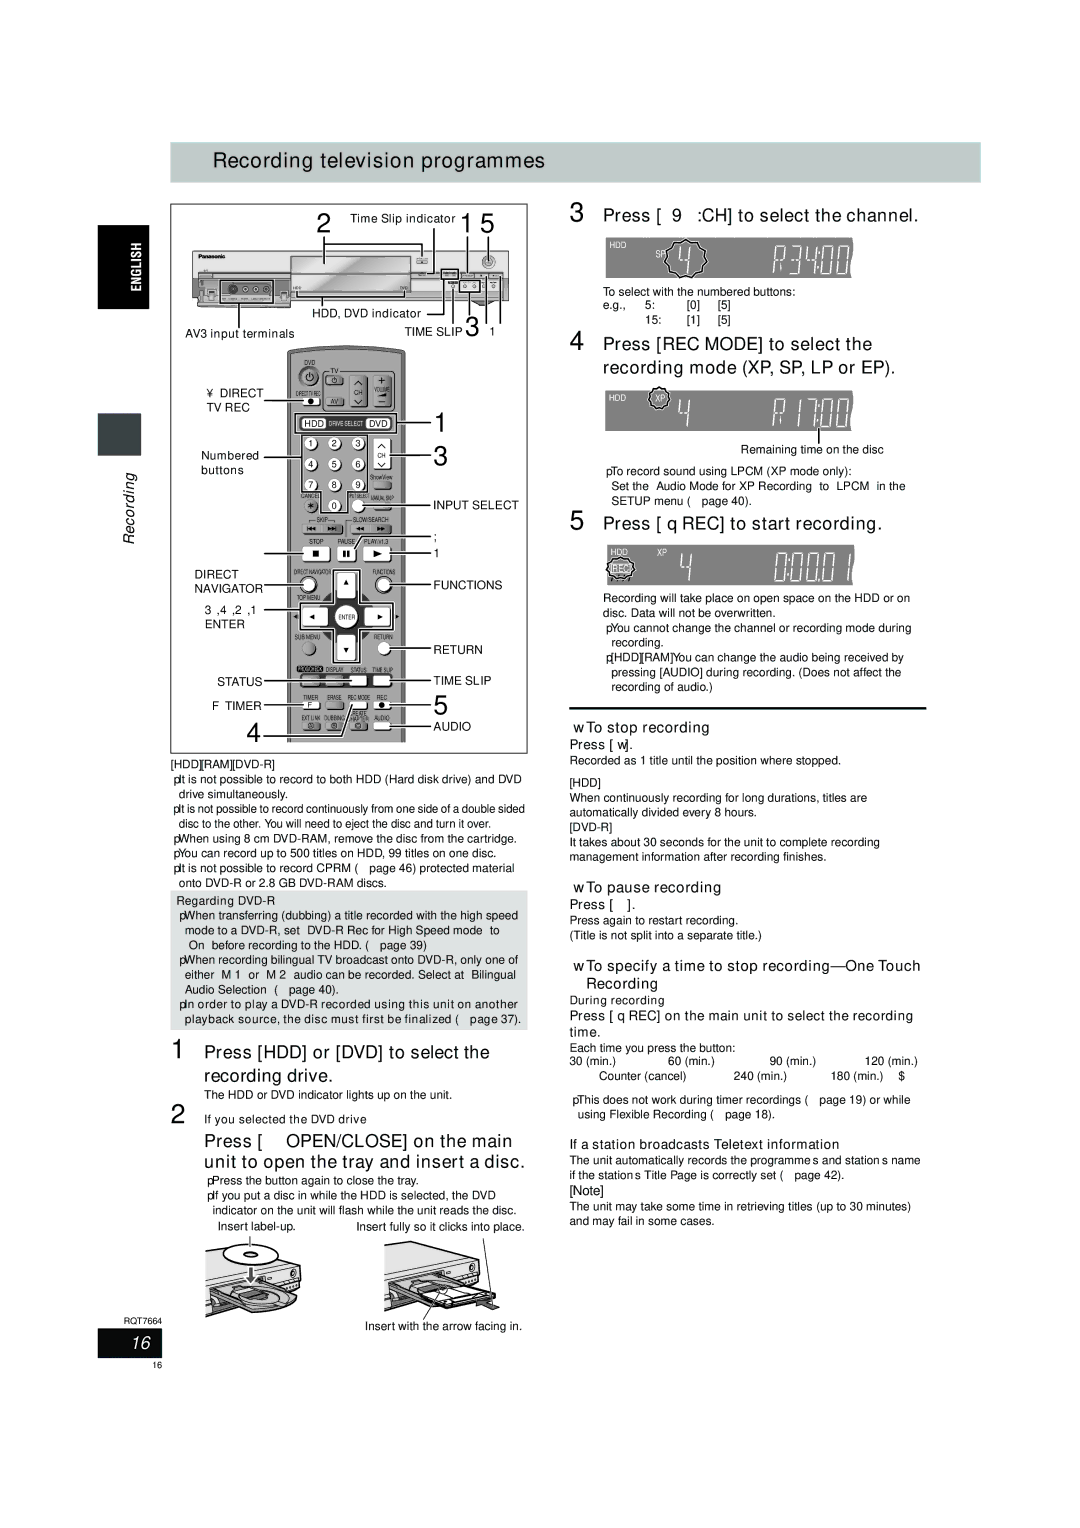
Recording television programmes
2 Time Slip indicator 1 5
|
|
|
|
|
| OPEN/CLOSE |
|
|
|
|
|
|
|
|
|
|
| REC |
|
|
|
|
|
|
| TIME SLIP | HDD DVD | DRIVE SELECT | /x1.3 |
| PULL OPEN |
|
|
|
|
| TIME SLIP | CH |
|
|
| HDD |
|
|
| DVD |
|
|
|
| AV3 |
|
|
|
|
|
|
|
|
|
| HDD, DVD indicator |
|
|
| ||||
| AV3 input terminals |
|
|
| TIME SLIP 3∫ 1 | ||||
|
| DVD |
|
|
|
|
|
|
|
|
|
| TV |
|
|
|
|
|
|
| ¥ DIRECT | DIRECT TV REC |
| CH |
| VOLUME |
|
|
|
| AV |
|
|
|
|
| |||
| TV REC |
|
|
|
|
|
|
| |
|
|
|
|
|
| 1 |
|
| |
|
| HDD DRIVE SELECT | DVD |
|
| ||||
|
|
|
|
| |||||
| Numbered | 1 | 2 | 3 |
|
| 3 |
|
|
| 4 | 5 | 6 |
| CH |
|
| ||
Recording | buttons |
|
|
|
| ||||
STOP | PAUSE | PLAY/x1.3 | ; |
|
| ||||
|
| 7 | 8 | 9 |
| ShowView |
|
|
|
|
|
|
|
|
|
| |||
|
| CANCEL | 0 | INPUT SELECT MANUAL SKIP | INPUT SELECT | ||||
|
|
|
|
|
| ||||
|
| SKIP | SLOW/SEARCH |
|
|
| |||
| ∫ |
|
|
|
|
| 1 |
|
|
| DIRECT | DIRECT NAVIGATOR |
|
| FUNCTIONS |
|
|
| |
|
|
|
|
|
| FUNCTIONS | |||
| NAVIGATOR |
|
|
|
|
| |||
| TOP MENU |
|
|
|
|
|
|
| |
|
|
|
|
|
|
|
|
| |
| 3,4,2,1 |
| ENTER |
|
|
|
|
| |
| ENTER |
|
|
|
|
|
| ||
|
|
|
|
|
|
|
|
| |
|
| SUB MENU |
|
|
| RETURN |
|
|
|
|
|
|
|
|
|
| RETURN |
| |
|
| PROG/CHECK | DISPLAY | STATUS | TIME SLIP | TIME SLIP |
| ||
| STATUS |
|
|
|
|
|
| ||
| FTIMER | TIMER | ERASE | REC MODE | REC | 5 |
|
| |
| F |
| CREATE |
|
|
| |||
|
| EXT LINK | DUBBING CHAPTER | AUDIO |
|
|
| ||
4 | A B C | AUDIO |
[HDD] [RAM] [DVD-R]
≥It is not possible to record to both HDD (Hard disk drive) and DVD drive simultaneously.
≥It is not possible to record continuously from one side of a double sided disc to the other. You will need to eject the disc and turn it over.
≥When using 8 cm
≥It is not possible to record CPRM (➡page 46) protected material onto
Regarding DVD-R
≥When transferring (dubbing) a title recorded with the high speed mode to a
≥When recording bilingual TV broadcast onto
≥In order to play a
1
2
RQT7664
16
3 Press [W X CH] to select the channel.
HDD XP
EXTLink SP
REC PLAY LP


 EP
EP
To select with the numbered buttons:
e.g., | 5: | [0] ➡ [5] |
| 15: | [1] ➡ [5] |
4 Press [REC MODE] to select the recording mode (XP, SP, LP or EP).
HDD XP
EXTLink SP
REC PLAY LP


 EP
EP
Remaining time on the disc
≥To record sound using LPCM (XP mode only):
Set the “Audio Mode for XP Recording” to “LPCM” in the SETUP menu (➡page 40).
5 Press [¥ REC] to start recording.
HDD XP
EXTLink SP
REC PLAY LP


 EP
EP
Recording will take place on open space on the HDD or on disc. Data will not be overwritten.
≥You cannot change the channel or recording mode during recording.
≥[HDD] [RAM] You can change the audio being received by pressing [AUDIO] during recording. (Does not affect the recording of audio.)
∫To stop recording
Press [∫].
Recorded as 1 title until the position where stopped.
[HDD]
When continuously recording for long durations, titles are automatically divided every 8 hours.
[DVD-R]
It takes about 30 seconds for the unit to complete recording management information after recording finishes.
∫To pause recording
Press [;].
Press again to restart recording. (Title is not split into a separate title.)
∫To specify a time to stop recording—One Touch
Recording
During recording
Press [¥ REC] on the main unit to select the recording time.
Each time you press the button: |
| |
30 (min.) ""# 60 (min.) | ""# 90 (min.) | ""# 120 (min.) |
^" Counter (cancel) ,"" | 240 (min.) ,"" | 180 (min.) ,} |
≥This does not work during timer recordings (➡page 19) or while using Flexible Recording (➡page 18).
If a station broadcasts Teletext information
The unit automatically records the programme’s and station’s name if the station’s Title Page is correctly set (➡page 42).
[Note]
The unit may take some time in retrieving titles (up to 30 minutes) and may fail in some cases.
16