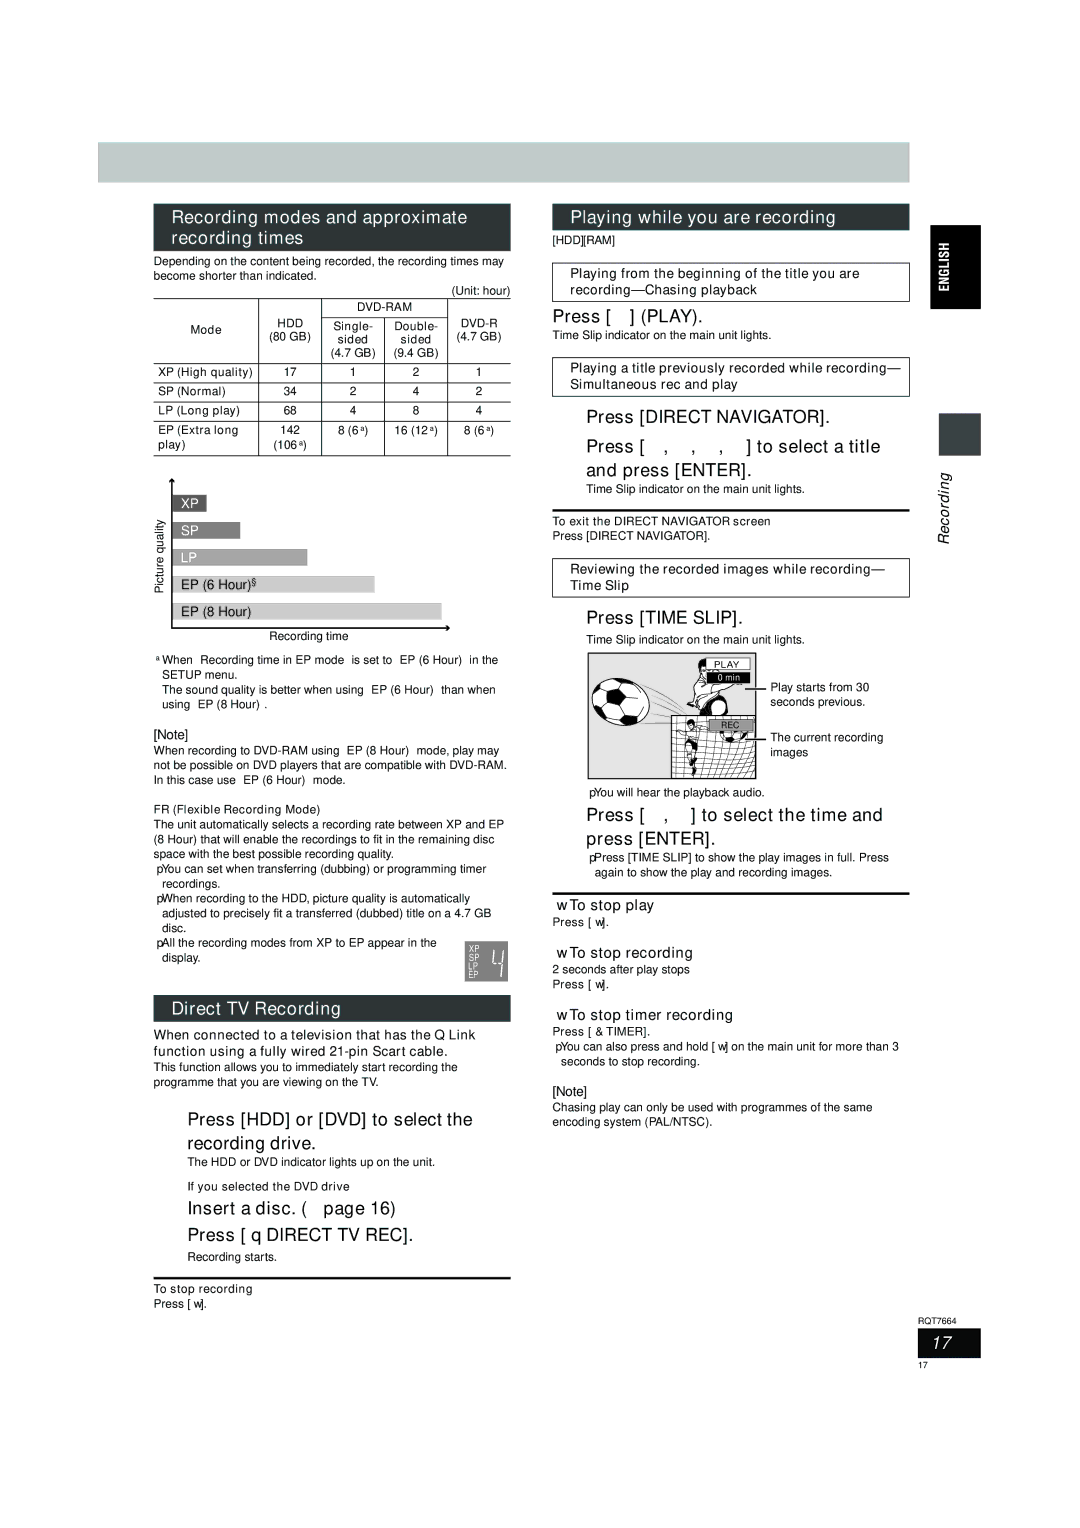
Recording modes and approximate recording times
Depending on the content being recorded, the recording times may become shorter than indicated.
|
|
|
| (Unit: hour) | |
|
|
|
| ||
| HDD |
|
| ||
Mode | Single- | Double- | |||
(80 GB) | sided | sided | (4.7 GB) | ||
| |||||
|
| (4.7 GB) | (9.4 GB) |
| |
|
|
|
|
| |
XP (High quality) | 17 | 1 | 2 | 1 | |
|
|
|
|
| |
SP (Normal) | 34 | 2 | 4 | 2 | |
|
|
|
|
| |
LP (Long play) | 68 | 4 | 8 | 4 | |
|
|
|
|
| |
EP (Extra long | 142 | 8 (6§) | 16 (12§) | 8 (6§) | |
play) | (106§) |
|
|
| |
|
|
|
|
|
|
|
| XP |
| ||||
quality |
|
|
|
|
|
|
SP |
| |||||
|
|
|
|
|
| |
LP |
|
|
| |||
Picture |
| |||||
|
|
|
|
|
| |
EP (6 Hour)§ |
|
| ||||
|
|
|
|
| ||
| EP (8 Hour) |
| ||||
|
|
|
|
|
|
|
|
|
| Recording time | |||
Playing while you are recording
[HDD] [RAM]
Playing from the beginning of the title you are
Press [1] (PLAY).
Time Slip indicator on the main unit lights.
Playing a title previously recorded while recording— Simultaneous rec and play
1Press [DIRECT NAVIGATOR].
2Press [3, 4, 2, 1] to select a title
and press [ENTER]. | Recording | |
Time Slip indicator on the main unit lights. | ||
| ||
|
| |
To exit the DIRECT NAVIGATOR screen |
| |
Press [DIRECT NAVIGATOR]. |
|
Reviewing the recorded images while recording— Time Slip
1Press [TIME SLIP].
Time Slip indicator on the main unit lights.
§When “Recording time in EP mode” is set to “EP (6 Hour)” in the SETUP menu.
The sound quality is better when using “EP (6 Hour)” than when using “EP (8 Hour)”.
[Note]
When recording to
PLAY |
0 min |
REC |
Play starts from 30 seconds previous.
The current recording images
FR (Flexible Recording Mode)
The unit automatically selects a recording rate between XP and EP (8 Hour) that will enable the recordings to fit in the remaining disc space with the best possible recording quality.
≥You can set when transferring (dubbing) or programming timer recordings.
≥When recording to the HDD, picture quality is automatically adjusted to precisely fit a transferred (dubbed) title on a 4.7 GB disc.
≥All the recording modes from XP to EP appear in the display.
Direct TV Recording
When connected to a television that has the Q Link function using a fully wired
This function allows you to immediately start recording the programme that you are viewing on the TV.
1Press [HDD] or [DVD] to select the
recording drive.
The HDD or DVD indicator lights up on the unit.
2If you selected the DVD drive
Insert a disc. (➡page 16)
3Press [¥ DIRECT TV REC].
Recording starts.
To stop recording
Press [∫].
≥You will hear the playback audio.
2Press [3, 4] to select the time and
press [ENTER].
≥Press [TIME SLIP] to show the play images in full. Press again to show the play and recording images.
∫To stop play
Press [∫].
∫To stop recording
2 seconds after play stops
Press [∫].
∫To stop timer recording
Press [F TIMER].
≥You can also press and hold [∫] on the main unit for more than 3 seconds to stop recording.
[Note]
Chasing play can only be used with programmes of the same encoding system (PAL/NTSC).
RQT7664
17
17
