Control reference guide
Remote control
DVD
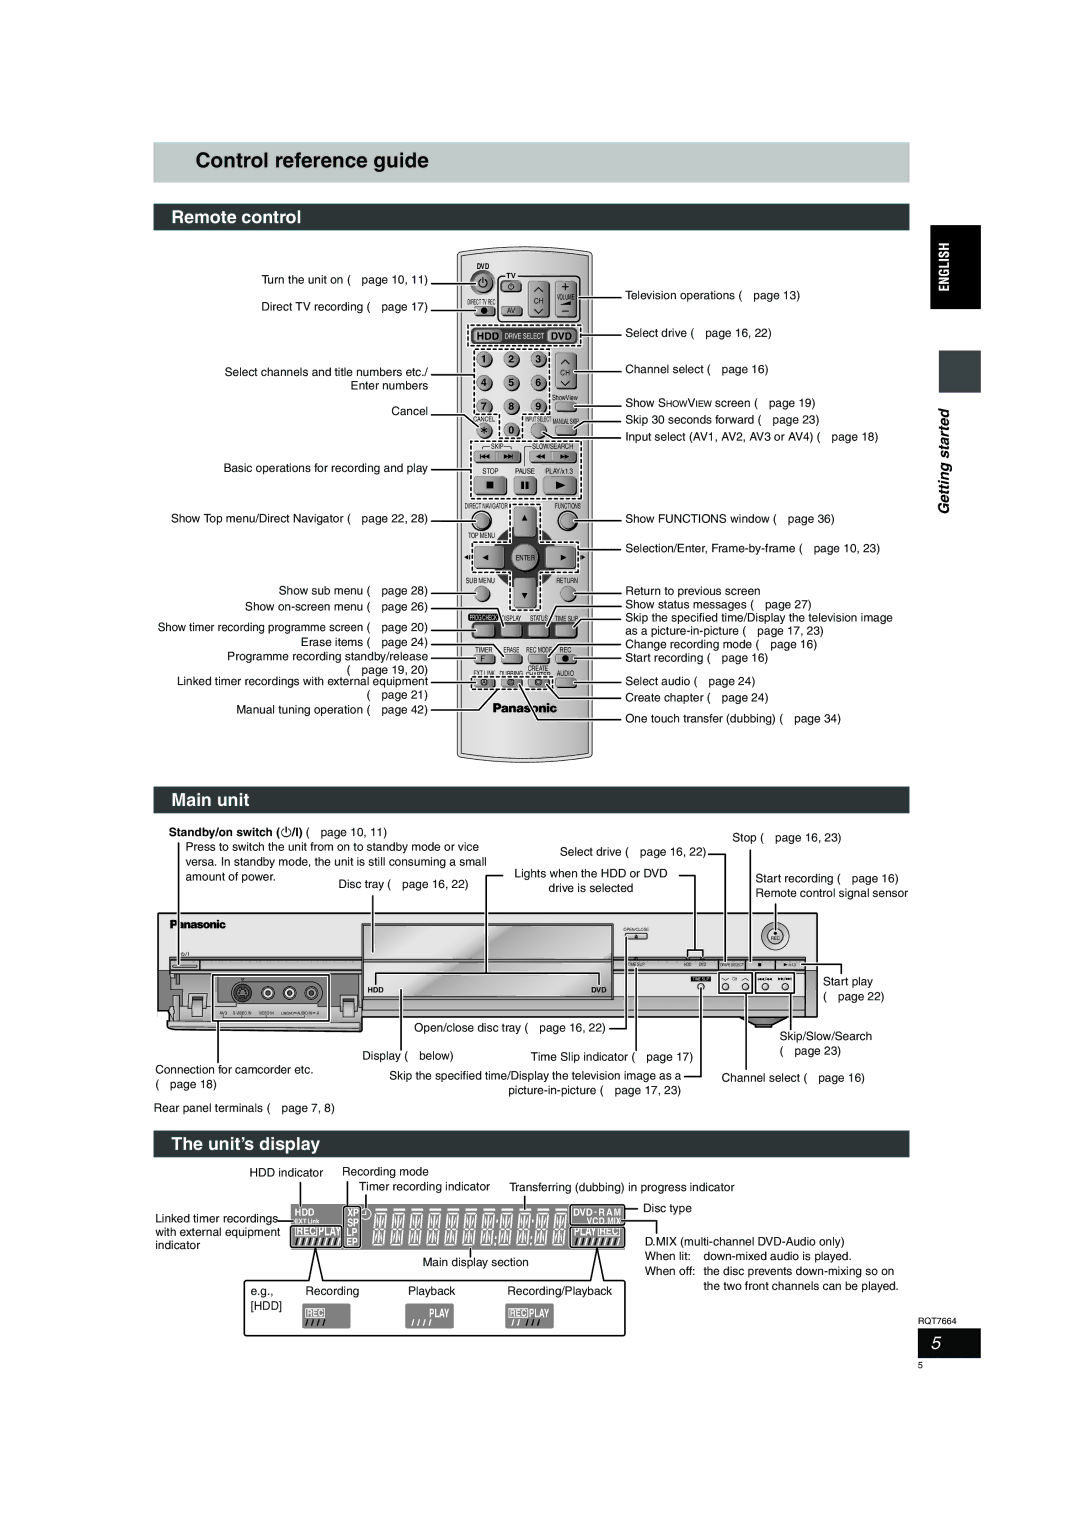
Turn the unit on (➡page 10, 11) |
| TV |
|
|
|
|
|
| |
Direct TV recording (➡page 17) | DIRECT TV REC | CH | VOLUME | Television operations (➡page 13) |
|
| |||
| AV |
|
| |
| HDD DRIVE SELECT DVD | Select drive (➡page 16, 22) | ||
Select channels and title numbers etc./ Enter numbers
Cancel
Basic operations for recording and play
Show Top menu/Direct Navigator (➡page 22, 28)
1 | 2 |
| 3 |
|
|
| CH |
4 | 5 |
| 6 |
|
|
| ShowView |
7 | 8 |
| 9 |
CANCEL | 0 | INPUT SELECT MANUAL SKIP | |
|
|
| |
SKIP |
| SLOW/SEARCH | |
STOP |
| PAUSE | PLAY/x1.3 |
DIRECT NAVIGATOR |
|
| FUNCTIONS |
TOP MENU
ENTER
Channel select (➡page 16)
Show SHOWVIEW screen (➡page 19) Skip 30 seconds forward (➡page 23)
Input select (AV1, AV2, AV3 or AV4) (➡page 18)
Show FUNCTIONS window (➡page 36)
Selection/Enter,
Getting started
Show sub menu (➡page 28) | SUB MENU |
|
| RETURN | |
|
|
|
| ||
Show |
|
|
|
| |
Show timer recording programme screen (➡page 20) | PROG/CHECK DISPLAY | STATUS | TIME SLIP | ||
|
|
|
| ||
Erase items (➡page 24) | TIMER | ERASE | REC MODE | REC | |
Programme recording standby/release | |||||
F |
|
|
| ||
(➡page 19, 20) | EXT LINK |
| CREATE | AUDIO | |
Linked timer recordings with external equipment | DUBBING CHAPTER | ||||
A | B | C |
| ||
(➡page 21) |
|
|
|
| |
Manual tuning operation (➡page 42) |
|
|
|
| |
Return to previous screen
Show status messages (➡page 27)
Skip the specified time/Display the television image as a
Change recording mode (➡page 16) Start recording (➡page 16)
Select audio (➡page 24)
Create chapter (➡page 24)
One touch transfer (dubbing) (➡page 34)
Main unit
Standby/on switch (Í/I) (➡page 10, 11)
Press to switch the unit from on to standby mode or vice versa. In standby mode, the unit is still consuming a small amount of power.
Select drive (➡page 16, 22)
Lights when the HDD or DVD
drive is selected
OPEN/CLOSE
TIME SLIP | HDD DVD |
Stop (➡page 16, 23)
Start recording (➡page 16) Remote control signal sensor
REC
DRIVE SELECT | /x1.3 |
|
|
PULL OPEN |
|
|
|
|
|
AV3 | VIDEO IN | L/MONO | AUDIO IN | R |
Connection for camcorder etc. (➡page 18)
Rear panel terminals (➡page 7, 8)
| TIME SLIP | CH | Start play |
HDD | DVD |
| |
| (➡page 22) | ||
|
|
|
Open/close disc tray (➡page 16, 22)
|
| Skip/Slow/Search |
Display (➡below) | Time Slip indicator (➡page 17) | (➡page 23) |
| ||
Skip the specified time/Display the television image as a | Channel select (➡page 16) | |
|
| |
The unit’s display
HDD indicator Recording mode |
|
|
|
| ||||||||
|
|
|
| Timer recording indicator | Transferring (dubbing) in progress indicator | |||||||
|
|
|
| |||||||||
|
|
|
|
|
|
|
|
|
|
| Disc type | |
Linked timer recordings |
| HDD | XP |
|
|
|
|
| DVD - R AM | |||
| EXTLink | SP |
|
|
|
|
| VCD.MIX |
|
| ||
with external equipment | REC PLAY | LP |
|
|
|
|
| PLAY REC |
|
| ||
|
|
|
|
| D.MIX | |||||||
indicator |
|
| EP |
|
|
|
|
|
| |||
|
|
|
|
|
|
|
|
|
|
| When lit: | |
|
|
|
|
|
| Main display section | ||||||
|
|
|
|
|
| When off: the disc prevents | ||||||
|
|
|
|
|
|
|
|
|
|
| ||
e.g., |
| Recording | Playback | Recording/Playback |
| the two front channels can be played. | ||||||
|
|
| ||||||||||
[HDD] |
| EXTLink |
| EXTLink | EXTLink |
|
| |||||
|
|
| REC PLAY |
|
| REC | PLAY | REC PLAY |
|
| ||
RQT7664
5
5