Changing the player settings
1
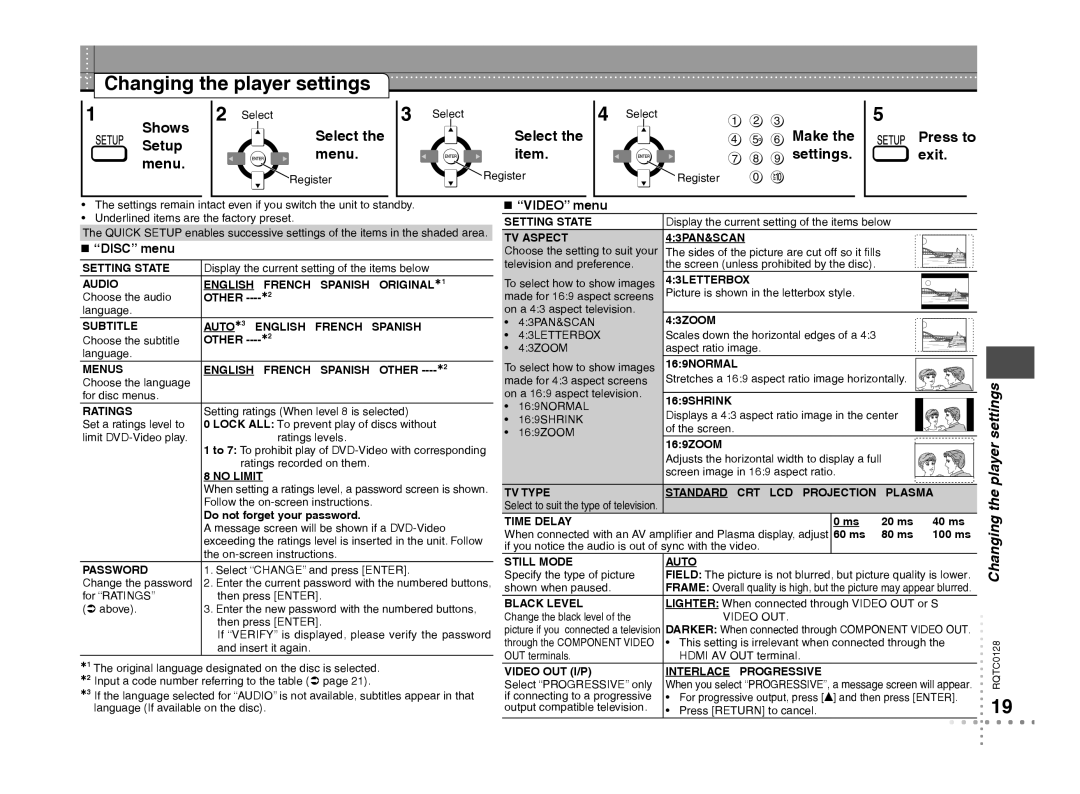
Shows Setup menu.
2Select
Select the menu.
Register
3Select
Select the item.
Register
4 Select | 1 | 2 | 3 | Make the |
| 4 | 5 | 6 | |
| 7 | 8 | 9 | settings. |
| Register | 0 |
|
|
5
Press to exit.
•The settings remain intact even if you switch the unit to standby.
•Underlined items are the factory preset.
The QUICK SETUP enables successive settings of the items in the shaded area.
“DISC” menu
SETTING STATE | Display the current setting of the items below |
AUDIO | ENGLISH FRENCH SPANISH ORIGINAL1 |
Choose the audio | OTHER |
language. |
|
SUBTITLE | AUTO3 ENGLISH FRENCH SPANISH |
Choose the subtitle | OTHER |
language. |
|
MENUS | ENGLISH FRENCH SPANISH OTHER |
Choose the language |
|
for disc menus. |
|
RATINGS | Setting ratings (When level 8 is selected) |
Set a ratings level to | 0 LOCK ALL: To prevent play of discs without |
limit | ratings levels. |
| 1 to 7: To prohibit play of |
| ratings recorded on them. |
| 8 NO LIMIT |
| When setting a ratings level, a password screen is shown. |
| Follow the |
| Do not forget your password. |
| A message screen will be shown if a |
| exceeding the ratings level is inserted in the unit. Follow |
| the |
PASSWORD | 1. Select “CHANGE” and press [ENTER]. |
Change the password | 2. Enter the current password with the numbered buttons, |
for “RATINGS” | then press [ENTER]. |
( above). | 3. Enter the new password with the numbered buttons, |
| then press [ENTER]. |
| If “VERIFY” is displayed, please verify the password |
| and insert it again. |
1 The original language designated on the disc is selected. 2 Input a code number referring to the table ( page 21).
3 If the language selected for “AUDIO” is not available, subtitles appear in that language (If available on the disc).
“VIDEO” menu
SETTING STATE | Display the current setting of the items below |
| ||
TV ASPECT | 4:3PAN&SCAN |
|
| |
Choose the setting to suit your | The sides of the picture are cut off so it fills |
|
| |
television and preference. | the screen (unless prohibited by the disc). |
|
| |
To select how to show images | 4:3LETTERBOX |
|
| |
made for 16:9 aspect screens | Picture is shown in the letterbox style. |
|
| |
on a 4:3 aspect television. | 4:3ZOOM |
|
| |
• | 4:3PAN&SCAN |
|
| |
• | 4:3LETTERBOX | Scales down the horizontal edges of a 4:3 |
|
|
• | 4:3ZOOM | aspect ratio image. |
|
|
To select how to show images | 16:9NORMAL |
|
| |
made for 4:3 aspect screens | Stretches a 16:9 aspect ratio image horizontally. |
| ||
on a 16:9 aspect television. | 16:9SHRINK |
|
| |
• | 16:9NORMAL |
|
| |
Displays a 4:3 aspect ratio image in the center |
| |||
• | 16:9SHRINK |
| ||
of the screen. |
|
| ||
• | 16:9ZOOM |
|
| |
16:9ZOOM |
|
| ||
|
|
|
| |
|
| Adjusts the horizontal width to display a full |
| |
|
| screen image in 16:9 aspect ratio. |
|
|
TV TYPE | STANDARD CRT LCD PROJECTION | PLASMA | ||
Select to suit the type of television. |
|
|
| |
TIME DELAY | 0 ms | 20 ms | 40 ms | |
When connected with an AV amplifier and Plasma display, adjust 60 ms | 80 ms | 100 ms | ||
if you notice the audio is out of sync with the video. |
|
| ||
STILL MODE | AUTO |
|
| |
Specify the type of picture | FIELD: The picture is not blurred, but picture quality is lower. | |||
shown when paused. | FRAME: Overall quality is high, but the picture may appear blurred. | |||
BLACK LEVEL | LIGHTER: When connected through VIDEO OUT or S | |||
Change the black level of the | VIDEO OUT. |
|
| |
picture if you connected a television DARKER: When connected through COMPONENT VIDEO OUT. | ||||
through the COMPONENT VIDEO | • This setting is irrelevant when connected through the | |||
OUT terminals. | HDMI AV OUT terminal. |
|
| |
VIDEO OUT (I/P) | INTERLACE PROGRESSIVE |
|
| |
Select “PROGRESSIVE” only | When you select “PROGRESSIVE”, a message screen will appear. | |||
if connecting to a progressive | • For progressive output, press [e] and then press [ENTER]. | |||
output compatible television. | • Press [RETURN] to cancel. |
|
| |
RQTC0128Changing the player settings
19