FX-301

PRECAUTIONS FOR PROPER USE.

Fiber

Fiber attachments (FX-AT)

Product outline

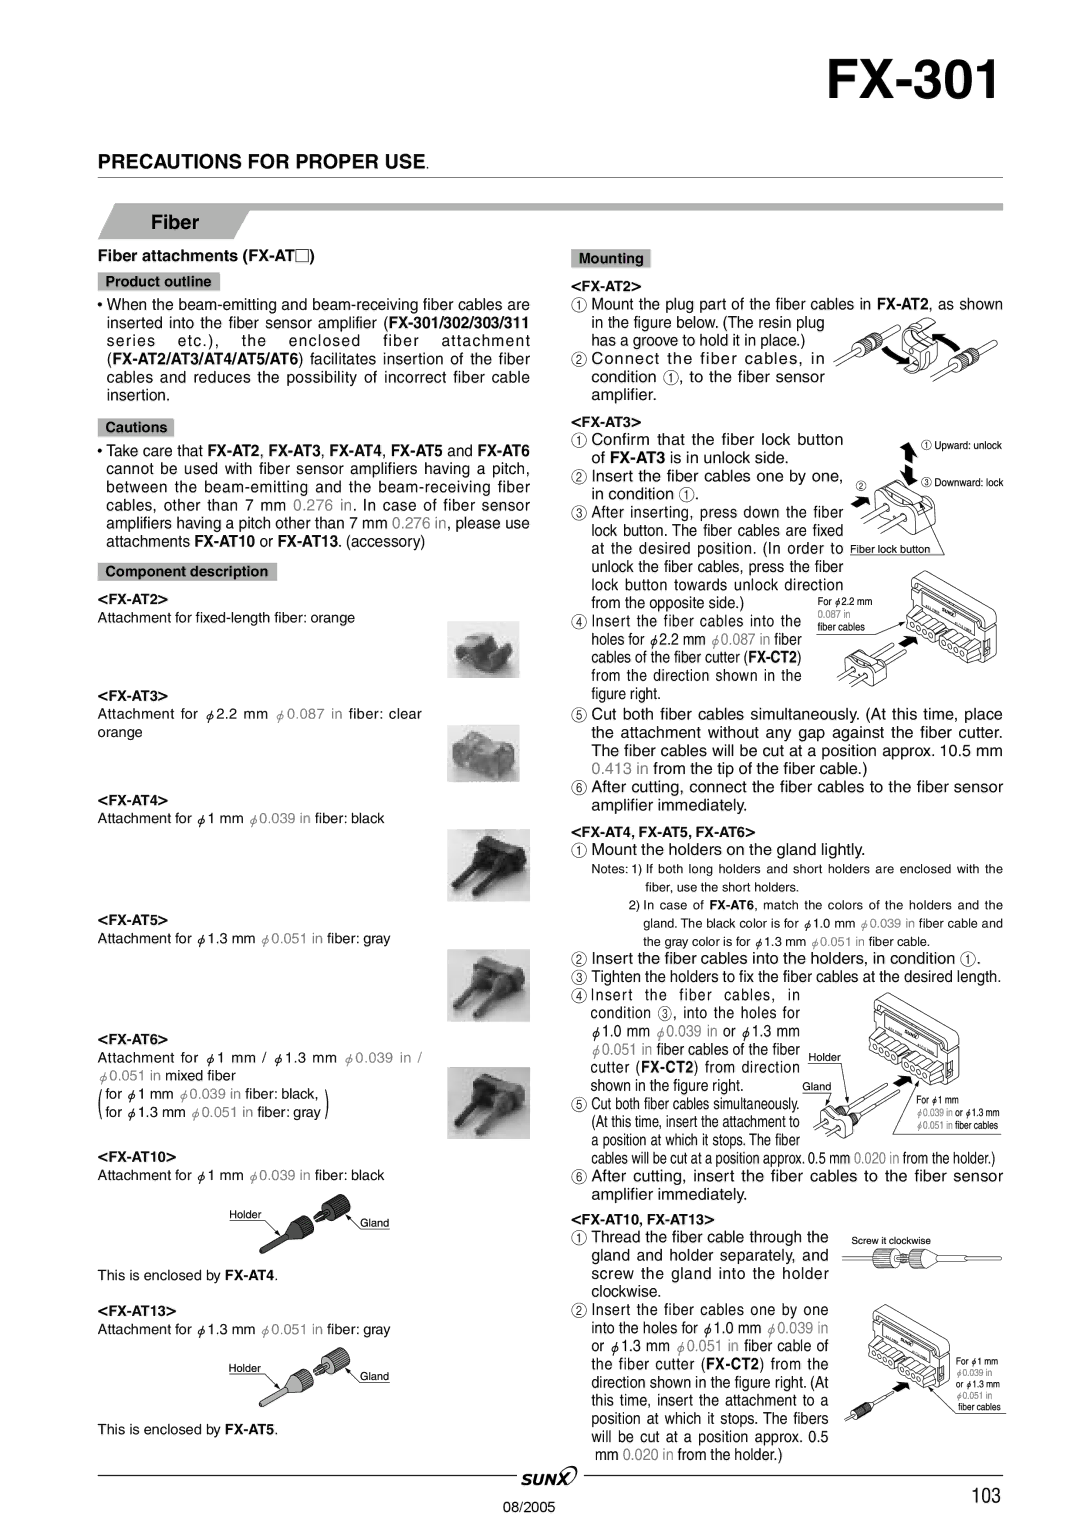
When the beam-emitting and beam-receiving fiber cables are inserted into the fiber sensor amplifier (FX-301/302/303/311series etc.), the enclosed fiber attachment (FX-AT2/AT3/AT4/AT5/AT6) facilitates insertion of the fiber cables and reduces the possibility of incorrect fiber cable insertion.

Cautions

Take care that FX-AT2,FX-AT3,FX-AT4,FX-AT5 and FX-AT6 cannot be used with fiber sensor amplifiers having a pitch, between the beam-emitting and the beam-receiving fiber cables, other than 7 mm 0.276 in. In case of fiber sensor amplifiers having a pitch other than 7 mm 0.276 in, please use attachments FX-AT10 or FX-AT13. (accessory)

Component description

<FX-AT2>

Attachment for fixed-length fiber: orange

<FX-AT3>

Attachment for "2.2 mm "0.087 in fiber: clear orange

<FX-AT4>

Attachment for "1 mm "0.039 in fiber: black

<FX-AT5>

Attachment for "1.3 mm "0.051 in fiber: gray

Mounting

<FX-AT2>

1Mount the plug part of the fiber cables in FX-AT2, as shown

in the figure below. (The resin plug has a groove to hold it in place.)

2 Connect the fiber cables, in condition 1, to the fiber sensor amplifier.

<FX-AT3>

1 Confirm that the fiber lock button of FX-AT3is in unlock side.

2 Insert the fiber cables one by one, in condition 1.

3After inserting, press down the fiber lock button. The fiber cables are fixed

at the desired position. (In order to unlock the fiber cables, press the fiber

lock button towards unlock direction from the opposite side.)

4 Insert the fiber cables into the holes for "2.2 mm "0.087 in fiber cables of the fiber cutter (FX-CT2)

from the direction shown in the figure right.

5Cut both fiber cables simultaneously. (At this time, place the attachment without any gap against the fiber cutter. The fiber cables will be cut at a position approx. 10.5 mm 0.413 in from the tip of the fiber cable.)

6After cutting, connect the fiber cables to the fiber sensor amplifier immediately.

<FX-AT4, FX-AT5, FX-AT6>

1Mount the holders on the gland lightly.

Notes: 1) If both long holders and short holders are enclosed with the fiber, use the short holders.

2)In case of FX-AT6, match the colors of the holders and the gland. The black color is for "1.0 mm "0.039 in fiber cable and the gray color is for "1.3 mm "0.051 in fiber cable.

<FX-AT6>

Attachment for "1 mm / "1.3 mm "0.039 in / "0.051 in mixed fiber

( for "1 mm "0.039 in fiber: black, ) for "1.3 mm "0.051 in fiber: gray

<FX-AT10>

Attachment for "1 mm "0.039 in fiber: black

This is enclosed by FX-AT4.

<FX-AT13>

Attachment for "1.3 mm "0.051 in fiber: gray

This is enclosed by FX-AT5.

2Insert the fiber cables into the holders, in condition 1.

3 Tighten the holders to fix the fiber cables at the desired length. 4 Insert the fiber cables, in

condition 3, into the holes for

"1.0 mm "0.039 in or "1.3 mm "0.051 in fiber cables of the fiber cutter (FX-CT2) from direction shown in the figure right.

5 Cut both fiber cables simultaneously.

(At this time, insert the attachment to a position at which it stops. The fiber

cables will be cut at a position approx. 0.5 mm 0.020 in from the holder.)

6After cutting, insert the fiber cables to the fiber sensor amplifier immediately.

<FX-AT10, FX-AT13>

1 Thread the fiber cable through the gland and holder separately, and screw the gland into the holder clockwise.

2Insert the fiber cables one by one into the holes for "1.0 mm "0.039 in

or "1.3 mm "0.051 in fiber cable of the fiber cutter (FX-CT2) from the direction shown in the figure right. (At this time, insert the attachment to a position at which it stops. The fibers will be cut at a position approx. 0.5

mm0.020 in from the holder.)

0 8 / 2 0 0 5

103


Page 36
Image 36
Panasonic FX-301 manual Fiber attachments FX-AT

FX-301 specifications

The Panasonic FX-301 is a compact digital camera that merges portability with advanced photographic features, making it an ideal choice for photography enthusiasts and everyday users alike. Launched within Panasonic's well-regarded Lumix line, the FX-301 is designed to deliver remarkable image quality while enhancing ease of use.

One of the standout features of the Panasonic FX-301 is its impressive 12.1-megapixel sensor, which enables users to capture high-resolution images with exceptional detail. This powerful sensor works alongside the camera's versatile 28mm wide-angle Leica lens, offering a 4x optical zoom. The lens not only enhances the camera's capability in capturing wide landscapes but also excels in various lighting conditions, allowing for both outdoor and indoor photography.

In addition to its robust photographic capabilities, the FX-301 incorporates several advanced technologies to optimize image quality. The Intelligent Auto Mode (iA) is a user-friendly feature that automatically adjusts settings based on the shooting environment, helping users achieve better results without the need for deep technical knowledge. Furthermore, the camera includes Optical Image Stabilization (OIS), which helps to minimize blur caused by hand movements, ensuring clearer images even in challenging situations.

The Panasonic FX-301 also boasts a range of creative shooting modes that cater to diverse photographic needs. From macro photography for close-up shots to night scene mode for capturing the beauty of nighttime scenes, the camera provides various options to enhance creative expression. This adaptability is further supported by its 2.7-inch LCD display, which facilitates easy framing and reviewing of shots, even in bright sunlight.

Battery life is another noteworthy aspect of the FX-301, allowing users to capture numerous shots on a single charge. This durability makes it an ideal companion for travel and daily use, ensuring that spontaneous moments can be captured without the worry of running out of power.

In summary, the Panasonic FX-301 is a compact digital camera that offers impressive image quality, a user-friendly interface, and a suite of features designed to elevate the photography experience. With its blend of advanced technologies, optical performance, and intuitive controls, it stands as a strong contender in the realm of portable digital cameras. This camera caters to both novice photographers and professionals seeking a reliable, high-quality shooting experience.