FX-301

PRECAUTIONS FOR PROPER USE

Amplifier

Teaching

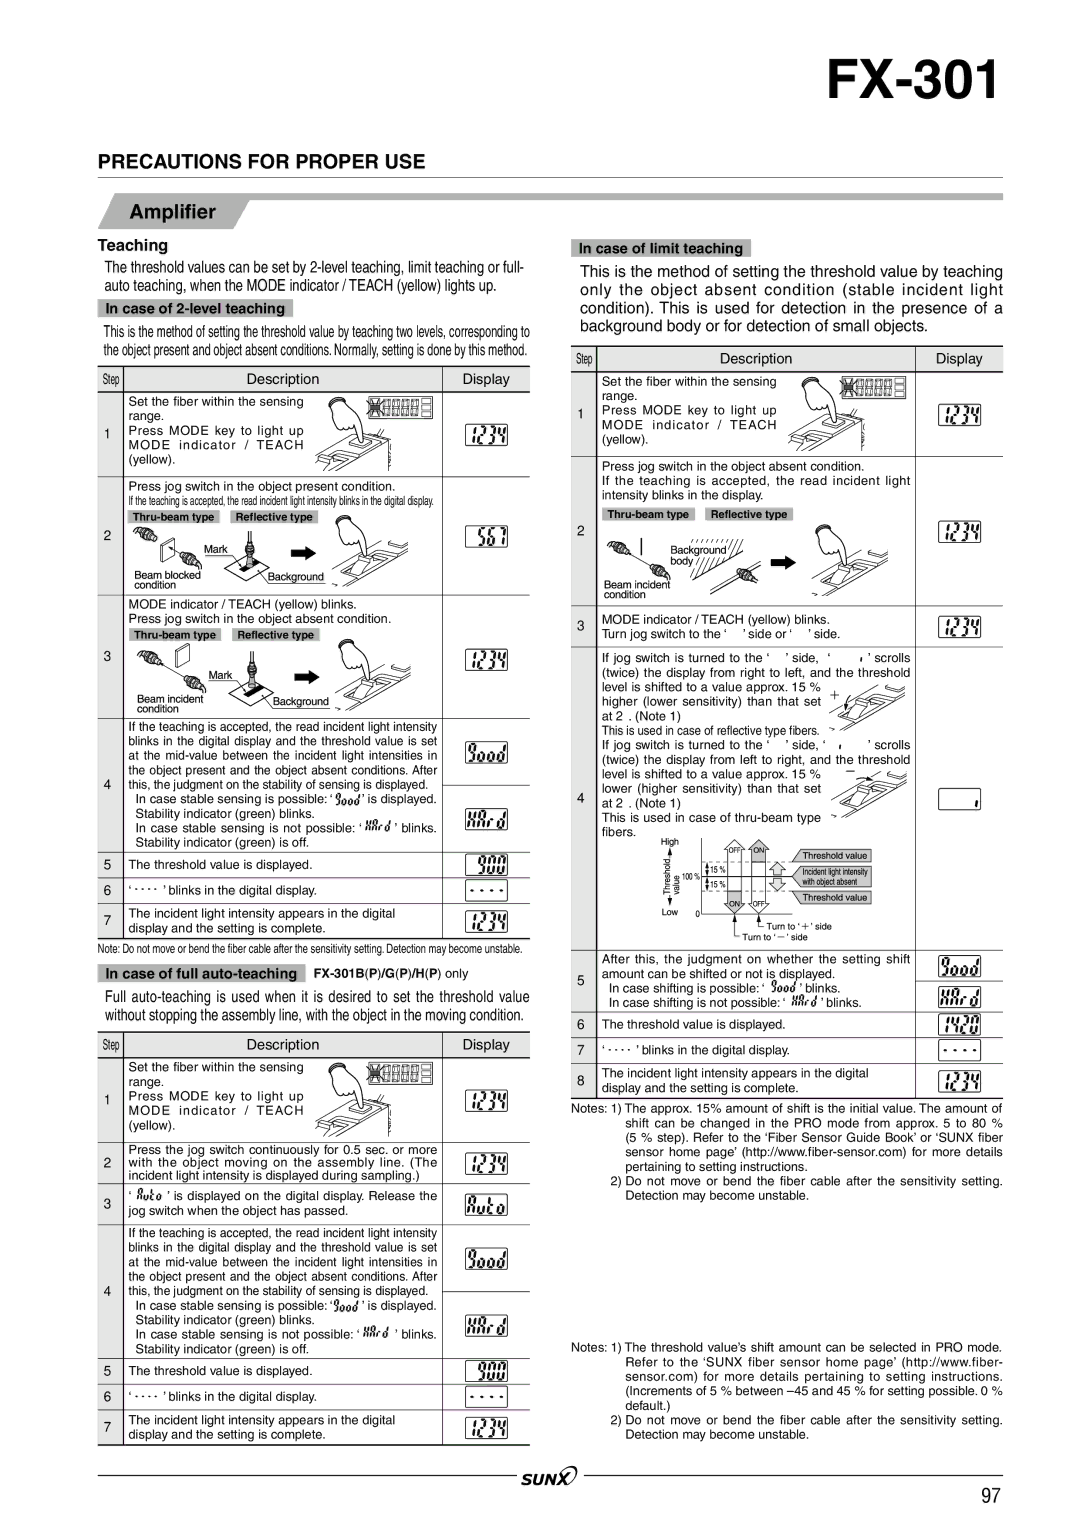
The threshold values can be set by 2-level teaching, limit teaching or full- auto teaching, when the MODE indicator / TEACH (yellow) lights up.

In case of 2-level teaching

This is the method of setting the threshold value by teaching two levels, corresponding to the object present and object absent conditions. Normally, setting is done by this method.

Step

Description

Display

Set the fiber within the sensing


range.


1 Press MODE key to light up


MODE indicator

/ TEACH


(yellow).


Press jog switch in the object present condition.


If the teaching is accepted, the read incident light intensity blinks in the digital display.


Thru-beam type

Reflective type


2

MODE indicator / TEACH (yellow) blinks.

Press jog switch in the object absent condition.

Thru-beam type

Reflective type

3

If the teaching is accepted, the read incident light intensity blinks in the digital display and the threshold value is set at the mid-value between the incident light intensities in the object present and the object absent conditions. After

4this, the judgment on the stability of sensing is displayed.

In case stable sensing is possible: ‘ ’ is displayed.

Stability indicator (green) blinks.

In case stable sensing is not possible: ‘ ’ blinks. Stability indicator (green) is off.

5

The threshold value is displayed.


6

’ blinks in the digital display.


7

The incident light intensity appears in the digital

display and the setting is complete.

Note: Do not move or bend the fiber cable after the sensitivity setting. Detection may become unstable.

In case of full auto-teaching FX-301B(P)/G(P)/H(P) only

Full auto-teaching is used when it is desired to set the threshold value without stopping the assembly line, with the object in the moving condition.

Step


Description

Display


Set the fiber within the sensing


range.


1

Press MODE key to light up


MODE indicator / TEACH


(yellow).


Press the jog switch continuously for 0.5 sec. or more


2

with the object moving on the assembly line. (The


incident light intensity is displayed during sampling.)


3

’ is displayed on the digital display. Release the


jog switch when the object has passed.


If the teaching is accepted, the read incident light intensity blinks in the digital display and the threshold value is set at the mid-value between the incident light intensities in the object present and the object absent conditions. After

4this, the judgment on the stability of sensing is displayed.

In case stable sensing is possible: ‘ ’ is displayed.

Stability indicator (green) blinks.

In case stable sensing is not possible: ‘ ’ blinks. Stability indicator (green) is off.

5

The threshold value is displayed.


6

’ blinks in the digital display.


7

The incident light intensity appears in the digital

display and the setting is complete.

In case of limit teaching

This is the method of setting the threshold value by teaching only the object absent condition (stable incident light condition). This is used for detection in the presence of a background body or for detection of small objects.

Step


Description

Display


Set the fiber within the sensing


range.


1 Press MODE key to light up


MODE indicator

/ TEACH


(yellow).


Press jog switch in the object absent condition.


If the teaching is accepted, the read incident light


intensity blinks in the display.


Thru-beam type

Reflective type


2


3

MODE indicator / TEACH (yellow) blinks.


Turn jog switch to the ‘’ side or ‘’ side.


If jog switch is turned to the ‘’ side, ‘

’ scrolls


(twice) the display from right to left, and the threshold


level is shifted to a value approx. 15 %


higher (lower sensitivity) than that set


at 2. (Note 1)


This is used in case of reflective type fibers.


If jog switch is turned to the ‘’ side, ‘

’ scrolls


(twice) the display from left to right, and the threshold


level is shifted to a value approx. 15 %


4

lower (higher sensitivity) than that set


at 2. (Note 1)


This is used in case of thru-beam type


fibers.


After this, the judgment on whether the setting shift

5

amount can be shifted or not is displayed.

In case shifting is possible: ‘

’ blinks.


In case shifting is not possible: ‘

’ blinks.

6 The threshold value is displayed.

7

’ blinks in the digital display.


8

The incident light intensity appears in the digital

display and the setting is complete.

Notes: 1) The approx. 15% amount of shift is the initial value. The amount of shift can be changed in the PRO mode from approx. 5 to 80 % (5 % step). Refer to the ‘Fiber Sensor Guide Book’ or ‘SUNX fiber sensor home page’ (http://www.fiber-sensor.com) for more details pertaining to setting instructions.

2)Do not move or bend the fiber cable after the sensitivity setting. Detection may become unstable.

Notes: 1) The threshold value’s shift amount can be selected in PRO mode. Refer to the ‘SUNX fiber sensor home page’ (http://www.fiber- sensor.com) for more details pertaining to setting instructions. (Increments of 5 % between –45 and 45 % for setting possible. 0 % default.)

2)Do not move or bend the fiber cable after the sensitivity setting. Detection may become unstable.

08/2005

97


Page 30
Image 30
Panasonic manual Teaching, Case of 2-level teaching, Step Description, Case of full auto-teaching FX-301BP/GP/HP only

FX-301 specifications

The Panasonic FX-301 is a compact digital camera that merges portability with advanced photographic features, making it an ideal choice for photography enthusiasts and everyday users alike. Launched within Panasonic's well-regarded Lumix line, the FX-301 is designed to deliver remarkable image quality while enhancing ease of use.

One of the standout features of the Panasonic FX-301 is its impressive 12.1-megapixel sensor, which enables users to capture high-resolution images with exceptional detail. This powerful sensor works alongside the camera's versatile 28mm wide-angle Leica lens, offering a 4x optical zoom. The lens not only enhances the camera's capability in capturing wide landscapes but also excels in various lighting conditions, allowing for both outdoor and indoor photography.

In addition to its robust photographic capabilities, the FX-301 incorporates several advanced technologies to optimize image quality. The Intelligent Auto Mode (iA) is a user-friendly feature that automatically adjusts settings based on the shooting environment, helping users achieve better results without the need for deep technical knowledge. Furthermore, the camera includes Optical Image Stabilization (OIS), which helps to minimize blur caused by hand movements, ensuring clearer images even in challenging situations.

The Panasonic FX-301 also boasts a range of creative shooting modes that cater to diverse photographic needs. From macro photography for close-up shots to night scene mode for capturing the beauty of nighttime scenes, the camera provides various options to enhance creative expression. This adaptability is further supported by its 2.7-inch LCD display, which facilitates easy framing and reviewing of shots, even in bright sunlight.

Battery life is another noteworthy aspect of the FX-301, allowing users to capture numerous shots on a single charge. This durability makes it an ideal companion for travel and daily use, ensuring that spontaneous moments can be captured without the worry of running out of power.

In summary, the Panasonic FX-301 is a compact digital camera that offers impressive image quality, a user-friendly interface, and a suite of features designed to elevate the photography experience. With its blend of advanced technologies, optical performance, and intuitive controls, it stands as a strong contender in the realm of portable digital cameras. This camera caters to both novice photographers and professionals seeking a reliable, high-quality shooting experience.