FX-301-F

PRECAUTIONS FOR PROPER USE

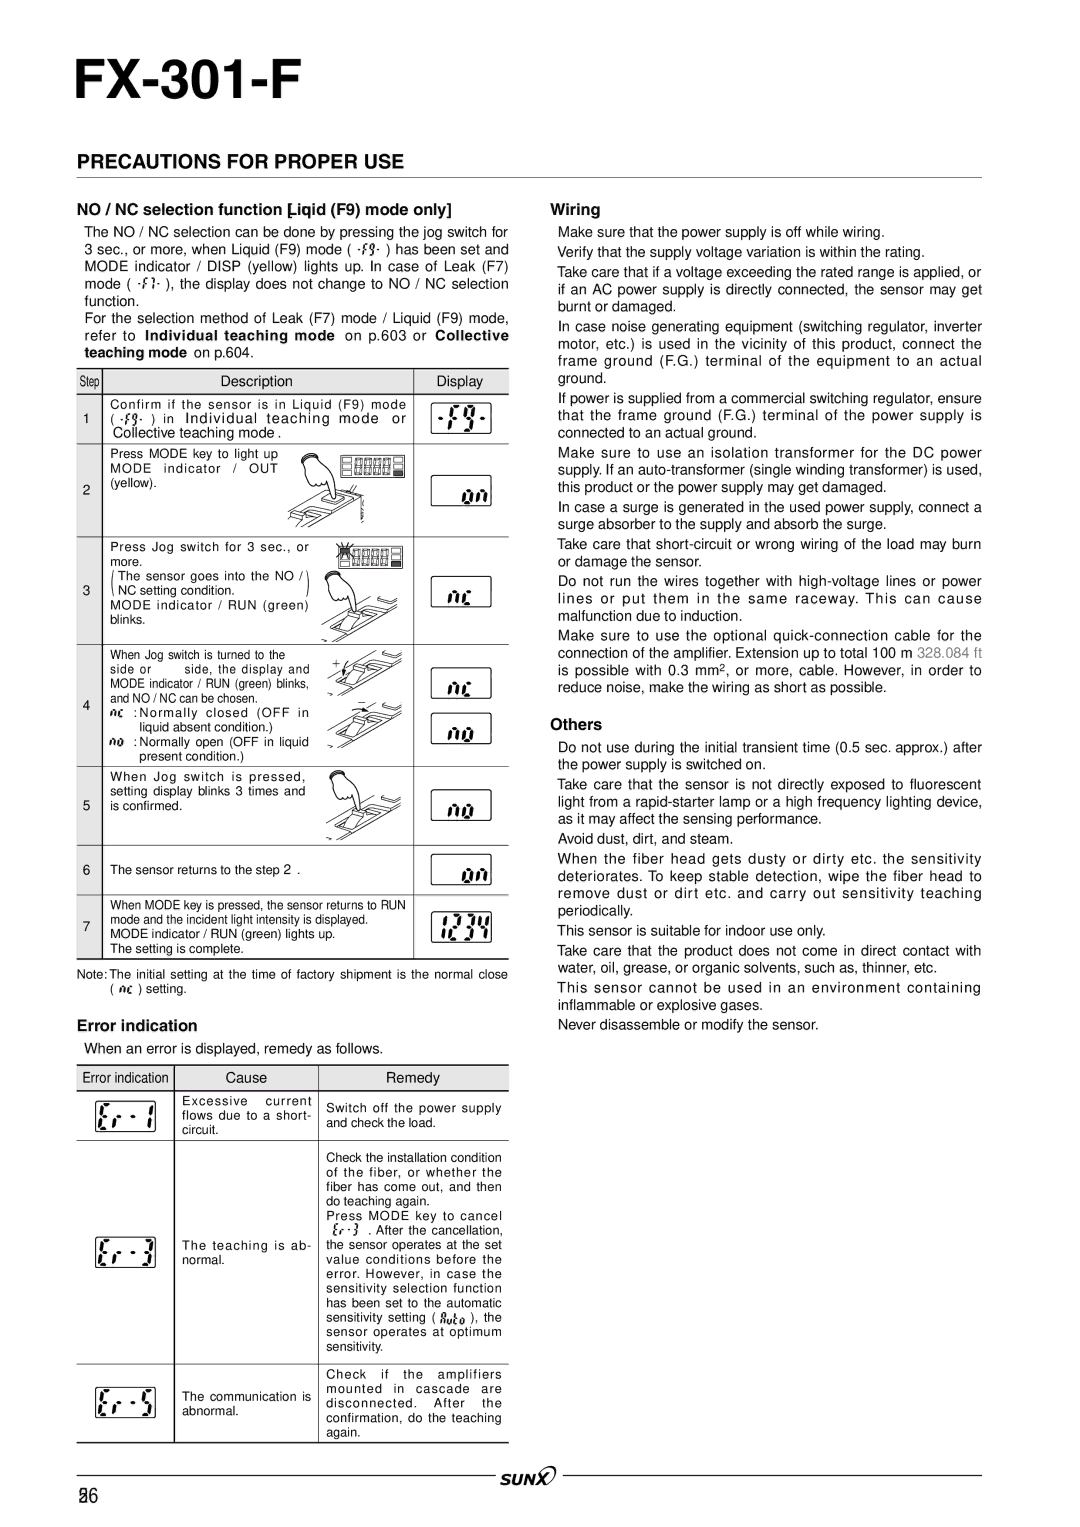
NO / NC selection function [Liquid (F9) mode only]

The NO / NC selection can be done by pressing the jog switch for

3 sec., or more, when Liquid (F9) mode ( ) has been set and MODE indicator / DISP (yellow) lights up. In case of Leak (F7)

mode ( ), the display does not change to NO / NC selection function.

For the selection method of Leak (F7) mode / Liquid (F9) mode, refer to ‘Individual teaching mode’ on p.603 or ‘Collective teaching mode’ on p.604.

Step


Description


Display


Confirm if the sensor is in Liquid (F9) mode

1

(

) in ‘Individual teaching

modeor


Collective teaching mode.


Press MODE key to light up


MODE indicator /

OUT


2

(yellow).


Press Jog switch for 3 sec., or


more.


(

The sensor goes into the NO /

(


3

NC setting condition.


MODE indicator / RUN (green)


blinks.


When Jog switch is turned to the ‘’ side or ‘ ’ side, the display and MODE indicator / RUN (green) blinks,

4and NO / NC can be chosen.

: Normally closed (OFF in liquid absent condition.)

: Normally open (OFF in liquid present condition.)

When Jog switch is pressed, setting display blinks 3 times and

5is confirmed.

6The sensor returns to the step 2.

When MODE key is pressed, the sensor returns to RUN

7mode and the incident light intensity is displayed. MODE indicator / RUN (green) lights up.

The setting is complete.

Note: The initial setting at the time of factory shipment is the normal close

( ) setting.

Error indication

When an error is displayed, remedy as follows.

Error indication

Cause


Remedy


Excessive current

Switch off the power supply


flows due to a short-


and check the load.


circuit.


Check the installation condition


of the fiber, or whether the


fiber has come out, and then


do teaching again.


Press MODE key to cancel


’. After the cancellation,


The teaching is ab-

the sensor operates at the set


normal.

value conditions before the


error. However, in case the


sensitivity selection function


has been set to the automatic


sensitivity setting (

), the


sensor operates at optimum


sensitivity.


Check if

the

amplifiers


The communication is

mounted

in cascade

are


disconnected.

After

the


abnormal.


confirmation, do the teaching


again.


Wiring

Make sure that the power supply is off while wiring.

Verify that the supply voltage variation is within the rating.

Take care that if a voltage exceeding the rated range is applied, or if an AC power supply is directly connected, the sensor may get burnt or damaged.

In case noise generating equipment (switching regulator, inverter motor, etc.) is used in the vicinity of this product, connect the frame ground (F.G.) terminal of the equipment to an actual ground.

If power is supplied from a commercial switching regulator, ensure that the frame ground (F.G.) terminal of the power supply is connected to an actual ground.

Make sure to use an isolation transformer for the DC power supply. If an auto-transformer (single winding transformer) is used, this product or the power supply may get damaged.

In case a surge is generated in the used power supply, connect a surge absorber to the supply and absorb the surge.

Take care that short-circuit or wrong wiring of the load may burn or damage the sensor.

Do not run the wires together with high-voltage lines or power lines or put them in the same raceway. This can cause malfunction due to induction.

Make sure to use the optional quick-connection cable for the connection of the amplifier. Extension up to total 100 m 328.084 ft is possible with 0.3 mm2, or more, cable. However, in order to reduce noise, make the wiring as short as possible.

Others

Do not use during the initial transient time (0.5 sec. approx.) after the power supply is switched on.

Take care that the sensor is not directly exposed to fluorescent light from a rapid-starter lamp or a high frequency lighting device, as it may affect the sensing performance.

Avoid dust, dirt, and steam.

When the fiber head gets dusty or dirty etc. the sensitivity deteriorates. To keep stable detection, wipe the fiber head to remove dust or dirt etc. and carry out sensitivity teaching periodically.

This sensor is suitable for indoor use only.

Take care that the product does not come in direct contact with water, oil, grease, or organic solvents, such as, thinner, etc.

This sensor cannot be used in an environment containing inflammable or explosive gases.

Never disassemble or modify the sensor.

526

08/2005


Page 63
Image 63
Panasonic FX-301 manual No / NC selection function Liquid F9 mode only, Error indication, Cause Remedy

FX-301 specifications

The Panasonic FX-301 is a compact digital camera that merges portability with advanced photographic features, making it an ideal choice for photography enthusiasts and everyday users alike. Launched within Panasonic's well-regarded Lumix line, the FX-301 is designed to deliver remarkable image quality while enhancing ease of use.

One of the standout features of the Panasonic FX-301 is its impressive 12.1-megapixel sensor, which enables users to capture high-resolution images with exceptional detail. This powerful sensor works alongside the camera's versatile 28mm wide-angle Leica lens, offering a 4x optical zoom. The lens not only enhances the camera's capability in capturing wide landscapes but also excels in various lighting conditions, allowing for both outdoor and indoor photography.

In addition to its robust photographic capabilities, the FX-301 incorporates several advanced technologies to optimize image quality. The Intelligent Auto Mode (iA) is a user-friendly feature that automatically adjusts settings based on the shooting environment, helping users achieve better results without the need for deep technical knowledge. Furthermore, the camera includes Optical Image Stabilization (OIS), which helps to minimize blur caused by hand movements, ensuring clearer images even in challenging situations.

The Panasonic FX-301 also boasts a range of creative shooting modes that cater to diverse photographic needs. From macro photography for close-up shots to night scene mode for capturing the beauty of nighttime scenes, the camera provides various options to enhance creative expression. This adaptability is further supported by its 2.7-inch LCD display, which facilitates easy framing and reviewing of shots, even in bright sunlight.

Battery life is another noteworthy aspect of the FX-301, allowing users to capture numerous shots on a single charge. This durability makes it an ideal companion for travel and daily use, ensuring that spontaneous moments can be captured without the worry of running out of power.

In summary, the Panasonic FX-301 is a compact digital camera that offers impressive image quality, a user-friendly interface, and a suite of features designed to elevate the photography experience. With its blend of advanced technologies, optical performance, and intuitive controls, it stands as a strong contender in the realm of portable digital cameras. This camera caters to both novice photographers and professionals seeking a reliable, high-quality shooting experience.