Tuning the TV to Your Unit
The unit supplies a signal to the TV via the RF coaxial cable on channel E21s69. It is possible to view the unit’s picture on your TV in the same way that you watch TV broadcasts. The unit is fitted with its own tuner (just like a normal TV) and can be preset to receive up to 99 TV broadcast stations.
≥Press [VHS].
¬If you have connected the unit to the TV through the audio/video output sockets
You do not need to follow the procedure below. To view the pictures from the unit, set to the AV mode on the TV with [AV].
VHS/DVD
Plug in Auto Tuning
VHS
| AUDIO | CH | VOLUME |
|
| ||
AV |
| AV |
|
VHS/DVD |
|
| |
VHS |
| VHS DVD | |
|
| ||
Numeric buttons
CANCEL/RESET | PLAY SPEED |
| |
INDEX/SKIP | SLOW/ |
REW SEARCH FF | |
| PLAY |
NAVI | SLOW | MENU |
DIRECT NAVIGATOR |
| PLAY LIST |
TOP MENU |
|
|
ENTER
DISPLAYRETURN
When the unit is turned on after connecting the aerial cable and the mains lead for the first time, tuning starts automatically.
≥If the unit is turned on with the aerial not connected, all channels are skipped.
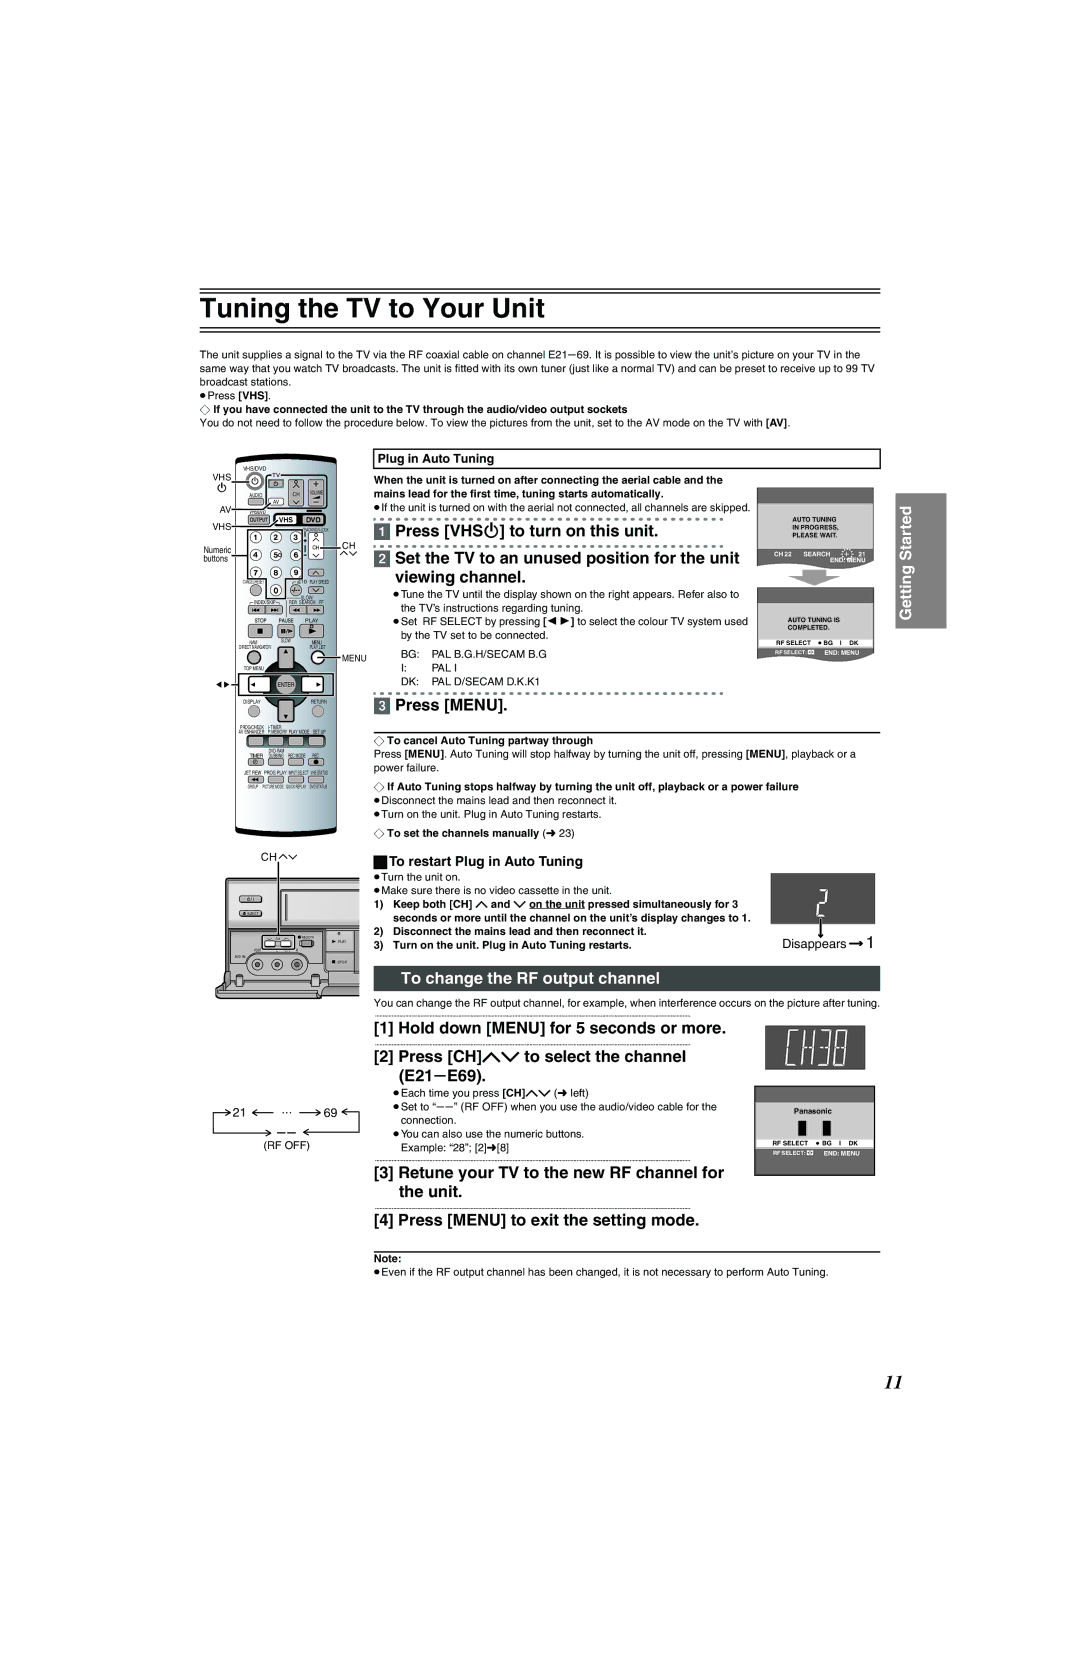
[1]Press [VHSÍ] to turn on this unit.
CH
[2] Set the TV to an unused position for the unit viewing channel.
≥Tune the TV until the display shown on the right appears. Refer also to the TV’s instructions regarding tuning.
≥Set RF SELECT by pressing [2 1] to select the colour TV system used by the TV set to be connected.
MENU | BG: | PAL B.G.H/SECAM B.G | |
I: | PAL I | ||
| |||
| DK: | PAL D/SECAM D.K.K1 |
[3] Press [MENU].
AUTO TUNING
IN PROGRESS,
PLEASE WAIT.
CH 22 SEARCH | 21 |
END: MENU
AUTO TUNING IS
COMPLETED.
RF SELECT ≥ BG I DK
RF SELECT: |
|
|
| END: MENU |
|
|
Getting Started
PROG/CHECK |
| SET UP | ||
AV ENHANCER | P.MEMORY PLAY MODE | |||
TIMER | REC MODE | REC | ||
DUBBING | ||||
JET REW | PROG PLAY INPUT SELECT | VHS STATUS | ||
GROUP | PICTURE MODE | QUICK REPLAY | DVD STATUS | |
¬To cancel Auto Tuning partway through
Press [MENU]. Auto Tuning will stop halfway by turning the unit off, pressing [MENU], playback or a power failure.
¬If Auto Tuning stops halfway by turning the unit off, playback or a power failure
≥Disconnect the mains lead and then reconnect it. ≥Turn on the unit. Plug in Auto Tuning restarts.
¬To set the channels manually (l 23)
CH |
| ªTo restart Plug in Auto Tuning |
|
| |
|
|
|
|
| |
|
|
| ≥Turn the unit on. |
|
|
|
|
| ≥Make sure there is no video cassette in the unit. |
|
|
/ I |
|
| 1) Keep both [CH] J and I on the unit pressed simultaneously for 3 |
|
|
EJECT |
|
|
|
| |
|
|
| seconds or more until the channel on the unit’s display changes to 1. |
|
|
|
| 2) Disconnect the mains lead and then reconnect it. |
| 1 | |
| CH | REC/OTR | 3) Turn on the unit. Plug in Auto Tuning restarts. | Disappears | |
VIDEO | L j AUDIO j R | PLAY | |||
AV2 IN |
|
|
|
|
|
|
| STOP |
|
|
|
|
|
| To change the RF output channel |
|
|
You can change the RF output channel, for example, when interference occurs on the picture after tuning.
................................................................................................................................................................................................................
|
|
|
|
|
| [1] | Hold down [MENU] for 5 seconds or more. |
|
|
|
|
|
| ................................................................................................................................................................................................................ | |
|
|
|
|
|
| [2] | Press [CH]JI to select the channel |
|
|
|
|
|
|
| (E21sE69). |
|
|
|
|
|
| ≥Each time you press [CH]JI (l left) | |
21 | 69 | ≥Set to “ss” (RF OFF) when you use the audio/video cable for the | |||||
| connection. | ||||||
|
|
|
|
|
|
| |
|
|
|
|
|
| ≥You can also use the numeric buttons. | |
| (RF OFF) | ||||||
|
| Example: “28”; [2]l[8] | |||||
|
|
|
|
|
| ................................................................................................................................................................................................................ | |
|
|
|
|
|
| [3] | Retune your TV to the new RF channel for |
|
|
|
|
|
|
| the unit. |
Panasonic
RF SELECT |
|
| ≥ BG I ≥ DK | |
RF SELECT: |
|
|
| END: MENU |
|
| |||
|
| |||
................................................................................................................................................................................................................
[4] Press [MENU] to exit the setting mode.
Note:
≥Even if the RF output channel has been changed, it is not necessary to perform Auto Tuning.
11