About Your Projector
Remote control
Preparation
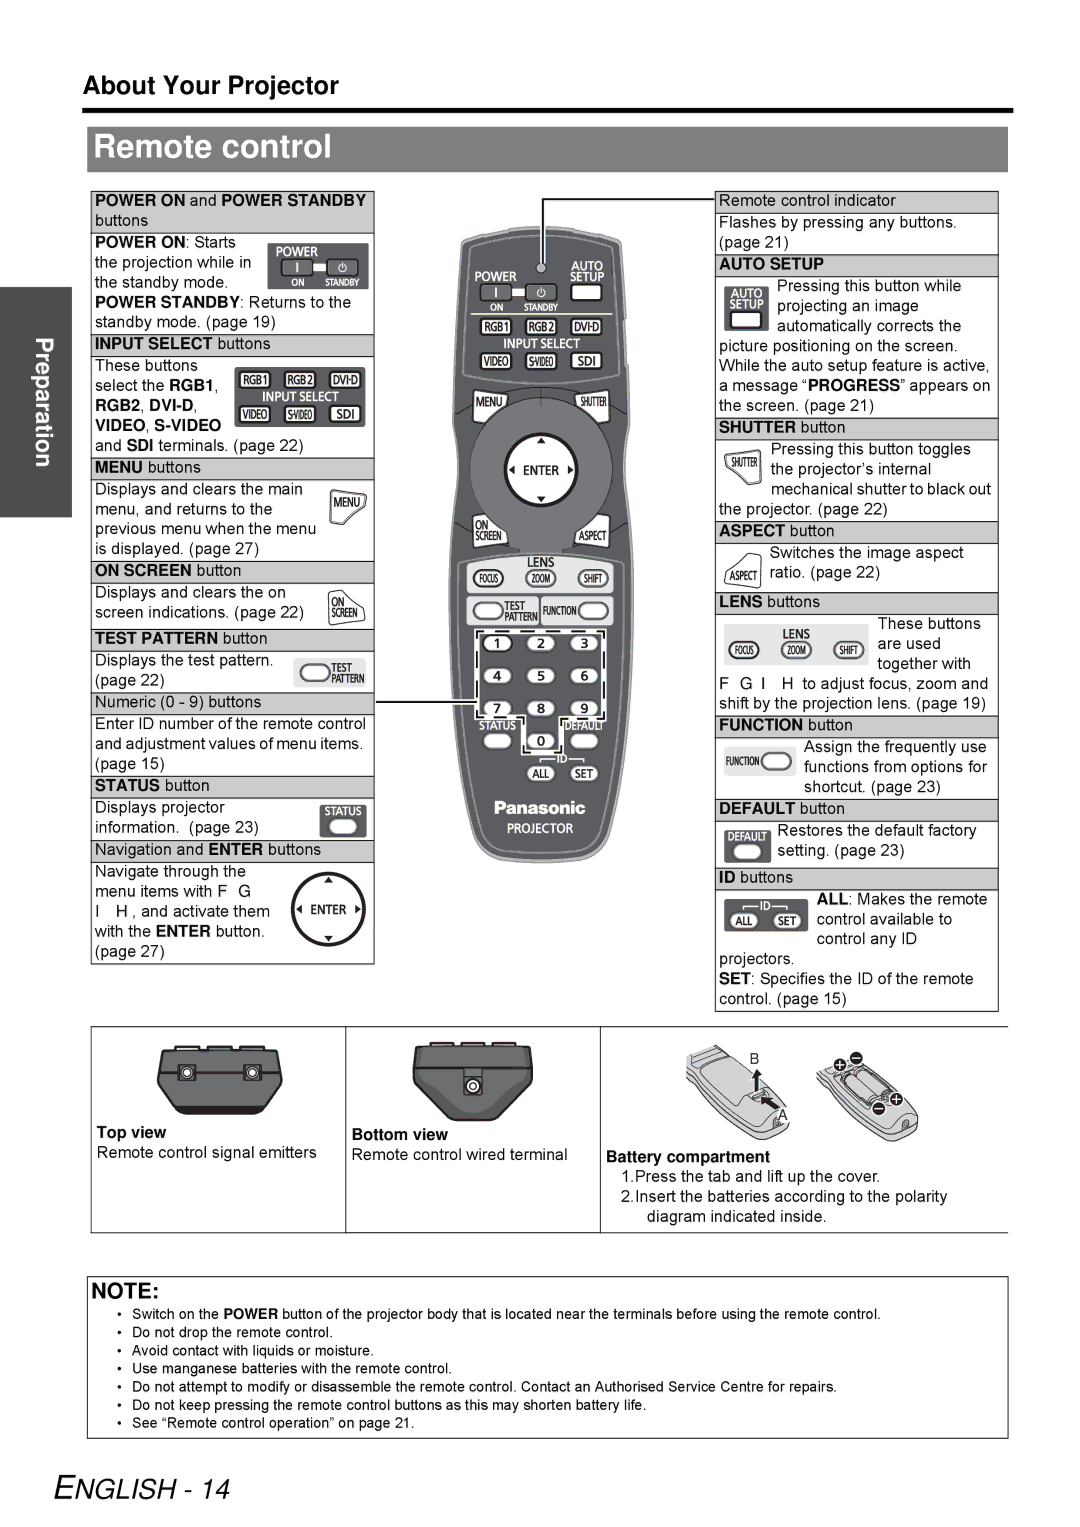
POWER ON and POWER STANDBY buttons
POWER ON: Starts
the projection while in ![]()
![]()
![]()
![]()
![]()
![]() the standby mode.
the standby mode. ![]()
![]()
![]()
![]()
![]()
![]()
![]()
![]()
![]() POWER STANDBY: Returns to the standby mode. (page 19)
POWER STANDBY: Returns to the standby mode. (page 19)
INPUT SELECT buttons These buttons
select the RGB1, RGB2,
VIDEO, S-VIDEO 

 and SDI terminals. (page 22) MENU buttons
Displays and clears the main menu, and returns to the previous menu when the menu is displayed. (page 27)
ON SCREEN button
Displays and clears the on screen indications. (page 22)
TEST PATTERN button
Displays the test pattern.
(page 22) Numeric (0 - 9) buttons
Enter ID number of the remote control and adjustment values of menu items. (page 15)
STATUS button
Displays projector information. (page 23)
Navigation and ENTER buttons Navigate through the
menu items with F G I H, and activate them with the ENTER button. (page 27)
Remote control indicator Flashes by pressing any buttons. (page 21)
AUTO SETUP
Pressing this button while projecting an image automatically corrects the
picture positioning on the screen. While the auto setup feature is active, a message “PROGRESS” appears on the screen. (page 21)
SHUTTER button
Pressing this button toggles
the projector’s internal mechanical shutter to black out
the projector. (page 22)
ASPECT button
![]() Switches the image aspect
Switches the image aspect ![]()
![]()
![]()
![]()
![]()
![]()
![]()
![]() ratio. (page 22)
ratio. (page 22)
LENS buttons
These buttons
are used together with
F G I H to adjust focus, zoom and shift by the projection lens. (page 19)
FUNCTION button
Assign the frequently use functions from options for shortcut. (page 23)
DEFAULT button
Restores the default factory
setting. (page 23)
ID buttons
ALL: Makes the remote
control available to control any ID
projectors.
SET: Specifies the ID of the remote control. (page 15)
Top view
Remote control signal emitters
Bottom view
Remote control wired terminal
B
A
Battery compartment
1.Press the tab and lift up the cover.
2.Insert the batteries according to the polarity diagram indicated inside.
NOTE:
•Switch on the POWER button of the projector body that is located near the terminals before using the remote control.
•Do not drop the remote control.
•Avoid contact with liquids or moisture.
•Use manganese batteries with the remote control.
•Do not attempt to modify or disassemble the remote control. Contact an Authorised Service Centre for repairs.
•Do not keep pressing the remote control buttons as this may shorten battery life.
•See “Remote control operation” on page 21.
