Method 4
Setting the network connection from an Internet browser.
With this method, you will access this system’s wireless network settings from the Internet browser of your compatible device.
• The following explanations are based on an iPhone.
1 Press [SETUP] on the remote control repeatedly to select “Net Setup” and then press [OK].
“With iPod” is indicated on the display.
2 Press [SETUP] on the remote control repeatedly to select “Manual” and then press [OK].
“Setting” blinks on the display.
3 After “Setting” blinks, connect your compatible device to this system’s wireless network named “00 Setup _ _ _ _ _ _”.
•“ _ ” stands for a digit that is unique to each set.
•Make sure that DHCP is enabled for the network setting on your compatible device.
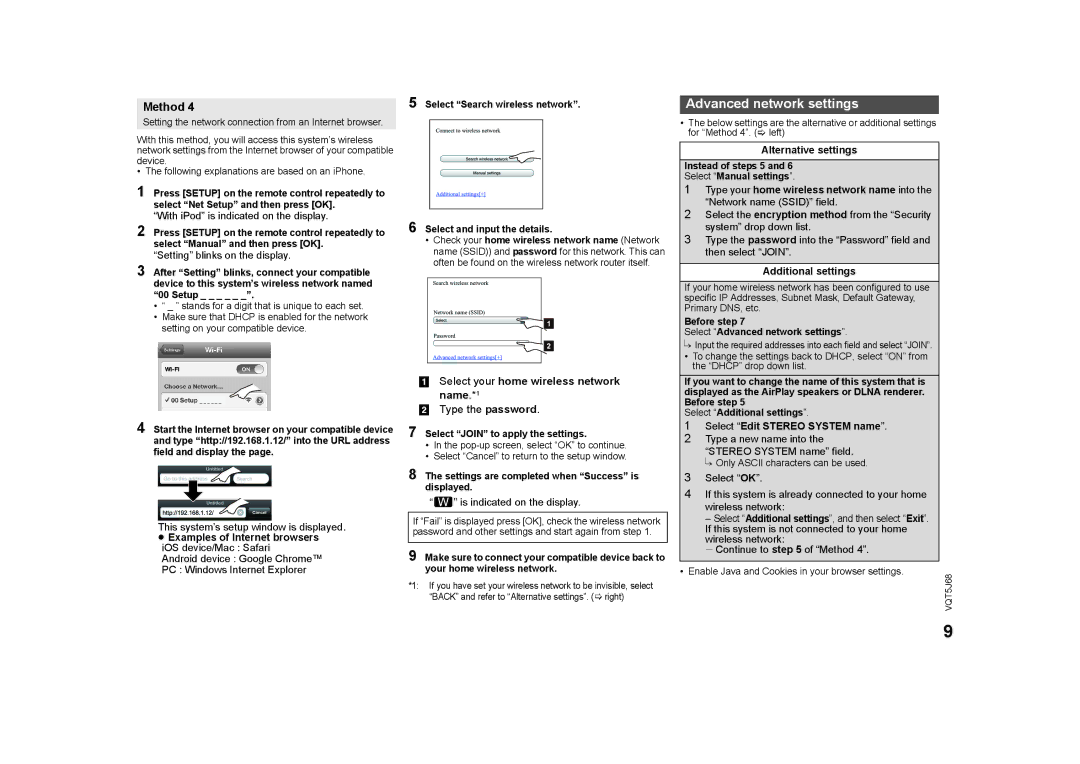
5 Select “Search wireless network”.
6 Select and input the details.
•Check your home wireless network name (Network name (SSID)) and password for this network. This can often be found on the wireless network router itself.
Advanced network settings
•The below settings are the alternative or additional settings for “Method 4”. (> left)
Alternative settings
Instead of steps 5 and 6
Select “Manual settings”.
1Type your home wireless network name into the “Network name (SSID)” field.
2Select the encryption method from the “Security system” drop down list.
3Type the password into the “Password” field and then select “JOIN”.
Additional settings
If your home wireless network has been configured to use specific IP Addresses, Subnet Mask, Default Gateway, Primary DNS, etc.
Before step 7
Select “Advanced network settings”.
{.Input the required addresses into each field and select “JOIN”.
• To change the settings back to DHCP, select “ON” from the “DHCP” drop down list.
4 Start the Internet browser on your compatible device and type “http://192.168.1.12/” into the URL address field and display the page.
This system’s setup window is displayed.
≥Examples of Internet browsers iOS device/Mac : Safari
Android device : Google Chrome™
PC : Windows Internet Explorer
[1]Select your home wireless network name.*1
[2]Type the password.
7 Select “JOIN” to apply the settings.
•In the
•Select “Cancel” to return to the setup window.
8 The settings are completed when “Success” is displayed.
“  ” is indicated on the display.
If “Fail” is displayed press [OK], check the wireless network password and other settings and start again from step 1.
9 Make sure to connect your compatible device back to your home wireless network.
*1: If you have set your wireless network to be invisible, select “BACK” and refer to “Alternative settings”. (> right)
If you want to change the name of this system that is displayed as the AirPlay speakers or DLNA renderer. Before step 5
Select “Additional settings”.
1 | Select “Edit STEREO SYSTEM name”. |
|
2 | Type a new name into the |
|
| “STEREO SYSTEM name” field. |
|
| {. Only ASCII characters can be used. |
|
3 | Select “OK”. |
|
4 | If this system is already connected to your home |
|
| wireless network: |
|
| – Select “Additional settings”, and then select “Exit”. |
|
| If this system is not connected to your home |
|
| wireless network: |
|
| jContinue to step 5 of “Method 4”. |
|
|
| |
• Enable Java and Cookies in your browser settings. | VQT5J68 | |
|
| |
9