Accessories / Options
Standard accessories Check that you have the accessories and items shown ![]()
![]()
Basic Connection
External equipment and cables shown are not supplied with this TV.
Please ensure that the unit is disconnected from the mains socket before attaching or disconnecting any leads.
Remote Control Transmitter | Batteries for the Remote | Operating Instructions with | ||
•N2QAYB000228 | Control Transmitter (2) | Warranty statement | ||
|
|
| •R6 (AA) |
|
1 | 2 | 3 |
|
|
4 | 5 | 6 |
|
|
7 | 8 | 9 |
|
|
| 0 |
|
|
|
Installing remote’s batteries
1 | 2 | Close |
Pull open |
| + |
-
+
- |
| Note the correct |
Hook | polarity (+ or |
|
Caution
•Incorrect installation may cause battery leakage and corrosion, resulting in damage to the remote control.
•Do not mix old and new batteries.
•Do not mix different battery types (such as alkaline and manganese batteries).
•Do not use rechargeable
•Do not burn or breakup batteries.
Batteries must not be exposed to excessive heat such as sunshine, fire or the like.
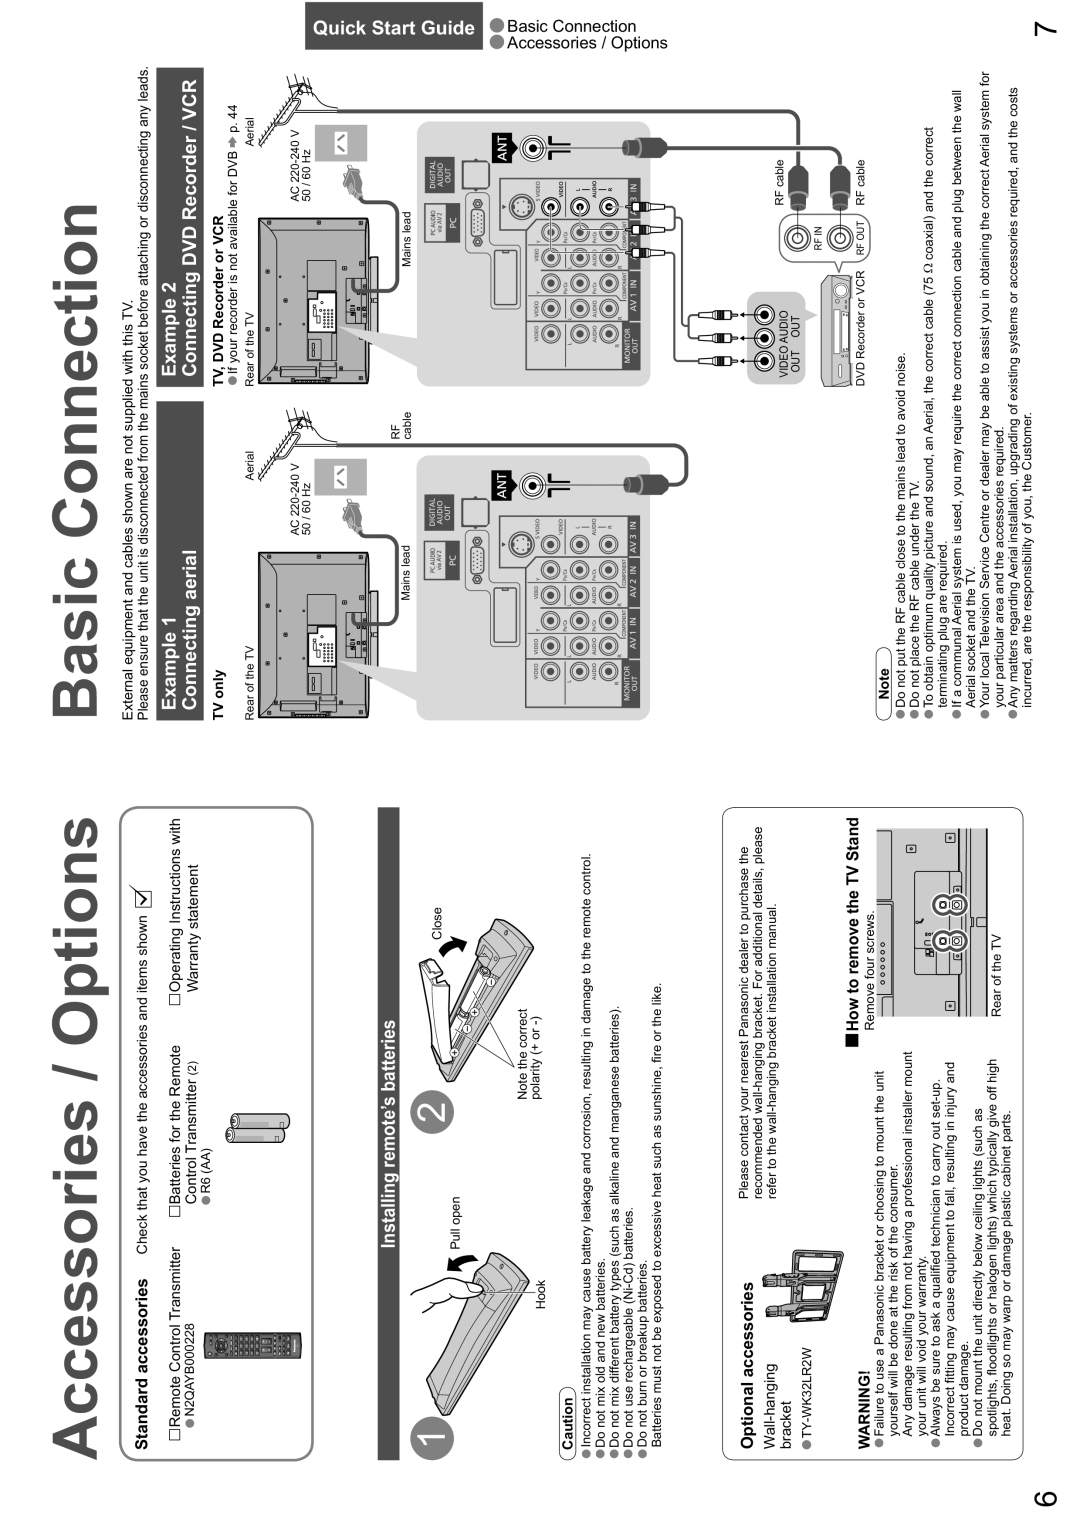
Example 1
Connecting aerial
TV only
Rear of the TV | Aerial |
AC
Mains lead | RF |
cable |
Example 2
Connecting DVD Recorder / VCR
TV, DVD Recorder or VCR
•If your recorder is not available for DVB  p. 44
p. 44
Rear of the TVAerial
AC
Mains lead
Quick Start Guide ••Basic Connection
Accessories / Options
Optional accessories | Please contact your nearest Panasonic dealer to purchase the |
| recommended |
refer to the | |
bracket |
|
|
|
VIDEO AUDIO | RF cable |
OUT OUT |
|
| RF IN |
WARNING!
•Failure to use a Panasonic bracket or choosing to mount the unit yourself will be done at the risk of the consumer.
Any damage resulting from not having a professional installer mount your unit will void your warranty.
•Always be sure to ask a qualified technician to carry out
•Do not mount the unit directly below ceiling lights (such as spotlights, floodlights or halogen lights) which typically give off high heat. Doing so may warp or damage plastic cabinet parts.
 How to remove the TV Stand
Remove four screws.
Rear of the TV
DVD Recorder or VCR RF OUT RF cable
Note
•Do not put the RF cable close to the mains lead to avoid noise.
•Do not place the RF cable under the TV.
•To obtain optimum quality picture and sound, an Aerial, the correct cable (75 : coaxial) and the correct terminating plug are required.
•If a communal Aerial system is used, you may require the correct connection cable and plug between the wall Aerial socket and the TV.
•Your local Television Service Centre or dealer may be able to assist you in obtaining the correct Aerial system for your particular area and the accessories required.
•Any matters regarding Aerial installation, upgrading of existing systems or accessories required, and the costs incurred, are the responsibility of you, the Customer.
6 | 7 |