PIG20-11041
Table of Contents
Components
Other Items You May Need
How the System Works
Key Definitions
Receiver Collar
Operating Guide
Locate the Fence Transmitter
Lay Out the System
Basic Planning Tips
Sample Layouts
Double Loop
Position the Boundary Wire
To Twist the Boundary Wire
To Splice or Repair the Boundary Wire
Step Connect the Wires to the Fence Transmitter
Additional Boundary Wire
Boundary Wire 4A
Ground Wire 4D
To Insert and Remove the Battery
Function and Response Table
Two Colour LED
To Set the Static Correction Level
Amount of Wire Setting
Set the Boundary Width and Test the Receiver Collar
Install the Boundary Wire
To Bury the Boundary Wire
To Attach the Boundary Wire to an Existing Fence
To Cross Hard Surfaces driveways, sidewalks, etc
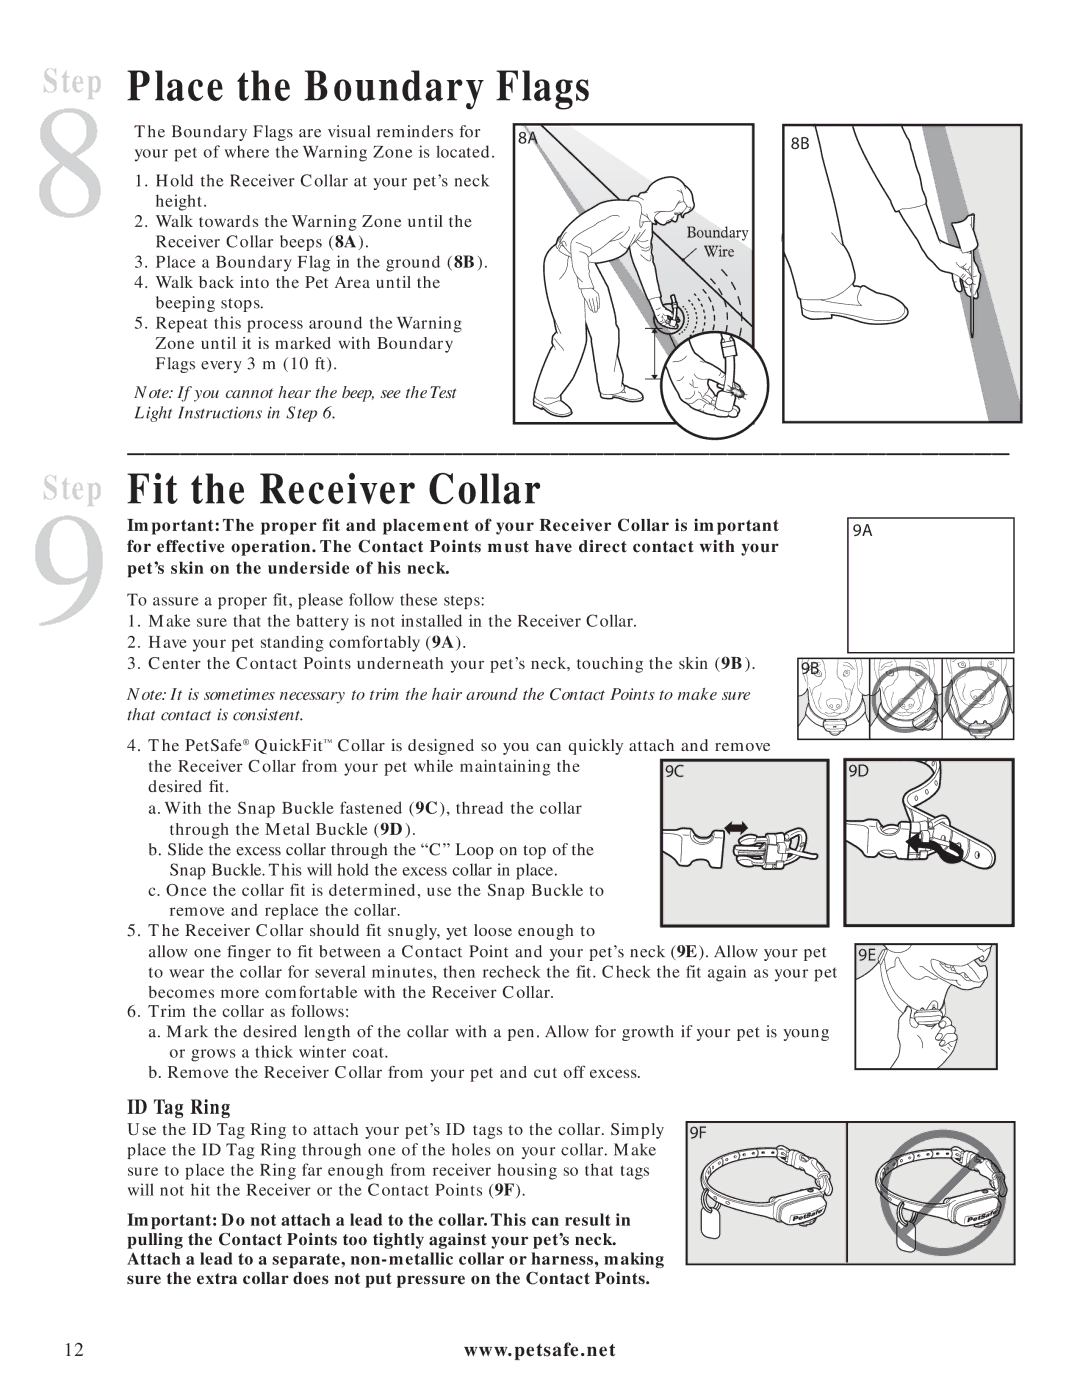
Place the Boundary Flags
Fit the Receiver Collar
ID Tag Ring
Setup
Training Guide
Be Patient With Your Pet
Day 1 Boundary Flag Awareness
Days 2 thru 4 Continue Boundary Flag Awareness
Steps
Days 5 thru 8 Distraction Phase
Days 9 thru 14 Unleashed Supervision
Days 15 thru 30 Pet Monitoring
Accessories
Days 31+ Tone Only Training
Taking Your Pet Out of the Pet Area
Component Part Number
Troubleshooting
To Locate a Break in the Boundary Wire
Additional Information
Short Loop Test
Battery Disposal Important Recycling Advice
Product Warranty
Terms of Use and Limitation of Liability
Compliance
Canadian Compliance
Table des matières
Manuel dutilisation
Contenu du kit
Autres articles dont vous pourriez avoir besoin
Fonctionnement du système
Définitions
Collier-récepteur
Schémas dinstallation du système
Manuel dutilisation
Positionnement de lémetteur de clôture
Conseils de préparation
Exemples de schémas dinstallation
Double boucle
Étape Positionnement du fil dantenne
Pour torsader le fil dantenne
Pour épisser ou réparer le fil dantenne
Étape Connexion des fils à lémetteur de clôture
Fil d’antenne supplémentaire
Fil d’antenne 4A
Fil de terre 4D
Étape Préparation du collier-récepteur
Tableau de fonction et de réponse
Insertion et retrait de la pile
Voyant à deux couleurs
Quantité de fil Réglage
Entendre
Installation du fil dantenne
Enterrer le fil dantenne
Fixer le fil dantenne à une clôture existante
Pour traverser des surfaces dures allées, trottoirs, etc
Pose des fanions de délimitation
Ajustement du collier-récepteur
Anneau didentification
Manuel de dressage
Soyez patient avec votre animal
Jour 1 Découverte des fanions de délimitation
Objectif
Jours 2 à 4 Confirmation de la découverte des fanions
Étapes
Jours 5 à 8 Phase de distraction
Jours 9 à 14 Surveillance sans laisse
Jours 15 à 30 Contrôle périodique
Jour 31 et + Dressage avec signal sonore
Accessoires
Sortir lanimal de la zone autorisée
Composant Numéro de pièce
Dépannage
Informations supplémentaires
Test à laide dune boucle courte
Pour localiser une rupture dans le fil dantenne
Élimination des batteries usagées
Conditions dutilisation et limitation de responsabilité
Garantie du produit
Conformité
Avertissement
Conformité pour le Canada
Inhoudsopgave
Bedieningshandleiding
Onderdelen
Andere zaken die u nodig kunt hebben
Hoe werkt het systeem
Belangrijke begrippen
Ontvangerhalsband
Bedieningshandleiding
De omheiningszender lokaliseren
Het systeem indelen
Basistips voor planning
Voorbeelden van indelingen
Dubbele lus
Positioneren van de grensdraad
Het draaien van de grensdraad
Koppelen of repareren van de grensdraad
Stap Verbinden van de draden aan de omheiningszender
Aanvullend grensdraad
Grensdraad 4A
Aardingsdraad 4D
Stap Voorbereiden van de ontvangerhalsband
Functie en respondstabel
Stel de grensbreedte in en test de ontvangerhalsband
Hoeveelheid draad Instelling
Installeren van de grensdraad
Het ingraven van de grensdraad
Bevestigen van de grensdraad aan een bestaande omheining
Oversteken van harde oppervlakken opritten, stoepen, etc
Plaatsen van de grensvlaggen
Pasklaar maken van de Ontvangerhalsband
Ring met ID-plaatje
Trainingshandleiding
Wees geduldig met uw huisdier
Dag 1 Bewust maken van grensvlaggetjes
Doel
Dag 2 t/m 4 Doorgaan met bewust maken van grensvlaggetjes
Stappen
Dag 5 t/m 8 Afleidingsfase
Dag 9 tot 14 Observatie zonder riem
Dag 15 t/m 30 Controleren van uw huisdier
Dag 31 en verder training met toon alleen
Uw huisdier uit het bewegingsgebied halen
Onderdeel Bestelnummer
Probleemoplossing
Aanvullende informatie
Korte lus test
Lokaliseren van een breuk in de grensdraad
Gebruiksvoorwaarden en beperking van aansprakelijkheid
Productgarantie
Naleving
Opgelet
Canadese naleving
Índice
Manual de funcionamiento
Componentes
Otros artículos que puede necesitar
Cómo funciona el sistema
Definiciones
Manual de funcionamiento
Localización del transmisor de valla
Trazado del sistema
Consejos de planificación básicos
Trazados de muestra
Bucle doble
Colocación del cable de antena
Para retorcer el cable de antena
Para empalmar o reparar el cable de antena
Conexión de los cables al transmisor de la valla
Cable de antena adicional
Cable de antena 4A
Cable de tierra 4D
Paso Preparación del collar receptor
Protección contra una estimulación excesiva
5Para insertar y retirar la pila
LED con dos colores
Cantidad de cable Ajuste
Escuchar el pitido
Instalación del cable de antena
Para enterrar el cable de antena
Para fijar el cable de antena a la valla existente
Para cruzar superficies duras entradas, veredas, etc
Colocación de los banderines
Ajustar el collar receptor
Anilla para etiqueta de identificación
Guía de entrenamiento
Sea paciente con su mascota
Día 1 Conocimiento de los banderines
Objetivo
Días 2 a 4 Continuación del conocimiento de los banderines
Pasos
Días 5 a 8 Fase de distracción
Días 9 a 14 Supervisión sin correa
Días 15 a 30 Supervisión de la mascota
Día 31 + Adiestramiento con señal acústica sola
Sacar a la mascota de su zona autorizada
Accesorios
Componentes Número de pieza
Resolución de problemas
Información adicional
Prueba con un bucle corto
Para localizar una rotura en el cable de antena
Condiciones de uso y limitación de responsabilidad
Garantía del producto
Conformidad
Precaución
Conformidad canadiense
Indice
Manuale di funzionamento
Componenti
Altro occorrente eventualmente necessario
Come funziona il sistema
Definizioni chiave
Collare ricevitore
Passaggio Installazione del trasmettitore
Manuale di funzionamento
Preparazione del sistema
Consigli di base per la pianificazione
Layout di esempio
Doppio perimetro
Esempio 1 perimetro chiuso singolo perimetro
Esempio 4 2G solo perimetro anteriore Doppio perimetro
Attorcigliamento del filo dantenna
Giunzione o riparazione del filo dantenna
Passaggio Collegamento dei fili al trasmettitore
Filo dantenna aggiuntivo
Filo dantenna 4A
Filo di terra 4D
Passaggio Preparazione del collare ricevitore
Tabella delle funzioni e delle reazioni
Segnale acustico alla distanza desiderata dal filo dantenna
Installazione del filo dantenna
Per interrare il filo dantenna
Per collegare il filo dantenna a una recinzione esistente
Posizionamento delle bandierine
Applicazione del collare ricevitore
Anello di identificazione
Manuale di addestramento
Dimostrarsi paziente con il cane
Giorno 1 Riconoscimento delle bandierine
Obiettivo
Giorni 2 4 Continuare con il riconoscimento delle bandierine
Passaggi
Giorni 5 8 Fase di distrazione
Giorni 9 14 Supervisione senza guinzaglio
Giorni 15 30 Controllo del cane
Accessori
Uscita dalla zona autorizzata
Componente Codice
Individuazione e risoluzione dei guasti
Stimolazione statica
Altre informazioni
Prova con un circuito corto
Individuazione di rotture nel filo dantenna
Limitazione di responsabilità e condizioni di utilizzo
Garanzia del prodotto
Conformità
Avvertenza
Conformità con le normative canadesi
Inhaltsverzeichnis
Gebrauchsanweisung
Bauteile
Anderes Material, das Sie eventuell benötigen
So funktioniert das System
Schlüsseldefinitionen
Empfängerhalsband
Gebrauchsanweisung
Montieren Sie die Sendeeinheit
Machen Sie ein Layout des Systems
GrundlegendeTipps für die Planung
Layout-Beispiel
Doppelte Schleife
101
Schritt Position des Antennendrahts
Drehen des Antennendrahts
Spleißen oder Reparieren des Antennendrahts
Zusätzlicher Antennendraht
Antennendraht 4A
Erdungsdraht 4D
Absicherung 4E
Schritt Bereiten Sie das Empfängerhalsband vor
Funktions- und Reaktionstabelle
105
Atennendrahtmenge Einstellung
Installieren Sie den Antennendraht
UnterirdischeVerlegung des Antennendrahts
Befestigen des Antennendrahts an bestehender Eingrenzung
Überqueren harter Flächen Einfahrten, Gehsteige etc
Schritt Platzieren Sie die Begrenzungsfähnchen
Passen Sie das Empfängerhalsband an
Kennschildring
107
Trainingsanleitung
Haben Sie Geduld mit Ihrem Haustier
Tag 1 Wahrnehmung der Begrenzungsfähnchen
Ziel
109
Schritte
Tage 5 bis 8 Ablenkungsphase
Tage 9 bis 14 Überwachung ohne Hundeleine
Tage 15 bis 30 Haustierüberwachung
Tage 31+ Training nur mit Tonsignal
Zubehör
Bauteil Teilenummer
111
Fehlerbehebung
Weitere Informationen
Kurzschleife-Test
Lokalisieren einer Bruchstelle im Antennendraht
Batterieentsorgung Wichtiger Hinweis zum Recycling
Verwendungsbedingungen und Haftungsbeschränkung
Produktgarantie
Konformität
Vorsicht
115