47APPENDIX
VAROITUS:
SIJOITA LAITE SITEN, ETTÄ VERKKOJOHTO VOIDAAN TARVITTAESSA HELPOSTI IRROTTAA PIS- TORASIASTA.
Plassering/Ventilasjon
ADVARSEL:
NÅR DETTE UTSTYRET PLASSERES, MÅ DU PASSE PÅ AT KONTAKTENE FOR STØMTILFØRSEL ER LETTE Å NÅ.
Ergonomie Hinweis (nur Deutschland)
Der von uns gelieferte Farbmonitor entspricht den in der "Verordnung über den Schutz vor Schäden durch Röntgenstrahlen" festgelegten Vorschriften.
Auf der Rückwand des Gerätes befindet sich ein Aufkleber, der auf die Unbedenklichkeit der Inbetriebnahme hinweist, da die Vorschriften über die Bauart von Störstrahlern nach Anlage III 5 Abs. 4 der Röntgenverordnung erfüllt sind.
Damit Ihr Monitor immer den in der Zulassung geforderten Werten entspricht, ist darauf zu achten, daß
Reparaturen nur durch Fachpersonal durchgeführt werden. nur
bei Ersatz der Bildröhre nur eine bauartgleiche eingebaut wird.
Aus ergonomischen Gründen wird empfohlen, die Grundfarben Blau und Rot nicht auf dunklem Untergrund zu verwenden (schlechte Lesbarkeit und erhöhte Augenbelastung bei zu geringem Zeichenkontrast wären die Folge).
Der arbeitsplatzbezogene Schalldruckpegel nach DIN 45 635 beträgt 70dB (A) oder weniger.
!ACHTUNG: BEIM AUFSTELLEN DIESES GERÄTES DARAUF ACHTEN, DAß NETZSTECK- ER UND NETZKABELANSCHLUß LEICHT ZUGÄNGLICH SIND.
End-of-Life Disposal
Your new monitor contains materials that can be recycled and reused. Specialized companies can recycle your product to increase the amount of reusable materials and to minimize the amount to be disposed of.
Please find out about the local regulations on how to dispose of your old monitor from your local Philips dealer.
APPENDIX 48
Information for UK only
WARNING — THIS APPLIANCE MUST BE EARTHED.
Important:
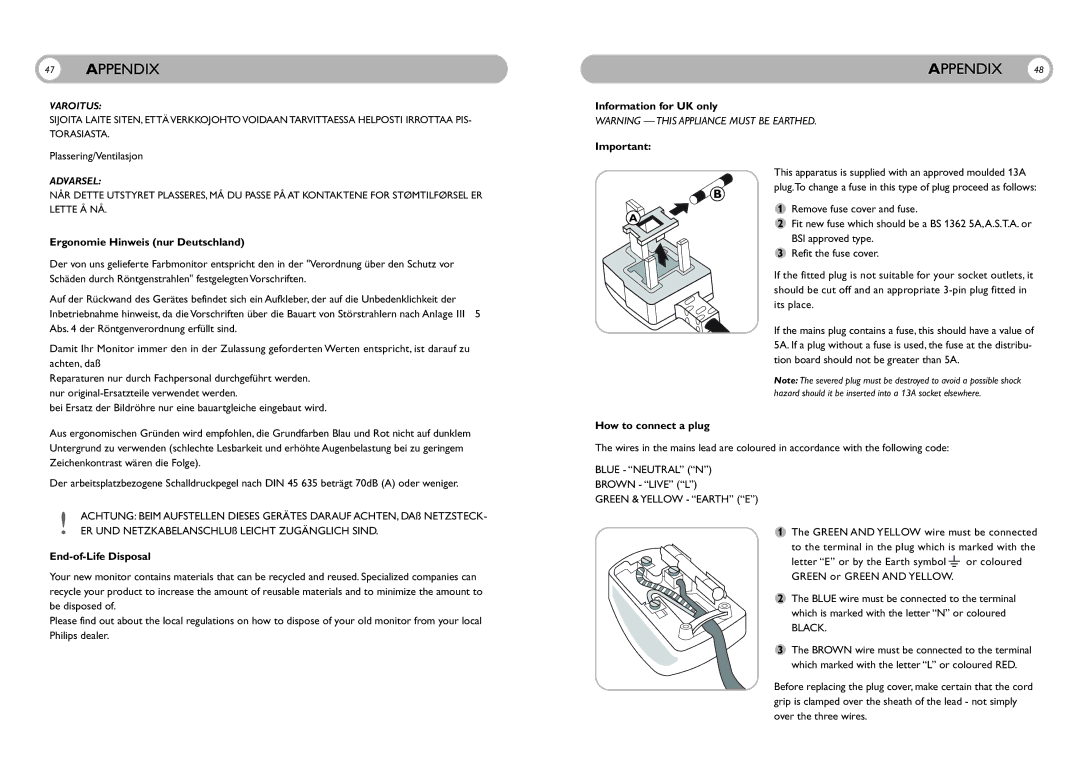
|
| This apparatus is supplied with an approved moulded 13A | |
| B | plug.To change a fuse in this type of plug proceed as follows: | |
|
|
| |
A |
| 1 | Remove fuse cover and fuse. |
| 2 | Fit new fuse which should be a BS 1362 5A,A.S.T.A. or | |
|
| ||
BSI approved type.
3Refit the fuse cover.
If the fitted plug is not suitable for your socket outlets, it should be cut off and an appropriate
If the mains plug contains a fuse, this should have a value of 5A. If a plug without a fuse is used, the fuse at the distribu- tion board should not be greater than 5A.
Note: The severed plug must be destroyed to avoid a possible shock hazard should it be inserted into a 13A socket elsewhere.
How to connect a plug
The wires in the mains lead are coloured in accordance with the following code:
BLUE - “NEUTRAL” (“N”)
BROWN - “LIVE” (“L”)
GREEN & YELLOW - “EARTH” (“E”)
1The GREEN AND YELLOW wire must be connected to the terminal in the plug which is marked with the
letter “E” or by the Earth symbol ![]() or coloured GREEN or GREEN AND YELLOW.
or coloured GREEN or GREEN AND YELLOW.
2 The BLUE wire must be connected to the terminal which is marked with the letter “N” or coloured
BLACK.
3The BROWN wire must be connected to the terminal which marked with the letter “L” or coloured RED.
Before replacing the plug cover, make certain that the cord grip is clamped over the sheath of the lead - not simply over the three wires.