Table of Contents
Grounding or Polarization
Important Safety Instructions
Products with 525P Progressive Scan Outputs
Legal Notices Regarding Macrovision’s Property Rights
Unplayable disc types
Disc Information
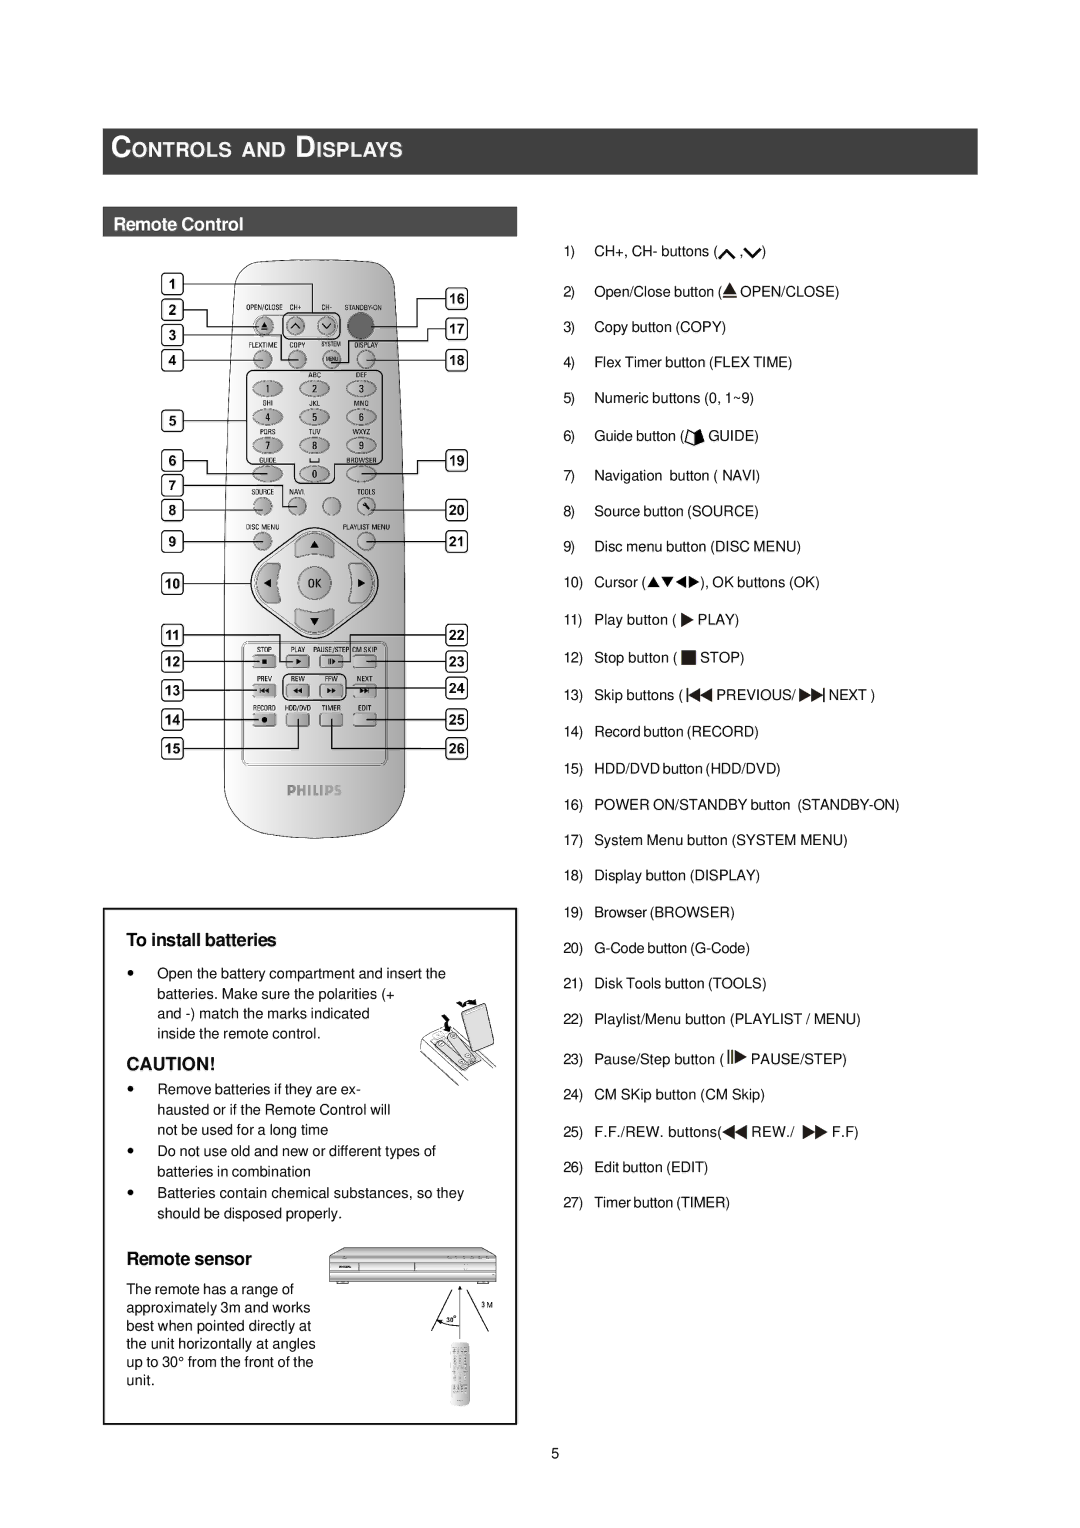
To install batteries
Remote Control
Controls and Displays
Remote sensor
HDD Indicator
DVD Indicator
DVD+R indicator
For reference only
AC In Terminal
TUNERTV/ANTENNA Jacks
Digital Audio OUT Optical Jack
Connecting to a TV with Composite jacks
Connecting to the antenna outlet and the television
Connections
Before making connections
Connecting to a TV via Component out
Connecting to a TV via S-Video out
Connecting to a TV with component jacks
Connecting to a TV with a S-Video jack
Connecting to a digital audio device
Connecting to a stereo audio amplifier or receiver
For Better Audio Quality
Digital out optical
Connecting the cable box/satellite box and television
Connecting Satellite Receiver or Cable BOX
Setting video output in System category
Setting the date and time in System category
Setting Aspect ratio in Playback category
Setting Audio in Audio category
Fine-tuning TV channels manually
TV Channel Setup
TV channel scanning
Editing TV channels manually
Moving up or moving down the TV channel
Channel Editor
Swapping TV channels
Inserting TV channels
Turning on or turning off TV channels manually
Setting up the G-Codesystem
Playback video files
Guide Menu Playback
Playback music files
Playback picture files
Playback pictures with music
Guide Menu PLAYBACK, Record
Playback the last recorded title on HDD only
Record on the HDD
Timer Record Date/Time Setting
Guide Menu RECORD, Timer Record
Record on DVD
Press pq to select Once, Daily, or Weekly
Timer Record G-CodeSetting
Guide Menu Timer Record
Copy From DVD to HDD
Guide Menu Timer RECORD, Copy
Copy From HDD to DVD
Before recording
Recording
Recording television programs
To check the disc status while recording
Using Guide
Using uPLAY
Adding new recordings
Change Chapter Intervals
Before starting to record
Recording from a VCR or Camcorder
To start recording
Front panel and rear panel connection
Use Guide Menu to record DV signal
Before you start to record DV contents
One-touch recording
DV recording
DV control
DV Recording Con’t
Setting the timer
Timer Record
Prior to timer record
To check the recording status while Timer Record is active
Timer Record using the G-Codesystem
If you enter a wrong selection
Press t u pq to select End End Time, and then press OK
Timer Record
Record and Play
Flex Time
During recording, press uPLAY
If you want to stop recording, press Stop for a second time
Basic playback
Playback
TIME0 1 2 7 3
Navigation operation
Example for DVD-VIDEO
Playing back video title
Video Title Playback by Browser
Playing back music files
Music File PLAYBACK, Picture File Playback by Browser
Playing back MP3 files
Playing back picture files
Audio CD playback
Audio CD PLAYBACK, Playback Pictures and Music
Playing Audio CDs
Slide show Pictures with Music
Transfer Speed from HDD
Copy
Browser menu
Edit
Naming a title HDD and DVD
Protecting a title HDD and DVD
Splitting a title HDD and DVD+RW disc
Setting a title thumbnail HDD and DVD
Merging two titles into one HDD and DVD+RW disc
Erasing a title HDD and DVD
Erasing Chapter Mark
Inserting chapter mark
Hiding Chapter
Erase
Disk Tools
Finalize make compatible
For DVD+R disc
Defragment HDD only
CleanUp Disk HDD only
GUI Operation
Record Quality
To exit the System menu
Chapter Mark
Fine Tune -- -24 ~ -1 0 +1 ~ +24
Glossary
Disc Types Supported Read Only
Specifications
Mode
Audio Format Supported Playback