DJM-1000
K015 En
Operating Environment
Confirm Accessories
Features
Contents
Location
Installing the DJM-1000 in an EIA rack
Cleaning the Unit
Condensation
Connection Panel
Before Using Connections
Connections
Power Cord Connection
Connecting to the Input Connectors
Connecting to the Effector and Output Connectors
Midi Connectors
Digital Link Connections
Connecting MICROPHONES, Headphones
Headphones
Main microphone
Before Using Part Names and Functions
Part Names and Functions
Curve Adjust CH Fader
Curve Adjust Cross Fader
Headphones Mono SPLIT/STEREO
Headphones Level
Effector Link buttons 1, 2 EFX 1, 2/Indicator E 1
Send channel selector switches
Return input level adjust dials Level
SEND/RETURN buttons/indicators on
Basic Operations
Fader Curve Adjustments
Operations
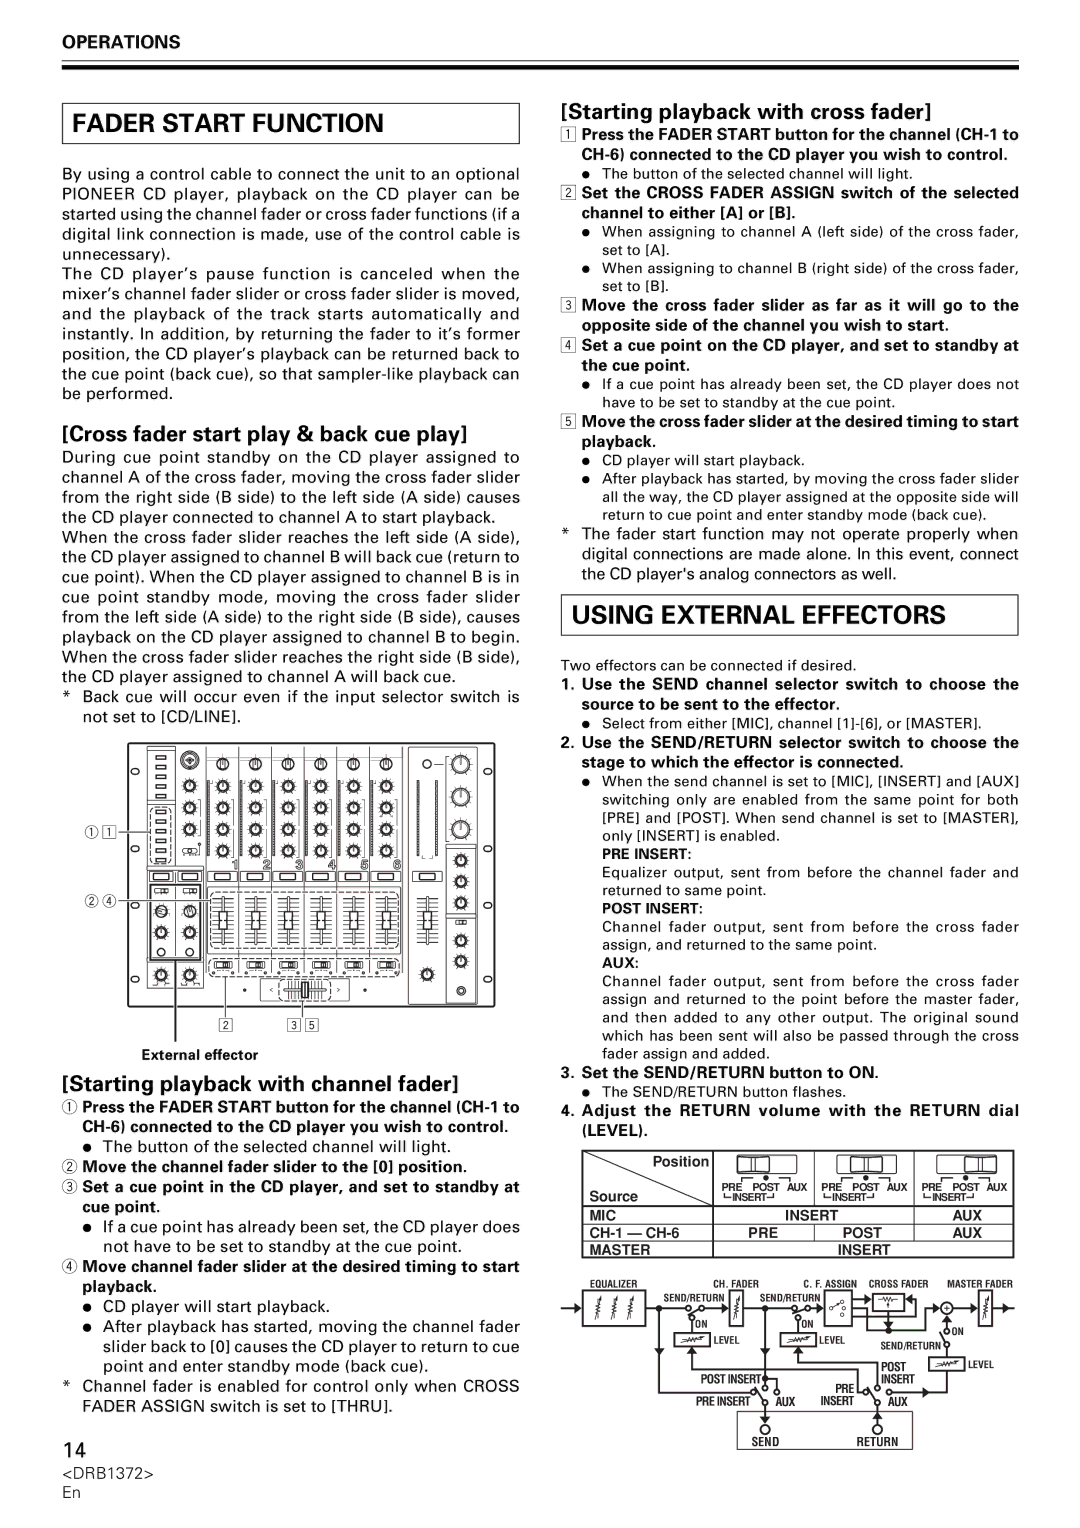
Cross fader start play & back cue play
Using External Effectors
Fader Start Function
Starting playback with channel fader
CDJ Mixer
Digital Link Function
EFX
AV Mixer
Symptom Possible Cause Countermeasure
Troubleshooting
Other Troubleshooting
Meaning Countermeasure
Specifications
Other Specifications
K015 Fr
Milieu de fonctionnement
Table DES Matières
Vérification DES Accessoires
Caractéristiques
Avertissements Concernant L’USAGE
Emplacement
Installation du DJM-1000 dans une baie EIA
Nettoyer l’appareil
Panneau DE Connexion
Avant L’UTILISATION Connexions
Branchement DU Cordon D’ALIMENTATION
Branchement DES Connecteurs D’ENTRÉE
Branchement DES Connecteurs D’EFFECTEUR ET DE Sortie
Connecteurs Midi
Branchement DE MICROPHONE, Casque D’ÉCOUTE
Branchements À Liaison Numérique
Level
Noms ET Fonctions DES Organes
Avant L’UTILISATION Noms ET Fonctions DES Organes
Cross Fader Assign
Mono SPLIT/STEREO
Booth Monitor HI
Booth Monitor LOW
Boutons/voyants SEND/RETURN on
41. Sélecteurs de canal Send
Bagues de réglage de niveau d’entrée Return Level
Boutons Sound Link 1, 2 Sound 1, 2/voyant S1
Sortie de casque d’écoute
Utilisation
Démarches DE Base
Entrée de microphone principal
Lancement de la lecture par fader croisé
Fonction DE Départ EN Fondu
Lancement de la lecture par le fader de canal
Réglez le bouton SEND/RETURN sur on
Mixeur AV
Fonction DE Liaison Numérique
CDJ Mixeur
Problème Cause possible Correction proposée
Dépannage
Divers Dépannage
Voyants Attention Signification Correction
Fiche Technique
Divers Fiche Technique
Wichtig
Betriebsumgebung
Merkmale
Inhaltsverzeichnis
Anschlussfeld
Vorsichtshinweise ZUR Handhabung
Anschlüsse
VOR Inbetriebnahme Anschlüsse
Anschliessen DES Netzkabels
Anschlüsse AN DEN Eingangsbuchsen
Anschlüsse AN DEN EFFEKTGERÄT- UND Ausgangsbuchsen
MIDI-ANSCHLUSS
Hauptmikrofon Nebenmikrofon
Anschliessen VON Mikrofonen UND Kopfhörer
Kopfhörer
Nebenmikrofon
Mikrofon-Entzerrungsregler für Tiefen EQ LOW
Mikrofon-Pegelregler MIC Level
Mikrofon-Entzerrungsregler für Höhen EQ HI
Mikrofonfunktions-Anzeige
Kanal-Entzerrungsregler für Mitten EQ MID
Eingangspegelregler Kanal 1 bis 6 Trim
Kanal-Entzerrungsregler für Höhen EQ HI
Kanal-Entzerrungsregler für Tiefen EQ LOW
Master Level L, R
Master Isolator on
Return Level
Eingangspegelregler für Rückleitungssignal
Ausgabekanal-Wahlschalter Send
Hauptmikrofon-Eingang
Bedienungsverfahren
Kopfhörerausgang
Kabinen-Monitorausgang
Wiedergabestart und Cue-Rücklauf über Kreuz-Faderhebel
FADER-STARTFUNKTION
Verwendung VON Externen Effektgeräten
Starten der Wiedergabe über Kanal-Faderhebel
DIGITALVERKNÜPFUNGS-FUNKTION
CDJ
Störung Mögliche Ursache Abhilfemaßnahme
Fehlerbeseitigung
Sonstiges Fehlerbeseitigung
Warnanzeigen Bedeutung Abhilfemaßnahme
Technische Daten
Sonstiges Technische Daten
Importante
Condizioni ambientali di funzionamento
Indice
Accessori in Dotazione
Caratteristiche
Posizionamento
Installazione del DJM-1000 in uno scaffale a norme EIA
Avvertenze PER L’USO
Condensa
Prima DELL’USO Collegamenti
Collegamenti
Pannello DEL Collegamenti
Collegamento DEL Cavo DI Alimentazione
Collegamenti AI Connettori DI Ingresso
Collegamento AI Connettori DI Unità Effetti E DI Uscita
Connettori Midi
Microfono secondario
Collegamento DI Microfoni E Cuffie
Cuffie
Microfono principale
Prima DELL’USO Nome Delle Varie Parti E Loro Funzione
Indicatore della funzione del microfono
Nome Delle Varie Parti E Loro Funzione
Manopola di regolazione MIC Level
Interruttori/indicatori Cross Fader Assign
Indicatori di livello dei canali
Pulsante/indicatori CUE della cuffia
Indicatore a di assegnazione della dissolvenza Incrociata a
Headphones Mixing
Selettori di canale Send
Pulsanti/indicatori SEND/RETURN on
Pulsanti funzione Sound Link 1, 2 Sound Indicatori Sound S1
Manopole di regolazione del livello di ingresso
Regolazione Delle Curve DI Dissolvenza
Operazioni
Operazioni DI Base
Inizio della riproduzione con la dissolvenza incrociata
Funzione DI Inizio Della Dissolvenza Incrociata
USO DI Unità Effetti Esterne
Inizio della riproduzione con la dissolvenza di canali
Funzione DI Collegamento Digitale
Mixer AV
Problema Causa possibile Rimedio
Diagnostica
Altri Dati Diagnostica
Indicatori Avvertenza Significato Rimedio
Caratteristiche Tecniche
Altri Dati Caratteristiche Tecniche
Belangrijk
Gebruiksomgeving
Controleer DE Accessoires
Kenmerken Inhoudsopgave
Opstelling van de DJM-1000 in een EIA-rek
Installatieplek
Waarschuwingen I.V.M. HET Gebruik
Condensatie
Voor Gebruik Aansluitingen
Aansluiten VAN HET Netsnoer
Aansluiten VAN Apparatuur OP DE Ingangsaansluitingen
MIDI-AANSLUITINGEN
Hoofdtelefoon
Aansluiten VAN Microfoons EN Hoofdtelefoons
Digitale LINK-AANSLUITINGEN
Hoofdmicrofoon
Voor Gebruik Benaming EN Functie VAN DE Bedieningsorganen
Fader-bedieningsgedeelte Curve Adjust CH Fader regelaar
Kanaalniveau-indicators
Hoofdtelefoon CUE toets/indicators
Curve Adjust Cross Fader regelaar
Master Isolator LOW
Master Isolator HI
Master Isolator MID
Linkfunctie ON/OFF gedeelte Visual Link toets/indicator
Effector Link toetsen 1, 2 EFX 1, 2/ indicator E 1
SEND/RETURN toetsen/indicators on
Sound Link toetsen 1, 2 Sound 1, 2/ indicator S1
Instellen VAN DE Fadercurve
Bediening
Basisbediening
Kruisfader-start weergave & terug-naar- cue weergave
Faderstartfunctie
Gebruik VAN Externe Effectors
Starten met afspelen met behulp van de kanaalfader
Digitale Linkfunctie
Overig Zelf Storingen Verhelpen
Waarschuwing indicators Betekenis Maatregel
Zelf Storingen Verhelpen
Storing Mogelijke oorzaak Maatregel
Algemene specificaties
Technische Gegevens
Overig Technische Gegevens
Audiogedeelte
Entorno de funcionamiento
Atención
Confirmación DE LOS Accesorios
Características
Índice
Instalación de la DJM-1000 en un bastidor
Precauciones Para LA Manipulación
Situación
Condensación
Antes DE LA Utilización Conexiones
Conexiones
Panel DE Conexiones
Conexión DEL Cable DE Alimentación
Conexión a LOS Conectores DE Entrada
Conexión a UN Generador DE Efectos Y Conectores DE Salida
Conectores Midi
Conexión DE Micrófonos Y Auriculares
Conexiones DE Enlace Digital
Mando de ajuste del nivel del micrófono MIC
Nomenclatura Y Funciones
Antes DE LA Utilización Nomenclatura Y Funciones
Indicador de función del micrófono
Mando de fundido cruzado de ajuste de la curva
Indicadores del nivel del canal
Botón/indicadores de activación de auriculares CUE
Indicador de asignación de fundido cruzado a a
Return
Selectores de canal de envío Send
Botones/indicadores de envío/retorno SEND/ RETURN, on
Salida de auriculares
Operaciones
Operaciones Básicas
Entrada de micrófono principal
Empleo DE Generadores DE Efectos Externos
Ajuste el volumen de Return con el mando Return Level
Función DE Inicio CON Fundido
Active on el botón SEND/RETURN
Función DE Enlace Digital
Síntoma Causa posible Contramedida
Solución DE Problemas
Otros Solución DE Problemas
Indicadores de precaución Significado Contramedida
Especificaciones
Otros Especificaciones
TSZRW/04L00000 Printed Imprimé au DRB1372-A